AngularJS体验式编程系列文章,将介绍如何用angularjs构建一个强大的web前端系统。angularjs是由Google团队开发的一款非常优秀web前端框架。在当前如此多的web框架下,angularjs能脱颖而出,从架构设计上就高人一等,双向数据绑定,依赖注入,指令,MVC,模板。Angular.js创新地把后台技术融入前端开发,扫去jQuery一度的光芒。用angularjs就像写后台代码,更规范,更结构化,更可控。
从 Angular 2.x 开始新的体验。
关于作者
- 张丹(Conan), 程序员R,Java,Nodejs
- weibo:@Conan_Z
- blog: http://blog.fens.me
- email: bsspirit@gmail.com
转载请注明出处:
http://blog.fens.me/angular2-init/

前言
随着Angular2的升级,从1.x升级2.x,但我却迟迟没有动手。原因了2.x对1.x完全不兼容,而且从原生Javascript变成了Typescript,增加很多的生成模块,依赖的类库一下子变得很多。变化实在太大了,确实让人难以接受。我特别对于Typescript的不解,喜欢javascript的灵活,而静态化意味代码量的增加。
前几天,看到Angular2的release,想来想去还是要试试。从官方文档中,看到对中文支持的非常好,开发团队真是用心了。开发团队用心的改变,作为使用者来说是切身可以感受的,带着敬意和信心,决定把Angular2学起来。
目录
- Angular2介绍
- Anguar2的快速启动
- 从命令行构建Anguar2
1. Angular2介绍
Angular是由Google开发的一套前端应用开发框架,可以快速帮你构建复杂的大型前端单页应用(Single Page Application)。我非常喜欢Angular 1.x 给我带来的前端开发体验,当前花了2周时间时间学习,几百行代码就实现了,超乎想象的应用效果。我放下了所有原来对于前端Javascript的认知,直接转向了Angular。
官方网站:https://angular.cn/
Angular2的新特性包括:
- 渐进式Web应用:借助现代化Web平台的力量,交付app式体验。高性能、离线化、零安装。
- 原生:借助来自Ionic、NativeScript和React Native中的技术与思想,构建原生移动应用。
- 桌面:借助你已经在Web开发中学过的能力,结合访问原生操作系统API的能力,创造能在桌面环境下安装的应用,横跨Mac、Windows和Linux平台。
- 代码生成:Angular会把你的模板转换成代码,针对现代JavaScript虚拟机进行高度优化,轻松获得框架提供的高生产率,同时又能保留所有手写代码的优点。
- 统一:在服务端渲染应用的首屏,像只有HTML和CSS的页面那样几乎瞬间展现,支持node.js、.NET、PHP,以及其它服务器,为通过SEO来优化站点铺平了道路。
- 代码拆分:Angular应用通过新的组件路由(Component Router)模块实现快速加载,提供了自动拆分代码的功能,为用户单独加载它们请求的视图中需要的那部分代码。
- 模板:通过简单而强大的模板语法,快速创建UI视图。
- Angular命令行工具:命令行工具:快速进入构建环节、添加组件和测试,然后立即部署。
- 各种IDE:在常用IDE和编辑器中获得智能代码补全、实时错误反馈及其它反馈等特性。
- 测试:使用Karma进行单元测试,让你在每次存盘时都能立即知道是否弄坏了什么。Protractor则让你的场景测试运行得又快又稳定。
- 动画:通过Angular中直观简便的API创建高性能复杂编排和动画时间线 —— 只要非常少的代码。
- 可访问性:通过支持ARIA的组件、开发者指南和内置的一体化测试基础设施,创建具有完备可访问性的应用。
接下来,就让我们来体验Angular2的新颖之处的。
2. Anguar2的快速启动
阅读官方文档,我们可以跟着文档进行项目的快速启动,快速启动项目quickstart,是基于github,node,npm的,我们按照文档执行就可以了。关于Node的介绍,可以参考系列文章从零开始nodejs系列文章
系统环境:
- Win10 64bit
- node v6.9.4
- npm 3.10.10
- git version 2.7.0.windows.1
2.1 构建项目
进入开发目录,下载quickstart项目。
~ cd D:\\workspace\js
~ git clone https://github.com/angular/quickstart.git quickstart
~ cd quickstart
~ npm install # 执行npm安装和配置
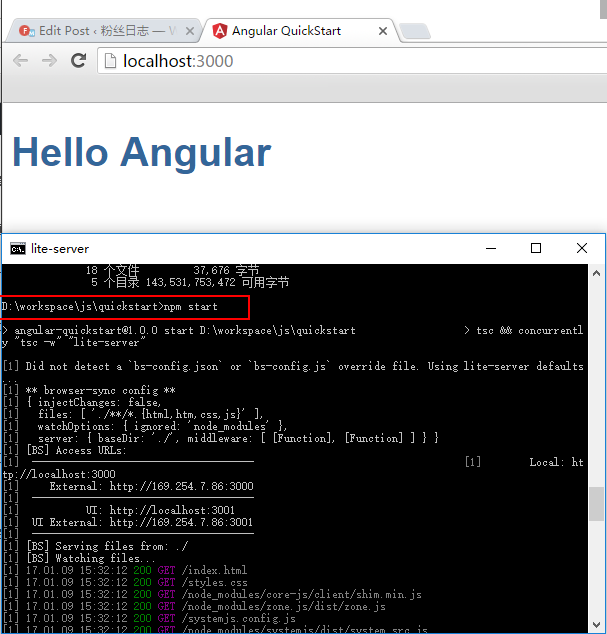
~ npm start # 启动项目
通过npm start命令,就直接启动了angular2的程序,默认会自动打开浏览器,就可以看到效果了。如果浏览没有自动打开,自己手动在浏览器打开localhost:3000,也可以打开。
2.2 目录结构
接下来,我们查看项目目录结构。
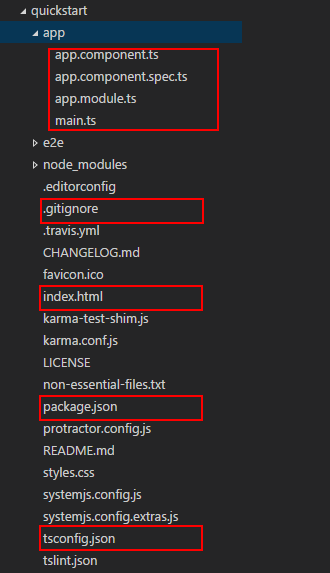
由于这个quickstart的模板项目,包含了太多的文件。一下子看到这么多东西,肯定要晕一会的。图中用红色部分标记的几个文件,是我们应该要知道的,其他的文件对于首次执行来说并不是太重要。
文件说明
- app/app.components.ts, 一个自定义组件,Typescript代码。
- app/app.module.ts, 模块文件,用于组合管理组件,Typescript代码。
- app/main.ts, 项目启动的入口,加载ts文件,Typescript代码。
- app/app.components.spec.ts, 单测试文件
- .gitignore, git的配置文件
- index.html, 单页应用的html入口文件
- package.json, Node项目的工程配置文件
- tsconfig.json, Typescript语言的配置文件
2.3 4个核心文件
把几个核心的文件中的代码,进行解释。
app/app.components.ts文件
import { Component } from '@angular/core';        //引用系统类库

@Component({                                      //定义组件
  selector: 'my-app',                             //对应该index.html的<my-app>标签
  template: `<h1>Hello {{name}}</h1>`,            //替换<my-app>标签的内容
})
export class AppComponent  { name = 'Angular'; }  //输出自定义组件
app/app.module.ts文件
import { NgModule }      from '@angular/core';                  //引用系统类库
import { BrowserModule } from '@angular/platform-browser';      //引用系统类库
import { AppComponent }  from './app.component';                //引用app.components.ts文件,定义的AppComponent组件

@NgModule({                                                     //定义模块
  imports:      [ BrowserModule ],                              //引用浏览器模块
  declarations: [ AppComponent ],                               //声明组件
  bootstrap:    [ AppComponent ]                                //启动组件
})
export class AppModule { }                                      //输出自定义模块
app/main.ts文件
import { platformBrowserDynamic } from '@angular/platform-browser-dynamic';  //引用系统类库

import { AppModule } from './app.module';                                    //引用app.module.ts文件的AppModule

platformBrowserDynamic().bootstrapModule(AppModule);                         //启动程序,加载模块
index.html文件
<!DOCTYPE html>
<html>
  <head>
    <title>Angular QuickStart</title>
    <meta charset="UTF-8">
    <meta name="viewport" content="width=device-width, initial-scale=1">
    <link rel="stylesheet" href="styles.css">

    <!-- Polyfill(s) for older browsers -->
    <script src="node_modules/core-js/client/shim.min.js"></script>

    <script src="node_modules/zone.js/dist/zone.js"></script>
    <script src="node_modules/systemjs/dist/system.src.js"></script>

    <script src="systemjs.config.js"></script>
    <script>
      System.import('app').catch(function(err){ console.error(err); });
    </script>
  </head>

  <body>
    <my-app>Loading AppComponent content here ...</my-app>
  </body>
</html>
index.html中$lt;my-app>l的标签,是会被app.components.ts文件定义的selector发现并处理。
这4个文件,其实就是程序源代码的核心文件。那么项目中的其他文件,都是各种工具的配置文件。比如,我要编译Typescript文件到Javascript文件,就是需要在tsconfig.json进行配置;对类库做动态加载就要用到systemjs;执行单元测试需要用到karma;上传到github需要用到.gitignore;对node项目的管理用package.json配置。
2.4 扩展工具
当然,还有一些扩展工具。
单独编译Typescrip到Javascript。
~ D:\workspace\js\quickstart>npm run tsc
单独编译Typescrip,并监控文件状态,发现文件变化重新变异。
~ D:\workspace\js\quickstart>npm run tsc:w
启动Server,在浏览器中查看效果。
~ D:\workspace\js\quickstart>npm run lite
单元测试
~ D:\workspace\js\quickstart>npm test
E2E测试End-to-end
~ D:\workspace\js\quickstart>npm run e2e
除了从github上面下载quickstart模板,还是另外一种初始构建项目的方式,就是用Anguar2的命令行工具。
3. 从命令行构建Anguar2
从上文的Angular2的特性中,就有一项是命令工具,用这种方式构建一个新项目,更符合开发人员“脚手架”的思路。首先,我们需要安装这个命令工具anguar-cli。请大家务必升级Nodejs到v6.x以上,我之前用v4.4,花了大量时间调试都没有通过。
3.1 安装anguar-cli
~ D:\workspace\js>npm install -g angular-cli
安装好后,我们可以通过help命令查看命令行有哪个功能。
D:\workspace\js>ng help
ember build
  Builds your app and places it into the output path (dist/ by default).
  aliases: b
  --target (String) (Default: development)
    aliases: -t , -dev (--target=development), -prod (--target=production)
  --environment (String) (Default: )
    aliases: -e
  --output-path (Path) (Default: null)
    aliases: -o
  --watch (Boolean) (Default: false)
    aliases: -w
  --watcher (String)
  --suppress-sizes (Boolean) (Default: false)
  --base-href (String) (Default: null)
    aliases: -bh
  --aot (Boolean) (Default: false)
  --sourcemap (Boolean) (Default: true)
    aliases: -sm
  --vendor-chunk (Boolean) (Default: true)
  --verbose (Boolean) (Default: false)
  --progress (Boolean) (Default: true)
  --i18n-file (String) (Default: null)
  --i18n-format (String) (Default: null)
  --locale (String) (Default: null)

  // 省略....
查看ng工具的版本
~ D:\workspace\js>ng version
                             _                           _  _
  __ _  _ __    __ _  _   _ | |  __ _  _ __         ___ | |(_)
 / _` || '_ \  / _` || | | || | / _` || '__|_____  / __|| || |
| (_| || | | || (_| || |_| || || (_| || |  |_____|| (__ | || |
 \__,_||_| |_| \__, | \__,_||_| \__,_||_|          \___||_||_|
               |___/

angular-cli: 1.0.0-beta.26
node: 6.9.4
os: win32 x64
当然,我们最需要的就是构建项目,启动服务,生成组件,指令,服务等功能。
3.2 新建项目
新建一个项目
~ D:\workspace\js>ng new conan1      // 新建项目
installing ng2
  create .editorconfig
  create README.md
  create src\app\app.component.css
  create src\app\app.component.html
  create src\app\app.component.spec.ts
  create src\app\app.component.ts
  create src\app\app.module.ts
  create src\assets\.gitkeep
  create src\environments\environment.prod.ts
  create src\environments\environment.ts
  create src\favicon.ico
  create src\index.html
  create src\main.ts
  create src\polyfills.ts
  create src\styles.css
  create src\test.ts
  create src\tsconfig.json
  create angular-cli.json
  create e2e\app.e2e-spec.ts
  create e2e\app.po.ts
  create e2e\tsconfig.json
  create .gitignore
  create karma.conf.js
  create package.json
  create protractor.conf.js
  create tslint.json
Successfully initialized git.
Installing packages for tooling via npm.
Installed packages for tooling via npm.
Project 'conan1' successfully created.
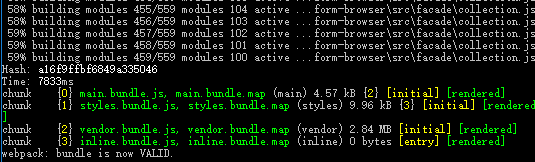
等了大概有10分钟,下载了有200mb的文件,希望大家有耐心。进入安装目录。
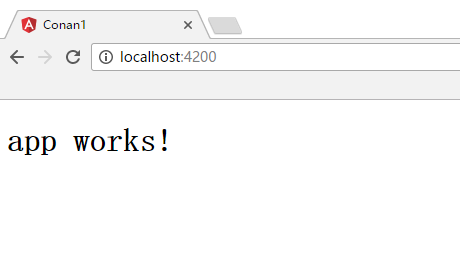
~ D:\workspace\js\conan1>cd conan1      // 进入项目目录
~ D:\workspace\js\conan1>ng serve       // 启动项目
打开浏览器,查看Web网页。
如果你想修改启动端口为4201,可以用下面的命令。
ng serve --host 0.0.0.0 --port 4201 --live-reload-port 49153
用命令工具构建的项目目录。

目录结构有一个变化,就是嵌套了一层src目录,然后才是app目录。另外,多了angular-cli.json的配置文件。
3.3 模块生成器
接下来,我们可以用命令工具,进行项目模块和组件的开发了。
| 命令 | 使用说明 |
|---|---|
| 组件Component | ng generate component my-new-component |
| 指令Directive | ng generate directive my-new-directive |
| 服务Service | ng generate pipe my-new-service |
| 管道Pipe | ng generate pipe my-new-pipe |
| 类Class | ng generate class my-new-class |
| 接口Interface | ng generate interface my-new-interface |
| 枚举对象Enum | ng generate enum my-new-enum |
| 模块Module | ng generate module my-module |
3.4 生成一个新组件
用命令生成一个hello的新组件,文件生成如下。
~ D:\workspace\js\conan1>ng generate component hello
installing component
  create src\app\hello\hello.component.css
  create src\app\hello\hello.component.html
  create src\app\hello\hello.component.spec.ts
  create src\app\hello\hello.component.ts
  update src\app\app.module.ts
在app目录下生成了一个hello的子目录,包括了4个组件的文件,同时在app.module.ts模块文件中,注册了这个新组件。
我们要修改2个地方,让这个新生成的hello组件可以运行。
1. 修改index.html文件,增加<app-hello>标签。
<!doctype html>
<html>
<head>
  <meta charset="utf-8">
  <title>Conan1</title>
  <base href="/">

  <meta name="viewport" content="width=device-width, initial-scale=1">
  <link rel="icon" type="image/x-icon" href="favicon.ico">
</head>
<body>
  <app-root>Loading...</app-root>

  <app-hello>Loading...</app-hello>
</body>
</html>
2. 修改app.module.ts文件,在@NgModule.bootstrap中,增加HelloComponent的启动项。
import { BrowserModule } from '@angular/platform-browser';
import { NgModule } from '@angular/core';
import { FormsModule } from '@angular/forms';
import { HttpModule } from '@angular/http';

import { AppComponent } from './app.component';
import { HelloComponent } from './hello/hello.component';

@NgModule({
  declarations: [
    AppComponent,
    HelloComponent
  ],
  imports: [
    BrowserModule,
    FormsModule,
    HttpModule
  ],
  providers: [],
  bootstrap: [AppComponent,HelloComponent]
})
export class AppModule { }
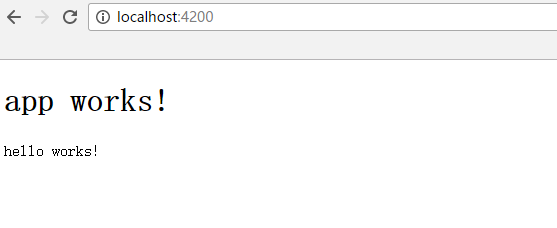
查看浏览器,我们可以看到hello works!显示到界面上。
3.5 生成一个新指令
属性型指令用于改变一个 DOM 元素的外观或行为。用命令生成一个link的新指令,操作如下。
~ D:\workspace\js\conan1>ng generate directive link
installing directive
  create src\app\link.directive.spec.ts
  create src\app\link.directive.ts
  update src\app\app.module.ts
主要生成了新文件link.directive.ts。
import { Directive } from '@angular/core';
@Directive({
  selector: '[appLink]'
})
export class LinkDirective {
  constructor() { }
}
接下来,用appLink指令来做一个样式的修饰,需要修改2个文件。
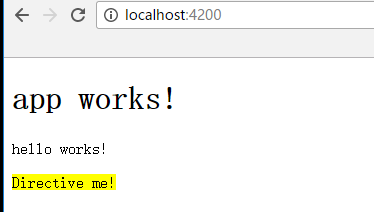
1. 修改hello.component.html文件,增加一段span的HTML标签,并配置appLink属性。
<p>hello works!</p>

<span appLink>Directive me!</span>
2. 修改link.directive.ts文件,在LinkDirective类的构造器constructor函数中,增加样式的修改属性。同时,通过@HostListener,监听鼠标动作。
import { Directive, ElementRef, HostListener, Renderer } from '@angular/core';
@Directive({
  selector: '[appLink]'
})
export class LinkDirective {
    constructor(el: ElementRef, renderer: Renderer) {
       renderer.setElementStyle(el.nativeElement, 'backgroundColor', 'yellow');
    }

    @HostListener('mouseenter') onMouseEnter() {
      this.highlight('blue');
    }
    @HostListener('mouseleave') onMouseLeave() {
      this.highlight('yellow');
    }

    private highlight(color: string) {
      this.renderer.setElementStyle(this.el.nativeElement, 'backgroundColor', color);
    }
}
修改后,我们在浏览器中查看运行的效果。
3.6 生成一个新服务
服务,可以封装代码,比如我们可以对数据访问代码单独隔离,封装到一个独立的服务中。用命令生成一个meta的新服务,操作如下。
~ D:\workspace\js\conan1>ng generate service meta
installing service
  create src\app\meta.service.spec.ts
  create src\app\meta.service.ts
  WARNING Service is generated but not provided, it must be provided to be used
生成了2个service的文件,同时提供了Service必须被provided,才可以被应用。我们如果想要启用meta的这个服务,需要在3个文件中进行修改。
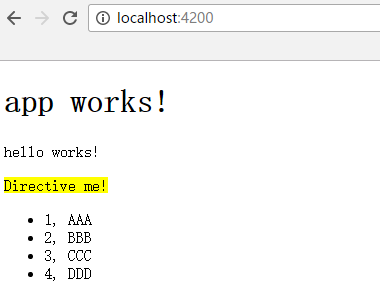
1. 修改meta.service.ts文件,增加getNames()函数,用于提供数据访问。
import { Injectable } from '@angular/core';
@Injectable()
export class MetaService {
  constructor() { }
  getNames():any[]{
    return [
        {id: 1, name: 'AAA'},
        {id: 2, name: 'BBB'},
        {id: 3, name: 'CCC'},
        {id: 4, name: 'DDD'}
      ];
  }
}
2. 修改hello.component.ts文件,把MetaService注入到HelloComponent中,通过providers进行依赖注入的体现,同时调用MetaService 类的getNames()函数获取数据。
import { Component, OnInit } from '@angular/core';
import { MetaService } from '../meta.service';
@Component({
  selector: 'app-hello',
  templateUrl: './hello.component.html',
  styleUrls: ['./hello.component.css'],
  providers: [MetaService]
})
export class HelloComponent implements OnInit {
  meta = [];
  constructor(private metaService: MetaService) { }
  ngOnInit() {
    this.meta = this.metaService.getNames();
  }
}
3. 修改hello.component.html文件,用于数据的html输出,以列表形式输出。
<p>hello works!</p>

<span appLink>Directive me!</span>

<ul>
  <li *ngFor="let m of meta">
    {{m.id}}, {{m.name}}
  </li>
</ul>
修改后,我们在浏览器中查看运行的效果。
3.7 生成一个新管道
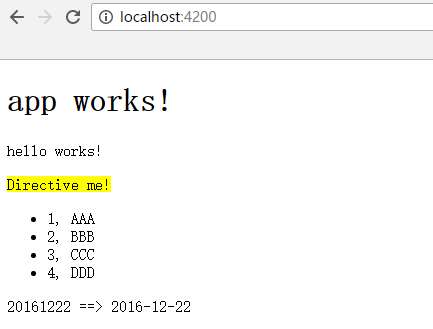
管道,可以用于数据的连续处理操作,比如可以把日期在界面端进行格式化,把20170101格式转型2017-01-01格式。用命令生成一个datef的新管道,操作如下。
~ D:\workspace\js\conan1>ng generate pipe datef
installing pipe
  create src\app\datef.pipe.spec.ts
  create src\app\datef.pipe.ts
  update src\app\app.module.ts
生成了2个pipe的文件。如果我们想使用这个功能,需要在2个文件中进行修改。
1. 修改datef.pipe.ts文件,对日期进行格式化,把20161222转化为2016-12-22。
import { Pipe, PipeTransform } from '@angular/core';
@Pipe({
  name: 'datef'
})
export class DatefPipe implements PipeTransform {
  transform(value: string) {
    var dat1 = value.toString();
    return dat1.substring(0,4)+ "-"+ parseInt(dat1.substring(4,6)) +  "-"+dat1.substring(6,8);
  }
}
2. 修改hello.component.html文件,进行HTML的输出。
<p>hello works!</p>

<span appLink>Directive me!</span>

<ul>
  <li *ngFor="let m of meta">
    {{m.id}}, {{m.name}}
  </li>
</ul>

<p>{{day}} ==> {{ day | datef}}</p>
修改后,我们在浏览器中查看运行的效果。
其他的命令,我们在后文再继续说明。本文只是一篇对Angular2的新体验介绍,由于Angular2整个框架还是变化挺大的,同时我对Typescript也不熟悉,对webapck也需要花时间学习。整个过程花了不少时间,也走了不少的弯路。
目前,网上Angular2框架介绍的文章本来就不多,虽然官网文档比较详细,但是上手来说,还是有一定的难度的,希望本文对于新手来说有一些帮助,也希望Angualr2尽快成熟,我准备正在项目中用起来!!
转载请注明出处:
http://blog.fens.me/angularjs-yeoman-project/