从零开始nodejs系列文章,将介绍如何利Javascript做为服务端脚本,通过Nodejs框架web开发。Nodejs框架是基于V8的引擎,是目前速度最快的Javascript引擎。chrome浏览器就基于V8,同时打开20-30个网页都很流畅。Nodejs标准的web开发框架Express,可以帮助我们迅速建立web站点,比起PHP的开发效率更高,而且学习曲线更低。非常适合小型网站,个性化网站,我们自己的Geek网站!!
关于作者
- 张丹(Conan), 程序员Java,R,PHP,Javascript
- weibo:@Conan_Z
- blog: http://blog.fens.me
- email: bsspirit@gmail.com
转载请注明出处:
http://blog.fens.me/nodejs-browserify/

前言
Nodejs的出现,为Javascript开辟了一条新的大路,让Javascript获得了新生。虽然Nodejs也基于Javascript语法和解释器,但是前后端各自有各自的库,无法重用真的很不舒服。
Browserify 通过预编译的方法,让Javascript前端可以直接使用Node后端的程序。我们可以用一套代码完成前后端,不仅工作量变少了,程序重用性增强,还可以直接在浏览器中使用大量的NPM第三方开源库的功能。
Web时代,将是我们创新与创造的新起点。
目录
- Browserify介绍
- Browserify安装
- Browserify命令行参数
- 在浏览器中运行Nodejs程序
- 在浏览器中模块化调用Nodejs程序
1. Browserify介绍
Browserify的出现可以让Nodejs模块跑在浏览器中,用require()的语法格式来组织前端的代码,加载npm的模块。在浏览器中,调用browserify编译后的代码,同样写在<script>标签中。
用 Browserify 的操作,分为3个步骤。
- 1. 写node程序或者模块
- 2. 用Browserify 预编译成 bundle.js
- 3. 在HTML页面中加载bundle.js
Browserify 的发布页:http://browserify.org/
2. Browserify安装
系统环境
- win7 64bit
- Nodejs:v0.10.5
- Npm:1.2.19
Browserify安装
~ D:\workspace\javascript>mkdir nodejs-browserify && cd nodejs-browserify

browserify@2.36.1 node_modules\browserify
├── inherits@1.0.0
├── deep-equal@0.1.0
├── duplexer@0.1.1
├── shell-quote@0.0.1
├── parents@0.0.2
├── through@2.3.4
├── stream-combiner@0.0.2 (duplexer@0.0.4)
├── deps-sort@0.1.1 (minimist@0.0.5)
├── optimist@0.5.2 (wordwrap@0.0.2)
├── browser-resolve@1.2.1 (resolve@0.6.1)
├── JSONStream@0.6.4 (jsonparse@0.0.5, through@2.2.7)
├── syntax-error@0.0.1 (esprima@0.9.9)
├── concat-stream@1.0.1 (bops@0.0.6)
├── insert-module-globals@1.3.1 (process@0.5.1, commondir@0.0.1, duplexer@0.0.4, through@2.2.7, JSONStream@0.4.4, lex
ical-scope@0.0.14)
├── module-deps@1.1.0 (minimist@0.0.5, resolve@0.6.1, detective@2.1.2)
├── browser-pack@1.1.0 (combine-source-map@0.3.0)
├── umd@1.3.1 (rfile@1.0.0, ruglify@1.0.0, uglify-js@2.4.6)
└── browser-builtins@2.0.5 (constants-browserify@0.0.1, os-browserify@0.1.1, console-browserify@1.0.1, vm-browserify@
0.0.1, punycode@1.2.3, buffer-browserify@0.2.2, crypto-browserify@1.0.9, http-browserify@0.1.14, zlib-browserify@0.0.3)
全局安装,安装过程提示错误。不过没有关系!
~ D:\workspace\javascript\nodejs-browserify>npm install browserify -g

D:\toolkit\nodejs\browserify -> D:\toolkit\nodejs\node_modules\browserify\bin\cmd.js
npm ERR! peerinvalid The package generator-karma does not satisfy its siblings' peerDependencies requirements!
npm ERR! peerinvalid Peer generator-angular@0.4.0 wants generator-karma@~0.5.0

npm ERR! System Windows_NT 6.1.7601
npm ERR! command "D:\\toolkit\\nodejs\\\\node.exe" "D:\\toolkit\\nodejs\\node_modules\\npm\\bin\\npm-cli.js" "install" "
browserify" "-g"
npm ERR! cwd D:\workspace\javascript\nodejs-browserify
npm ERR! node -v v0.10.5
npm ERR! npm -v 1.2.19
npm ERR! code EPEERINVALID
npm ERR!
npm ERR! Additional logging details can be found in:
npm ERR!     D:\workspace\javascript\nodejs-browserify\npm-debug.log
npm ERR! not ok code 0
3. Browserify命令行参数
使用Browserify命令正常。
~ D:\workspace\javascript\nodejs-browserify>browserify
Usage: browserify [entry files] {OPTIONS}

Standard Options:

    --outfile, -o  Write the browserify bundle to this file.
                   If unspecified, browserify prints to stdout.

    --require, -r  A module name or file to bundle.require()
                   Optionally use a colon separator to set the target.

      --entry, -e  An entry point of your app

     --ignore, -i  Omit a file from the output bundle.

   --external, -x  Reference a file from another bundle.

  --transform, -t  Use a transform module on top-level files.

    --command, -c  Use a transform command on top-level files.

  --standalone -s  Generate a UMD bundle for the supplied export name.
                   This bundle works with other module systems and sets the name
                   given as a window global if no module system is found.

       --debug -d  Enable source maps that allow you to debug your files
                   separately.

       --help, -h  Show this message

For advanced options, type `browserify --help advanced`.

Specify a parameter.
- –outfile, -o: browserify日志打印到文件
- –require, -r: 绑定模块名或文件,用逗号分隔
- –entry, -e: 应用程序的入口
- –ignore, -i: 省略输出
- –external, -x: 从其他绑定引入文件
- –transform, -t: 对上层文件进行转换
- –command, -c: 对上层文件使用转换命令
- –standalone -s: 生成一个UMB的绑定的接口,提供给其他模块使用。
- –debug -d: 激活source maps调试文件
- –help, -h: 显示帮助信息
高级命令:
~ D:\workspace\javascript\nodejs-browserify>browserify --help advanced
Advanced Options:

  --insert-globals, --ig, --fast    [default: false]

    Skip detection and always insert definitions for process, global,
    __filename, and __dirname.

    benefit: faster builds
    cost: extra bytes

  --detect-globals, --dg            [default: true]

    Detect the presence of process, global, __filename, and __dirname and define
    these values when present.

    benefit: npm modules more likely to work
    cost: slower builds

  --ignore-missing, --im            [default: false]

    Ignore `require()` statements that don't resolve to anything.

  --noparse=FILE

    Don't parse FILE at all. This will make bundling much, much faster for giant
    libs like jquery or threejs.

  --deps

    Instead of standard bundle output, print the dependency array generated by
    module-deps.

  --list

    Print each file in the dependency graph. Useful for makefiles.

  --extension=EXTENSION

    Consider files with specified EXTENSION as modules, this option can used
    multiple times.
- –insert-globals, –ig, –fast: 跳过检查,定义全局变量。[default:false]
- –detect-globals, –dg: 检查全局变量是否存在。 [default:true]<
- –ignore-missing, –im: 忽略require()函数。[default: false]
- –noparse=FILE: 不解析文件,直接build。
- –deps: 打印完整输出日志
- –list: 打印每个文件的依赖关系
- –extension=EXTENSION: 指名扩展名的文件做为模块加载,允许多次设置
4. Browserify使用:在浏览器中运行Nodejs程序
新建4个文件:
- multiply.js: 乘法计算
- square.js: 平方计算,依赖multiply.js
- index.js: node启动程序,调用square.js
- index.html: 用于显示的HTML网页
新建文件:multiply.js
~ vi multiply.js

module.exports = function (a, b) {
    console.log("js:multiply");
    return a * b;
};
新建文件:square.js
~ vi square.js

var multiply = require('./multiply');
module.exports = function (n) {
    console.log("js:square");
    return multiply(n, n);
};
新建文件:index.js
~ vi index.js

var square = require('./square');
console.log("js:index");
console.log(square(125));
在node环境中运行
~ node index.js
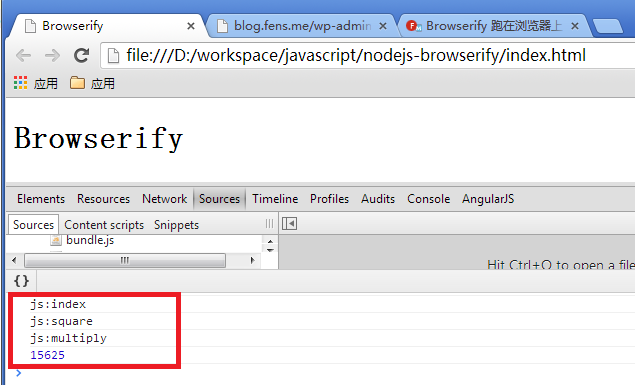
js:index
js:square
js:multiply
15625
用browserify编译index.js文件到bundle.js
~ browserify index.js > bundle.js
新建文件:index.html
<!DOCTYPE html>
<html>
<head>
<title>Browserify</title>
<style>input{width:50px;}</style>
</head>
<body>
<h1>Browserify</h1>
<script src="bundle.js"></script>
</body>
</html>
在index.html中,我们加载刚才生成的bundle.js文件。
在浏览器中预览效果:
5. 在浏览器中模块化调用Nodejs函数
新建文件:
- multiply.js: 同上面的文件
- module.html: 用于显示的HTML网页
查看文件:multiply.js
~ vi multiply.js

module.exports = function (a, b) {
    console.log("js:multiply");
    return a * b;
};
用browserify编译multiply.js文件到bundle.js,作为模块
~ browserify -r ./multiply.js > bundle.js新建文件:module.html
<!DOCTYPE html>
<html>
<head>
<title>Browserify</title>
<style>input{width:50px;}</style>
</head>
<body>
<form>
<p>
<input type="text" id="x" value="2"/> * <input type="text" id="y" value="3" /> = <span id="result"></span>
</p>
<input type="button" onclick="add()" value="M1"/>
<input type="button" onclick="add2()" value="M2"/>
</form>
<script src="bower_components/jquery/jquery.min.js"></script>
<script src="bundle.js"></script>
<script>
function add(){
var x = parseInt($('#x').val());
var y = parseInt($('#y').val());
console.log(x*y);
$('#result').text(x*y);
}

var m = require('./multiply.js');
function add2(){
var x = parseInt($('#x').val());
var y = parseInt($('#y').val());
console.log(m);
console.log(x*y);
$('#result').text(m(x,y));
}
</script>
</body>
</html>
在浏览器中打开:
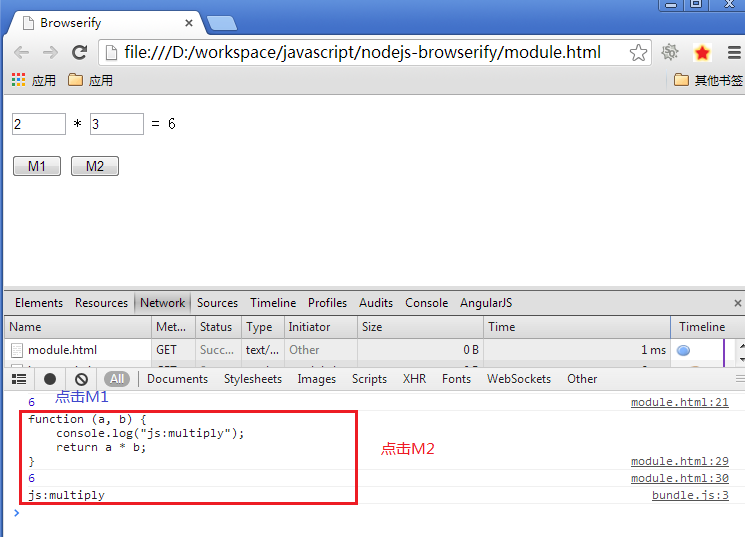
- 点击M1,通过add1函数计算出6
- 点击M2,通过add2函数,调用bundle.js中的multiply.js的函数,计算出6
转载请注明出处:
http://blog.fens.me/nodejs-browserify/