R的极客理想系列文章,涵盖了R的思想,使用,工具,创新等的一系列要点,以我个人的学习和体验去诠释R的强大。
R语言作为统计学一门语言,一直在小众领域闪耀着光芒。直到大数据的爆发,R语言变成了一门炙手可热的数据分析的利器。随着越来越多的工程背景的人的加入,R语言的社区在迅速扩大成长。现在已不仅仅是统计领域,教育,银行,电商,互联网….都在使用R语言。
要成为有理想的极客,我们不能停留在语法上,要掌握牢固的数学,概率,统计知识,同时还要有创新精神,把R语言发挥到各个领域。让我们一起动起来吧,开始R的极客理想。
关于作者:
- 张丹(Conan), 程序员Java,R,PHP,Javascript
- weibo:@Conan_Z
- blog: http://blog.fens.me
- email: bsspirit@gmail.com
转载请注明出处:
http://blog.fens.me/r-shiny-aws/

前言
无意中发现了AWS的提供免费的服务器资源,必须要大赞一下,写篇文章大大的推广。
Shiny是R语言中一个神级的应用,唯一的缺点就是不支持并发。所以,我们很多时候都是做本地Shiny应用,用于展示各种报表的效果。但有时候也需要把报表上传到互联网上,其他人也能看到。这样就需要一个互联网的解决方案,刚好AWS有了免费的服务器支持。简直是完美!!
目录
- Shiny是什么?
- 本地开发一个Shiny小应用
- 申请AWS免费服务器
- 在AWS上安装R语言环境
- 在AWS上安装Shiny Server
- 在AWS上部署自己的Shiny应用
1. Shiny是什么?
Shiny是RStudio公司开发的,一个用于R语言的Web应用程序框架,可以轻松开发交互式web应用,不需要了解HTML, CSS, JS等前端知识。
Shiny构建出应用的惊艳程度,远远超过了说明的文字。一定要学学,下面是一个Shiny小程序的截图。
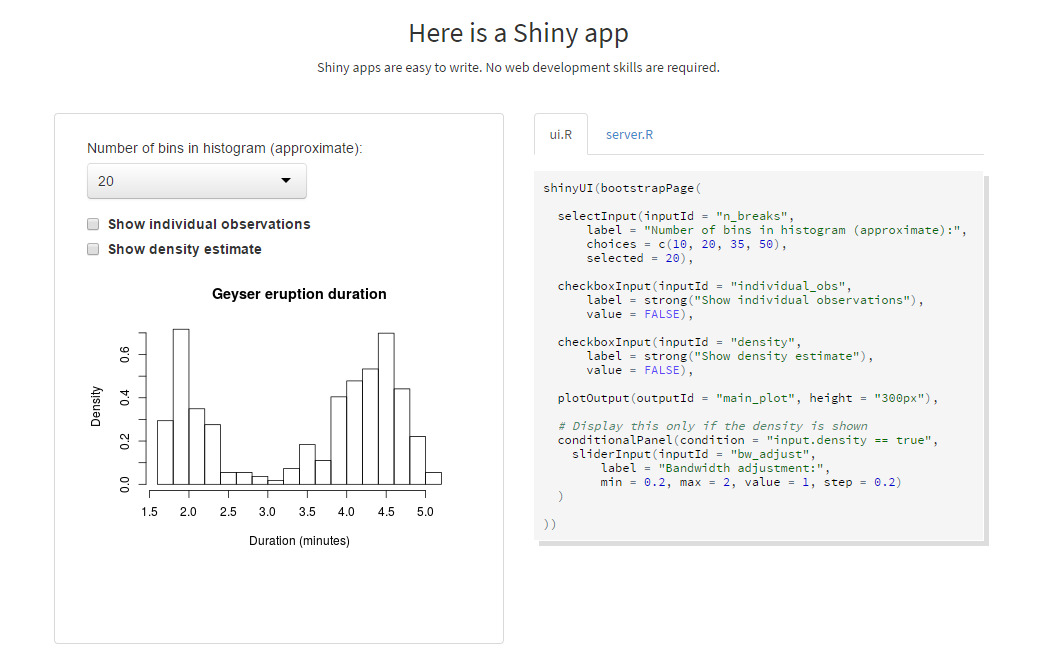
Shiny的主页:http://shiny.rstudio.com/
我们安装Shiny可以直接从CRAN获取,通过一行R程序就可以安装了。
~ R
> install.packages("shiny")
2. 本地开发一个Shiny小应用
下面我们用Shiny开发一个小应用的实例,主要是为介绍Shiny的用法,包括网页的界面UI和后端程序,数据源使用R语言自带的一个数据集。
数据集是faithful,统计的是美国黄石国家公园的泉水(Old Faithful geyser) 喷发的持续时间和喷发等待时间 。
包括2列,eruptions为喷发持续时间,waiting为喷发的等待时间。
> head(faithful,20)
   eruptions waiting
1      3.600      79
2      1.800      54
3      3.333      74
4      2.283      62
5      4.533      85
6      2.883      55
7      4.700      88
8      3.600      85
9      1.950      51
10     4.350      85
11     1.833      54
12     3.917      84
13     4.200      78
14     1.750      47
15     4.700      83
16     2.167      52
17     1.750      62
18     4.800      84
19     1.600      52
20     4.250      79
开发环境所使用的系统环境
- Win10 64bit
- R: 3.2.3 x86_64-w64-mingw32/x64 b4bit
Shiny应用,分为定义了客户端程序ui.R,和服务器端程序server.R,这2个文件默认要求放同一个目录中。另外,我们还需要一个启动文件run.R,用于启动Shiny的应用。当然,如果在RStudio中开发,就不需要run.R的文件,直接点Shiny应用的启动按钮就行了。
开始创建项目目录和文件。
~ cd D:\workspace\dash
~ mkdir demo1
~ notepad run.R
~ cd demo1
~ notepad server.R
~ notepad ui.R
目录结构如下:
D:\workspace\dash
|--run.R
|--demo1
   |--server.R
   |--ui.R
编辑文件:run.R
library("shiny")
runApp("./demo1",host='127.0.0.1',port=3840)
编辑文件:server.R
library(shiny)

shinyServer(function(input, output) {

  # 输出到UI的main_plot
  output$main_plot <- renderPlot({

    # 直方图
    hist(faithful$eruptions,
         probability = TRUE,
         breaks = as.numeric(input$n_breaks),
         xlab = "持续时间",
         main = "喷发持续时间")

    # 是否显示individual_obs
    if (input$individual_obs) {
      rug(faithful$eruptions)
    }

    # 是否显示conditionalPanel
    if (input$density) {
      dens <- density(faithful$eruptions, adjust = input$bw_adjust)
      lines(dens, col = "blue")
    }

  })
})
编辑文件:ui.R
library(shiny)
shinyUI(bootstrapPage(

  headerPanel("第一个Shiny应用"),

  # 左侧布局
  sidebarPanel(

    # 下拉框
    selectInput(inputId = "n_breaks",label = "直方图中的分隔数",choices = c(10, 20, 35, 50),selected = 20),

    # 单选框
    checkboxInput(inputId = "individual_obs",label = strong("实际观察点"),value = FALSE),

    # 单选框
    checkboxInput(inputId = "density",label = strong("密度估计曲线"),value = FALSE)
  ),

  # 主布局
  mainPanel(
    plotOutput(outputId = "main_plot", height = "300px"),

    conditionalPanel(condition = "input.density == true",
                     sliderInput(inputId = "bw_adjust",label = "带宽调整", min = 0.2, max = 2, value = 1, step = 0.2)
    )
  )
))
启动Shiny应用时,本地的3840端口,就被打开了。
~ D:\workspace\dash>R -f run.r
R version 3.2.3 (2015-12-10) -- "Wooden Christmas-Tree"
Copyright (C) 2015 The R Foundation for Statistical Computing
Platform: x86_64-w64-mingw32/x64 (64-bit)
R
'license()''licence()'
R.
'contributors()'
'citation()'RR
'demo()''help()'
'help.start()'HTML
'q()'R.

> library("shiny")
> runApp("./demo1",host='127.0.0.1',port=3840)

Listening on http://127.0.0.1:3840
我们可以用浏览器,来访问本地的服务 http://127.0.0.1:3840 。
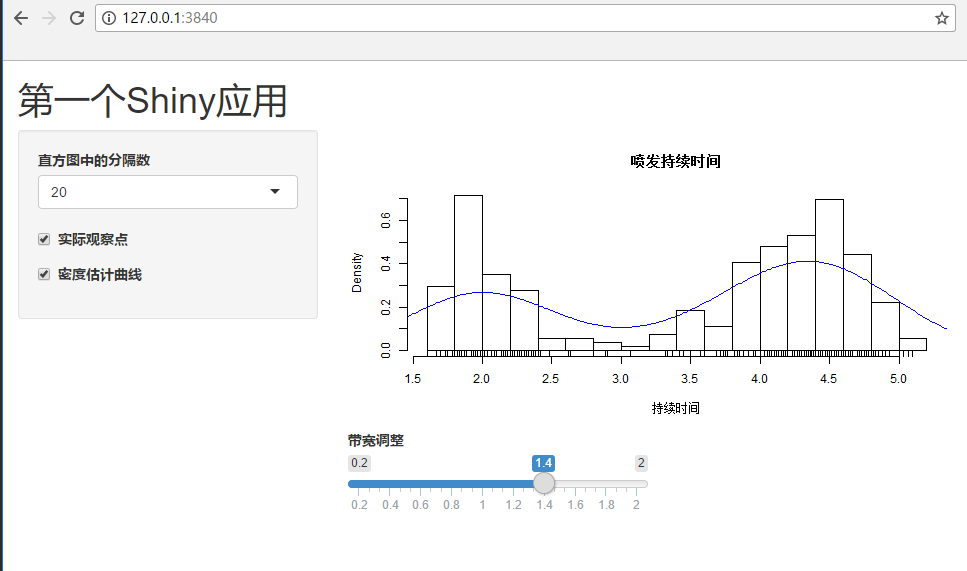
这是一个标准的Web网页,如果我们操作网页上的表单元素,对应该的数据也会发生变化了。这样我们就完成了一个本的Shiny的小应用的开发,接下来就是把这个程序部署到AWS上面了。
3. 申请AWS免费服务器
AWS是Amazon提供的一个云服务平台,利用亚马逊 AWS,软件开发人员可以轻松购买计算、存储、数据库和其他基于 Internet 的服务来支持其应用程序。开发人员能够灵活选择任何开发平台或编程环境,以便于其尝试解决问题。由于开发人员只需按使用量付费,无需前期资本支出,亚马逊 AWS 是向最终用户交付计算资源、保存的数据和其他应用程序的一种最经济划算的方式。
AWS有一个免费的套餐,让互联网用户可以免费的使用他的资源,包括了服务器,数据库,CDN,负载均衡等服务。我们为了部署自己的Shiny应用,可以申请免费的服务器资源,先跑一下,看看效果。
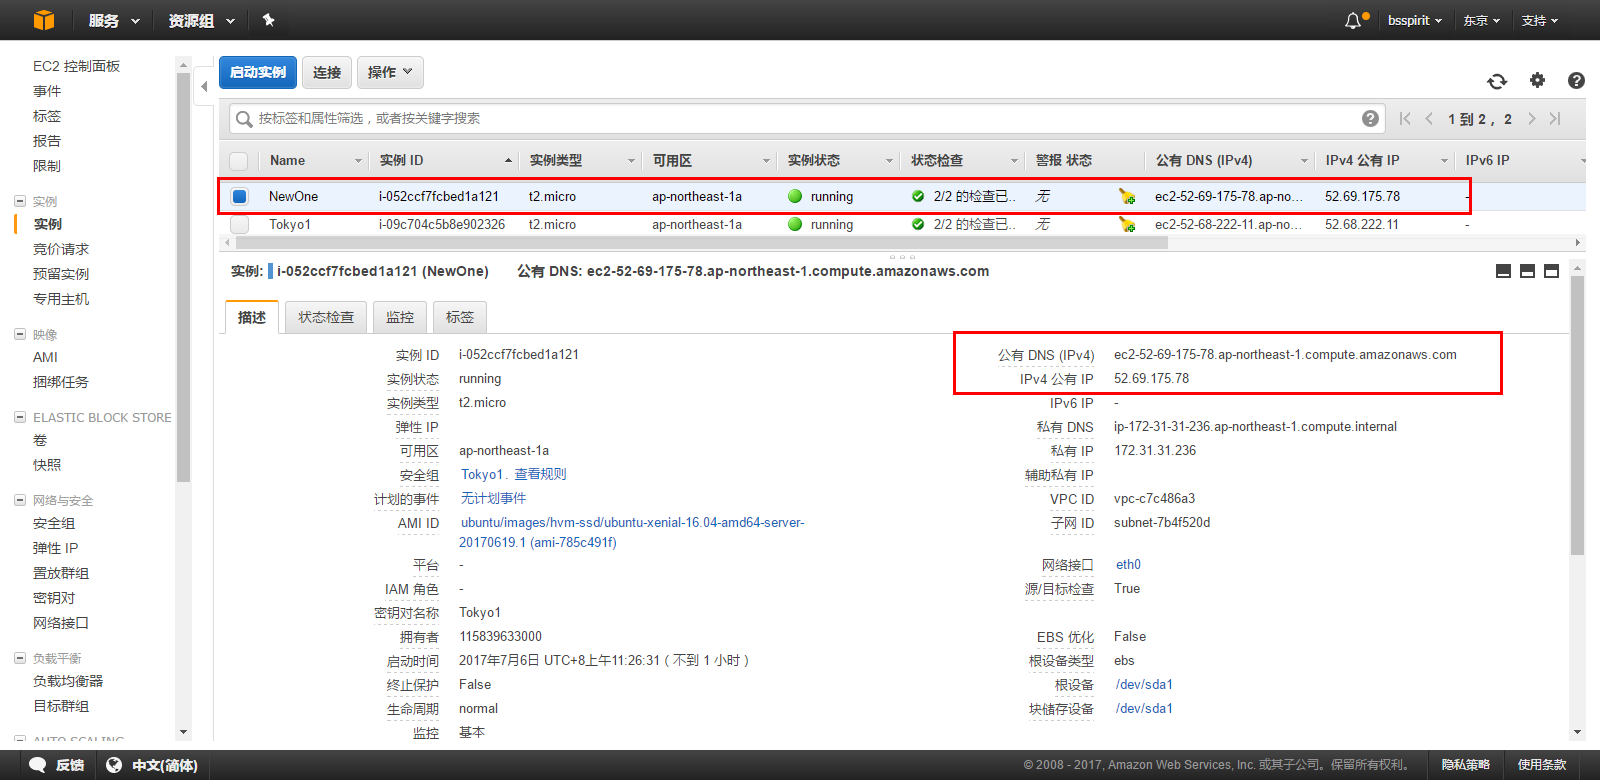
首先,你需要注册一个AWS账号,然后登录进去,选择地区,申请免费的服务器。目前免费开放的区域不包括中国区,我选择了一个日本东京的服务器,Ubuntu Linux 64bit。
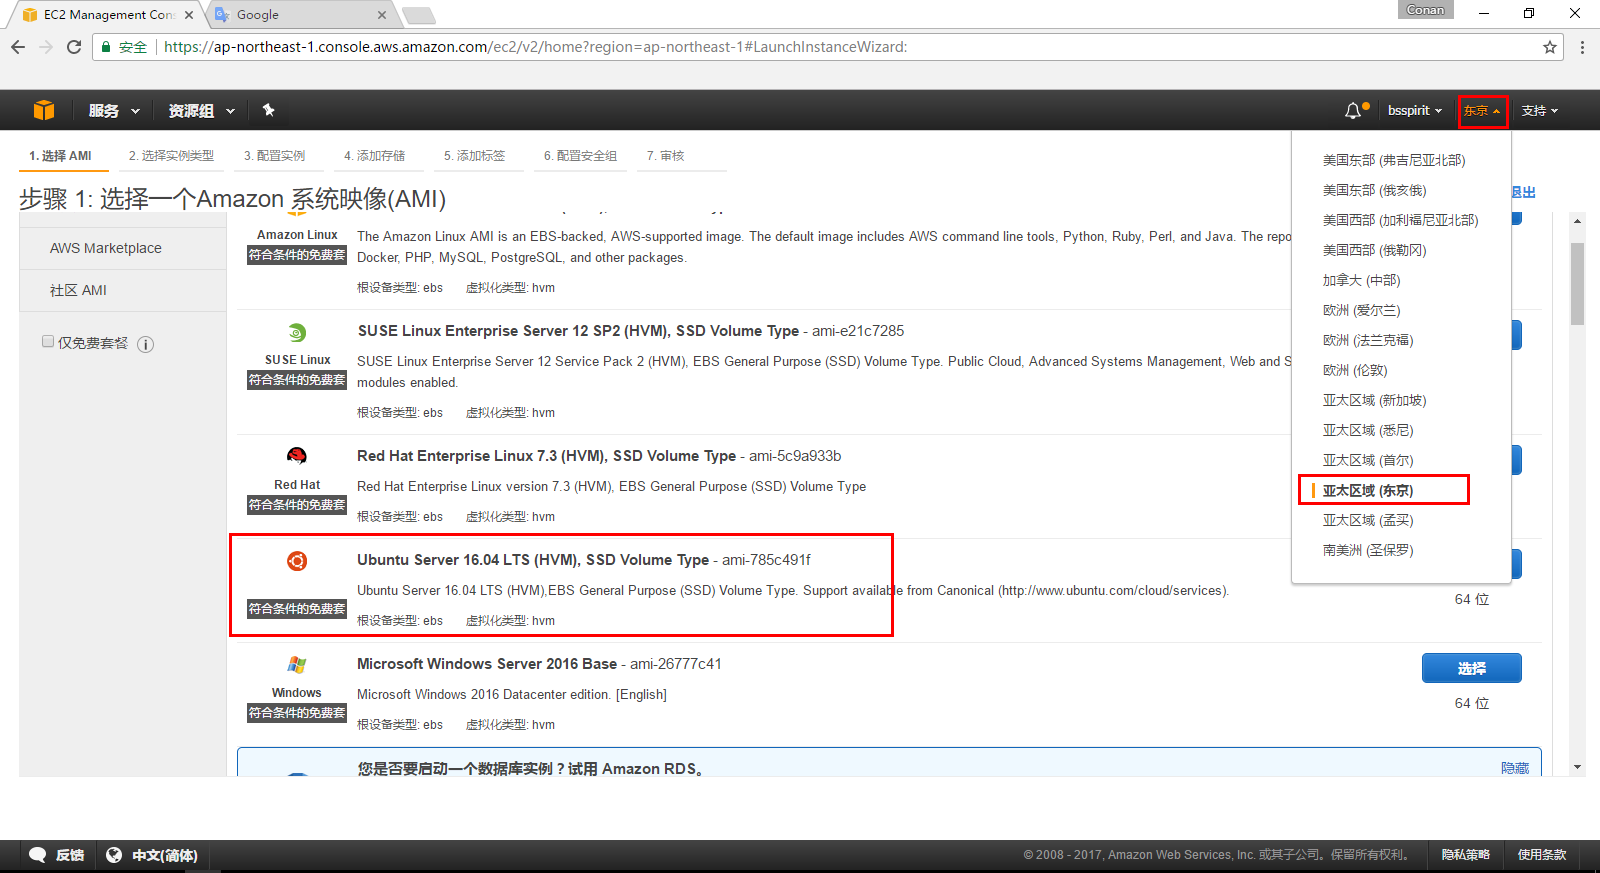
免费的资源,有一些限制,只能1核心CPU,1G内存,最大30G存储等。当然了,有免费的资源,已经是很棒的了,而且是AWS的服务。
接下来,就是做资源配置,然后就可以启动服务器了。
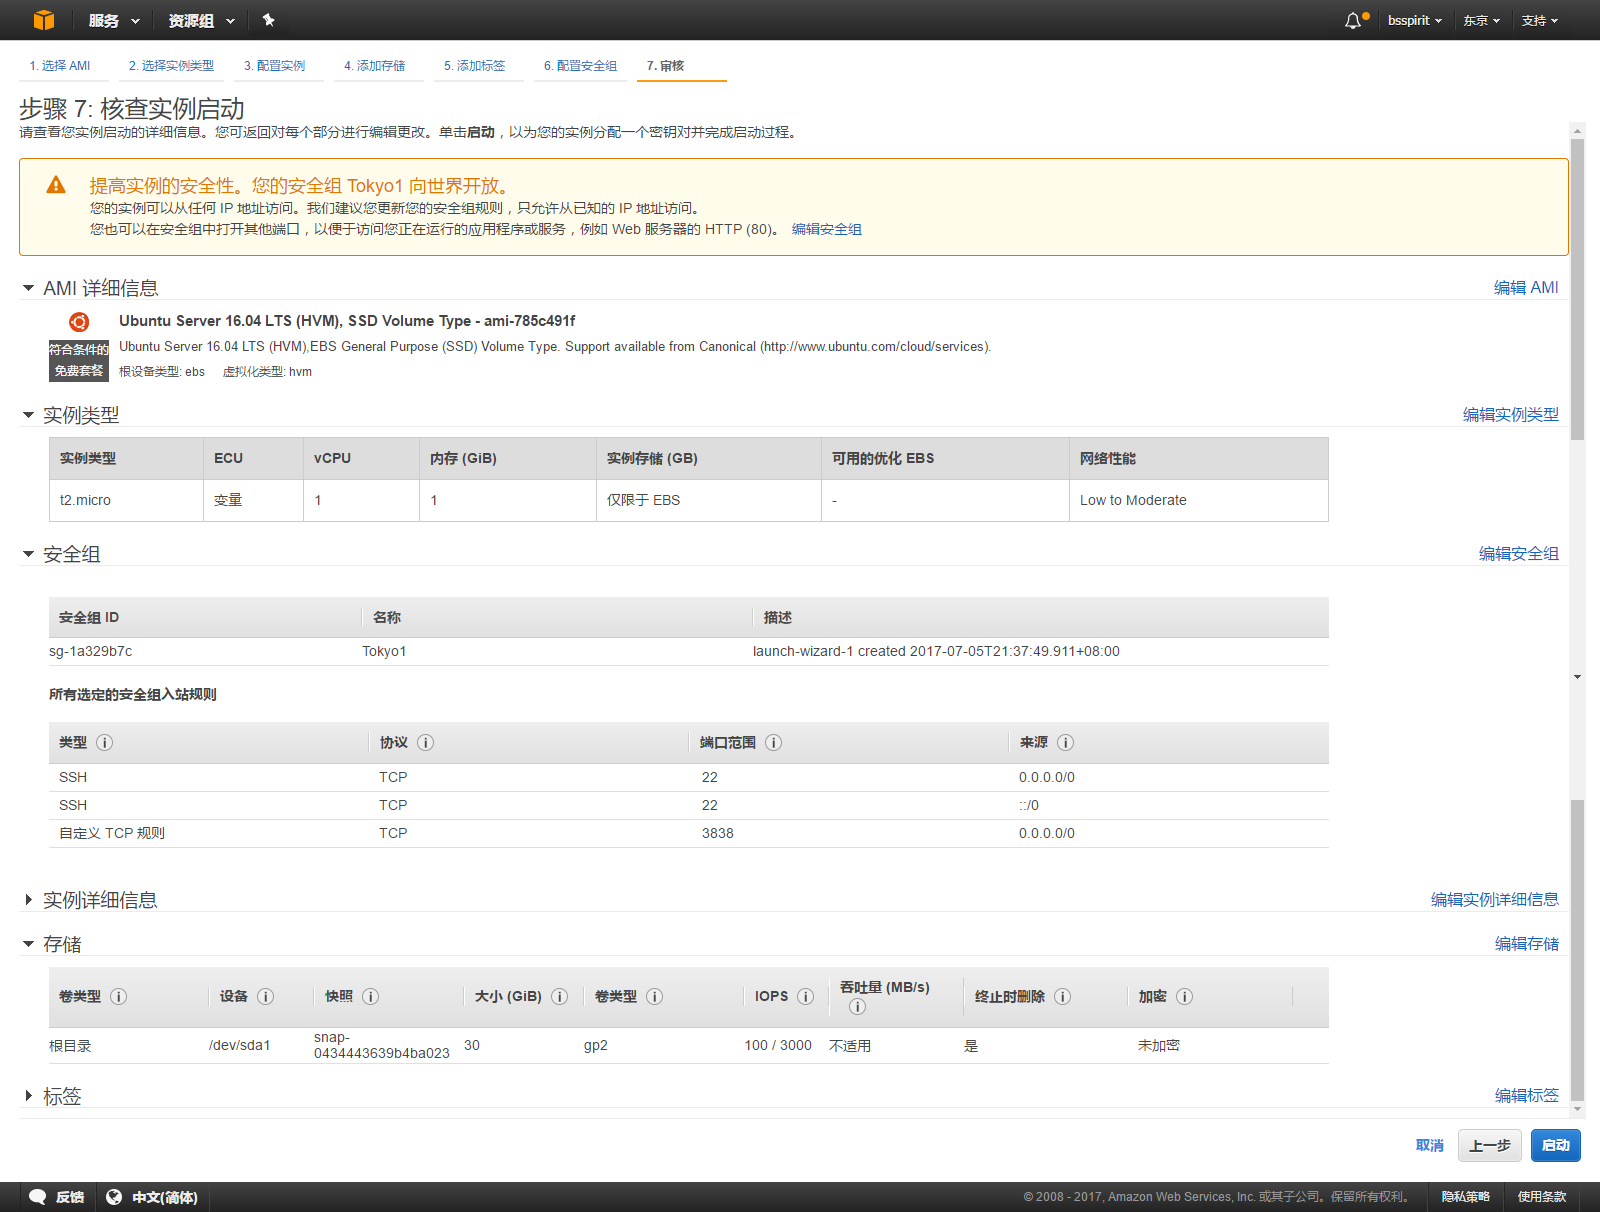
大概等3分钟,服务器启动完成,然后就可以通过SSH进行访问了。
AWS为了保证安全性,建议使用秘钥访问,而不是直接的用户名和密码的方式,所以你需要创建一个秘钥对,下载一个xx.pem的私钥,然后配到Putty或XShell等用于远程登录的客户端里。
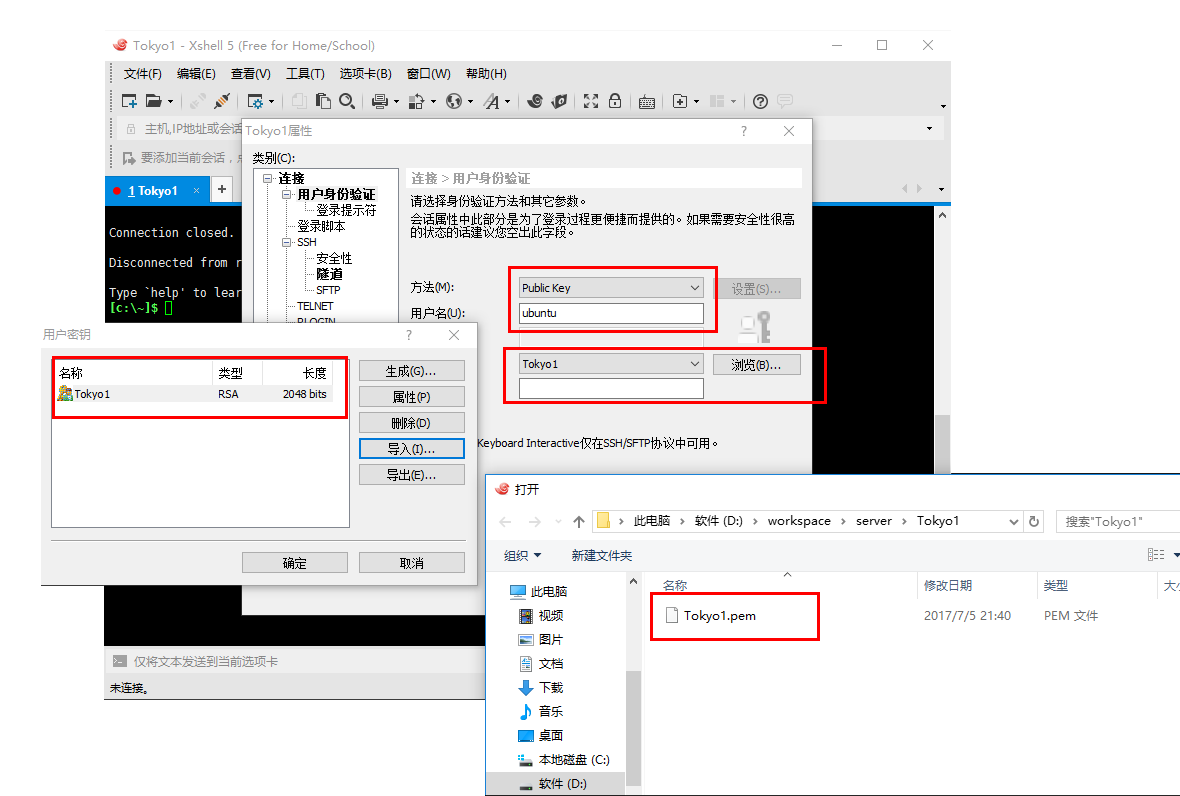
然后,就可以用XShell连接,免费创建的EC2的服务器了。在这里,如果是Ubuntu的Linux服务器,用户名需要使用ubuntu,不能直接设置root。
4. 安装R语言环境
登录后,我们就可以安装R语言的环境了。安装过程比较简单,如果你需要装指定版本的R软件,那么你需要参考文章,R的历史版本安装。如果是安装默认版本的R语言环境,直接使用是apt-get命令就是最方便的。
服务器所使用的系统环境
- Linux Ubuntu 16.04.2 LTS 64-bit
- R: 3.2.3 x86_64-pc-linux-gnu (64-bit)
我们先更新apt的软件源,安装必备的系统软件,包括r-base和git,以及的Shiny应用的依赖库libcurl4-openssl-dev,libxml2-dev。如果你忘了装了,后面再装也都不影响。
~ sudo apt-get update
~ sudo apt-get install r-base
~ sudo apt-get install git
~ sudo apt-get install libcurl4-openssl-dev
~ sudo apt-get install libxml2-dev
接下来,让我们安装R语言的依赖包。这里有一个小技巧,就是在R语言的环境中安装第三方R包,并切换成root用户。
~ sudo -i  # 切换成root用户
~ R        # 启动R语言环境
我们需要预装的包,主要就是shiny,当然如果你还有依赖其他的包,都可以一块安装。安装时,R会让我们选择软件源,如果用https协议的镜像列表,你需要配置一下curl进行下载。你依然可以选择用http协议的镜像列表,选61之后,会出现http的镜像列表。
我们的服务器在Tokyo,所以也选择Tokyo的镜像列表,然后开始下载R的第三方软件包。
# 安装包
> install.packages("shiny")

Installing package into ‘/usr/local/lib/R/site-library’
(as ‘lib’ is unspecified)
--- Please select a CRAN mirror for use in this session ---
HTTPS CRAN mirror

 1: 0-Cloud [https]                 2: Algeria [https]
 3: Australia (Canberra) [https]    4: Australia (Melbourne) [https]
 5: Australia (Perth) [https]       6: Austria [https]
25: France (Montpellier) [https]   26: France (Paris 2) [https]
27: Germany (Göttingen) [https]    28: Germany (Münster) [https]
29: Greece [https]                 30: Iceland [https]
31: India [https]                  32: Indonesia (Jakarta) [https]
33: Ireland [https]                34: Italy (Padua) [https]
35: Japan (Tokyo) [https]          36: Malaysia [https]
61: (HTTP mirrors)

Selection: 61

HTTP CRAN mirror

 1: 0-Cloud                       2: Algeria
 3: Argentina (La Plata)          4: Australia (Canberra)
 5: Austria                       6: Belgium (Antwerp)
 7: Belgium (Ghent)               8: Brazil (BA)
 9: Brazil (PR)                  10: Brazil (RJ)
11: Brazil (SP 1)                12: Brazil (SP 2)
13: Bulgaria                     14: Canada (BC)
37: Hungary                      38: Iceland
39: India                        40: Iran
41: Ireland                      42: Italy (Milano)
43: Italy (Padua)                44: Italy (Palermo)
45: Japan (Tokyo)                46: Korea (Seoul 1)
47: Korea (Seoul 2)              48: Korea (Ulsan)
89: USA (TX 1)                   90: Venezuela

Selection: 45
顺利安装完R的依赖包,接下来就是要安装Shiny Server了。Shiny Server是一个单独的软件,目前还不支持通过apt-get或R本身进行安装,需要下载安装。
5. 安装Shiny Server
在开发时,我们其实只是用到了shiny的R语言第三方包,可以在本地的开发环境,运行Shiny的程序。那么,如果把一个Shiny放到公司内网或外网给其他人用呢?这时就是需要Shiny Server了。
Shiny Server提供一个稳定的Shiny应用在线的运行环境,Shiny Server分成开源版本和企业版本。开源版本,提供了基本的Shiny功能,数据、可视化、运行环境,对于个人来说已经足够用了,而且非常友好。企业版本,提供安全和管理功能添加到基本的开源版本中。RStudio公司出品,必属精品!!
Shiny Server是一个单独的软件,我们需要下载进行安装,下载地址:https://www.rstudio.com/products/shiny/shiny-server/
在Ubuntu的环境中,我们可以通过下面的命令,进行下载和安装。
~ sudo apt-get install gdebi-core
~ wget https://download3.rstudio.org/ubuntu-12.04/x86_64/shiny-server-1.5.3.838-amd64.deb
~ sudo gdebi shiny-server-1.5.3.838-amd64.deb

Reading package lists... Done
Building dependency tree
Reading state information... Done
Reading state information... Done

Shiny Server
 Shiny Server is a server program from RStudio, Inc. that makes Shiny applications available over the web. Shiny is a web application framework for the R statistical computation language.
Do you want to install the software package? [y/N]:y
Selecting previously unselected package shiny-server.
(Reading database ... 63176 files and directories currently installed.)
Preparing to unpack shiny-server-1.5.3.838-amd64.deb ...
Unpacking shiny-server (1.5.3.838) ...
Setting up shiny-server (1.5.3.838) ...
Creating user shiny
Adding LANG to /etc/systemd/system/shiny-server.service, setting to en_US.UTF-8
Created symlink from /etc/systemd/system/multi-user.target.wants/shiny-server.service to /etc/systemd/system/shiny-server.service.
● shiny-server.service - ShinyServer
   Loaded: loaded (/etc/systemd/system/shiny-server.service; enabled; vendor preset: enabled)
   Active: active (running) since Thu 2017-07-06 07:40:24 UTC; 6ms ago
  Process: 25322 ExecStartPost=/bin/sleep 3 (code=exited, status=0/SUCCESS)
 Main PID: 25325 (shiny-server)
    Tasks: 12
   Memory: 35.4M
      CPU: 411ms
   CGroup: /system.slice/shiny-server.service
           ├─25321 /bin/bash -c /opt/shiny-server/bin/shiny-server --pidfile=/var/run/shiny-server.pid >> /var/log...
           └─25325 /opt/shiny-server/ext/node/bin/shiny-server /opt/shiny-server/lib/main.js --pidfile=/var/run/sh...

Jul 06 07:40:21 ip-172-31-31-236 systemd[1]: Starting ShinyServer...
Jul 06 07:40:24 ip-172-31-31-236 systemd[1]: shiny-server.service: Supervising process 25325 which is not our...xits.
Jul 06 07:40:24 ip-172-31-31-236 systemd[1]: Started ShinyServer.
Hint: Some lines were ellipsized, use -l to show in full.
运行完安装的命令,默认情况Shiny Server会被直接启动起来,其中3838的端口被打开。
检查启动端口
~ netstat -nlpt
(Not all processes could be identified, non-owned process info
 will not be shown, you would have to be root to see it all.)
Active Internet connections (only servers)
Proto Recv-Q Send-Q Local Address           Foreign Address         State       PID/Program name
tcp        0      0 0.0.0.0:22              0.0.0.0:*               LISTEN      -
tcp        0      0 0.0.0.0:3838            0.0.0.0:*               LISTEN      -
tcp6       0      0 :::22                   :::*                    LISTEN      -
我们可以通过浏览器,直接基于IP和端口进行Shiny Server的访问了。
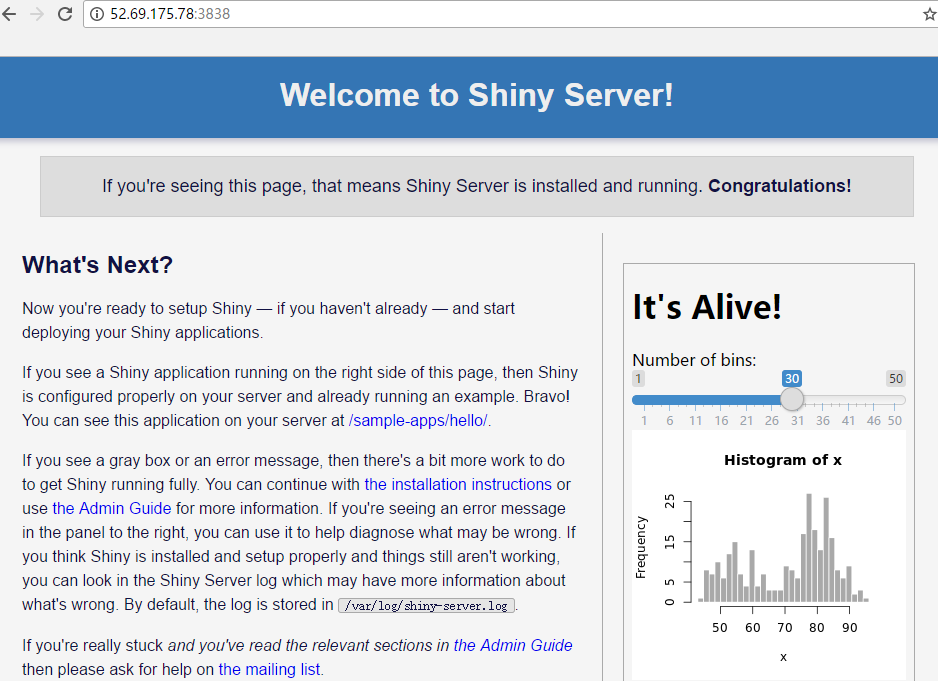
打开的页面是默认的Shiny Server的网页,如果和上面的截图一样,说明你的Shiny Server安装成功了。
提醒一下,AWS的EC2的主机,一定要配置网络访问策略,打开3838端口,允许外部访问,不然一直都是无法访问此网站的错误。
6. 部署自己的Shiny应用
还差最后一步,就是把我们自己开发的Shiny应用,部署到AWS的EC2上面。代码上传的过程,我们可以基于github来完成。
操作过程如下:
- 在github上面,新建一个项目,名为shiny-demo。
- 把本地开发的代码,上传到github的shiny-demo项目中。
- 在AWS的EC2上,从github的shiny-demo项目中,下载代码。
- 在AWS的EC2上,修改Shiny Server的配置,加载项目代码。
- 在AWS的EC2上,重启Shiny Server,发现错误。
- 在AWS的EC2上,查看日志修复错误。
- 在浏览器上访问,自己的Shiny应用。
6.1. 在github上面创建项目,名为shiny-demo。
github操作过程省略。项目地址 https://github.com/bsspirit/shiny-demo。
6.2 把本地开发的代码,上传到github的shiny-demo项目中。
切换到本地开发的环境。
~ cd d:\workspace\dash
~ git init
~ git add .
~ git commit -m 'init'
~ git remote add origin https://github.com/bsspirit/shiny-demo.git
~ git push -u origin master
6.3 在AWS的EC2上,从github的shiny-demo项目中,下载代码。
切换到服务器环境。
# 查看当前目录
~ pwd
/home/ubuntu

# 下载github项目
~ git clone https://github.com/bsspirit/shiny-demo
Cloning into 'shiny-demo'...
remote: Counting objects: 12, done.
remote: Compressing objects: 100% (11/11), done.
remote: Total 12 (delta 0), reused 12 (delta 0), pack-reused 0
Unpacking objects: 100% (12/12), done.
Checking connectivity... done.

# 查看项目文件
~ cd shiny-demo
~ tree
.
├── demo1
│   ├── server.R
│   └── ui.R
├── README.md
└── run.r

1 directory, 4 files
6.4 在AWS的EC2上,修改Shiny Server的配置,加载项目代码。
编辑shiny-server的配置文件shiny-server.conf。
~ sudo vi /etc/shiny-server/shiny-server.conf

# Instruct Shiny Server to run applications as the user "shiny"
run_as shiny;

# Define a server that listens on port 3838
server {
  listen 3838;

  # Define a location at the base URL
  location / {

    # Host the directory of Shiny Apps stored in this directory
    site_dir /srv/shiny-server;

    # Log all Shiny output to files in this directory
    log_dir /var/log/shiny-server;

    # When a user visits the base URL rather than a particular application,
    # an index of the applications available in this directory will be shown.
    directory_index on;
  }

  # 新增加指向github的代码位置
  location /demo1 {
    app_dir /home/ubuntu/shiny-demo/demo1;
    log_dir /var/log/shiny-server/demo1;
  }
}
增加 location /demo1 { } 的配置部分,用来把自己的Shiny的应用,在Shiny Server中进行注册。当然,对于不熟悉Shiny Server的配置的人,可以参考Shiny Server的管理员使用手册 http://docs.rstudio.com/shiny-server/ 。
6.5 在AWS的EC2上,重启Shiny Server,发现错误。
重启Shiny Server,虽然只是重启,但经常出现错误。
~ sudo service shiny-server restart

# 对于Ubuntu 15.04+的系统,推荐用下面的命令。
~ sudo systemctl restart shiny-server
重启后,就可以在浏览器上,访问自己的Shiny应用了。
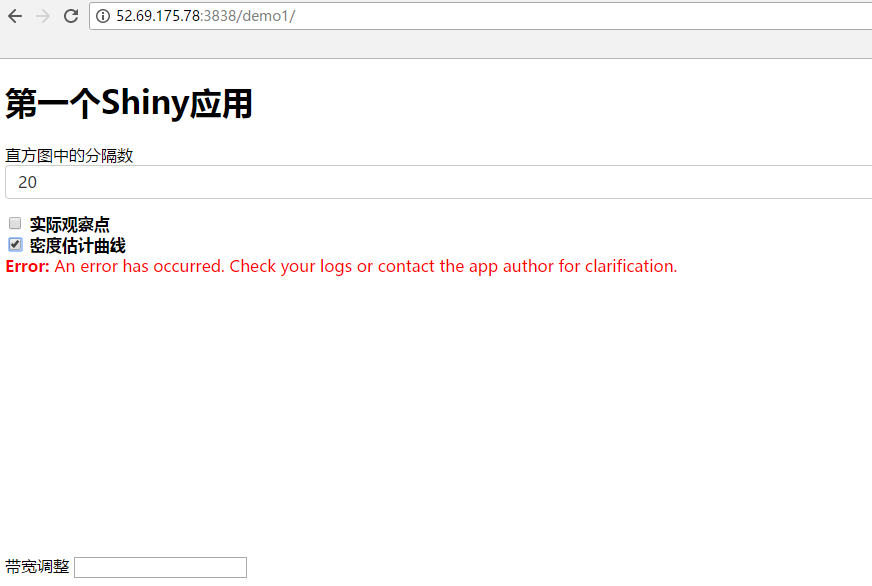
打开以后,出现了一个错误页面,这种情况太正常了。会出现各种各样的异常的情况,然后就需要我们反复进行调试了。
6.6 在AWS的EC2上,查看日志,修复错误。
主要的调试的方法,就是检查Shiny Server的日志。日志在设置上,有一个很大的坑,我也是在挠头搞了3个小时后才发现的。
由于Shiny Server为了保证性能,所以非敏感性的错误日志被设置了自动清除,每当你出现了错误,要去看日志定位问题的时候,这个日志就刚好被自动清除了。坑很大!!都开始怀疑人生了。
所以,你在调试时需要修改一个参数,保证日志不会被自动清除。
修改文件shiny-server.conf
~ sudo vi /etc/shiny-server/shiny-server.conf

run_as shiny;

access_log /var/log/shiny-server/access.log default;  # 增加记录访问
preserve_logs true;                                   # 禁止自动清除日志

# Define a server that listens on port 3838
server {
  listen 3838;

# 省略
}
再次重启Shiny Server。
~ sudo systemctl restart shiny-server
发现问题,检查日志,然后,我们对应日志的解决问题。
~ sudo cat /var/log/shiny-server/demo1/demo1-shiny-20170706-081120-42749.log

Listening on http://127.0.0.1:42749
Warning: Error in if: argument is of length zero
Stack trace (innermost first):
    101: density.default
    100: density
     99: renderPlot [/home/ubuntu/shiny-demo/demo1/server.R#22]
     89:
     78: plotObj
     77: origRenderFunc
     76: output$main_plot
      1: runApp
很多情况下,诡异的错误都是缺少第三方包造成的,当你程序中使用了第三包的时候,一直要记得在Shiny的服务器上面安装好。记得用root用户!!
总结一下,我们利用免费的AWS的EC2服务器资源,发布了自己的Shiny应用,是多么的开心啊!这样以后就可以大胆地去开发自己喜欢的Shiny应用了,当然不只是Shiny应用,你可以利用AWS的免费资源,做更多的事情。老司机,都明白的!!
原本是准备把一个基于赌场原型的Shiny应用放到互联网,考虑服务器位置和选型的问题,无意中发现了AWS的免费资源,这样就有了这样的一篇Shiny与AWS结合的文章。下一篇,要不要分析一下赌场的模型呢。
转载请注明出处:
http://blog.fens.me/r-shiny-aws/