比特币吸金之道系列文章,由计算机黑客发明的网络货币,无国界,无政府,无中心。没有政府滥发货币,没有通货膨胀。在全球计算机网络中,自由的实现货币兑换和流通。
本系列文章只讲程序和策略,不谈挖矿…
关于作者:
- 张丹(Conan), 程序员/Quant: Java,R,Nodejs
- blog: http://blog.fens.me
- email: bsspirit@gmail.com
转载请注明出处:
http://blog.fens.me/bitcoin-eth-truffle

前言
区块链的开发对于大多数的人来说,都是一件很新、很难的事情,有太多不一样的技术要学习。区块链有自己的设计理念,不同于传统分布式系统架构,数据同步机制,共识算法等。以太坊作为区块链2.0的产品,最独特是智能合约的设计,是超脱于技术的思维体系。
通过 Truffle 把这些不同的理念和思路进行整合,转换为开发人员能明白的一种编程方法。本文中的所有源代码已经上传到github,请有需要的同学下载使用: https://github.com/bsspirit/truffle-demo
目录
- Truffle安装
- 初始化项目
- 启动测试节点
- 部署合约
- 自定义的智能合约
- 交互的控制台
- 启动合约服务
1. Truffle安装
Truffle是Dapp开发框架,他可以帮我们处理掉大量无关紧要的小事情,让我们可以迅速开始写代码-编译-部署-测试-打包DApp这个流程。Truffle是使用Nodejs开发的,我们首先需要安装Nodejs运行环境。关于Nodejs的详细使用,请参考系列文章从零开始nodejs系列文章
DApp是什么?
App我们都知道是客户端应用,DApp就是D+App,D是英文单词decentralization的缩写,即DApp为去中心化应用。
检查操作系统版本和Nodejs版本。
> cat /etc/issue
Ubuntu 16.04 LTS \n \l

# Nodejs版本
> npm -v
6.0.0
> node -v
v8.9.4
全局安装Truffle工具。
# 安装truffle工具
> npm install -g truffle
/usr/local/bin/truffle -> /usr/local/lib/node_modules/truffle/build/cli.bundled.js
+ truffle@4.1.12
added 81 packages from 309 contributors in 2.571s
查看命令行帮助
> truffle
Truffle v4.1.12 - a development framework for Ethereum

Usage: truffle  [options]

Commands:
  init      Initialize new and empty Ethereum project
  compile   Compile contract source files
  migrate   Run migrations to deploy contracts
  deploy    (alias for migrate)
  build     Execute build pipeline (if configuration present)
  test      Run JavaScript and Solidity tests
  debug     Interactively debug any transaction on the blockchain (experimental)
  opcode    Print the compiled opcodes for a given contract
  console   Run a console with contract abstractions and commands available
  develop   Open a console with a local development blockchain
  create    Helper to create new contracts, migrations and tests
  install   Install a package from the Ethereum Package Registry
  publish   Publish a package to the Ethereum Package Registry
  networks  Show addresses for deployed contracts on each network
  watch     Watch filesystem for changes and rebuild the project automatically
  serve     Serve the build directory on localhost and watch for changes
  exec      Execute a JS module within this Truffle environment
  unbox     Download a Truffle Box, a pre-built Truffle project
  version   Show version number and exit

See more at http://truffleframework.com/docs
2. 初始化项目
新建工程目录,然后用truffle初始化项目。
> cd /root/workspace
> mkdir truffle01
> cd truffle01/

# 初始化项目
> truffle init
Downloading...
Unpacking...
Setting up...
Unbox successful. Sweet!

Commands:

  Compile:        truffle compile
  Migrate:        truffle migrate
  Test contracts: truffle test
查看项目目录,目录下会生成下面的文件和目录。
> tree
.
├── contracts
│   └── Migrations.sol
├── migrations
│   └── 1_initial_migration.js
├── test
├── truffle-config.js
└── truffle.js
- contracts/ , Truffle默认的合约文件存放地址。
- migrations/ , 存放发布脚本文件
- test/ , 用来测试应用和合约的测试文件
- truffle-config.js, 配置文件
- truffle.js, 配置文件
在contracts目录下,默认生成了一个合约文件Migrations.sol,执行编译合约。
> truffle compile
Compiling ./contracts/Migrations.sol...
Writing artifacts to ./build/contracts
成功编译后,会在build/contracts目录下,生成对于合约的Migrations.json文件,这个JSON就是
3. 启动测试节点
接下来,我们用testrpc搭建一个本地的简单的测试网络,相当于是一个mock,这样操作比较直接接入以太坊网络环境要容易的多。
安装测试网络工具testrpc
# 安装testrpc工具
> npm install -g ethereumjs-testrpc
npm WARN deprecated ethereumjs-testrpc@6.0.3: ethereumjs-testrpc has been renamed to ganache-cli, please use this package from now on.
/usr/local/bin/testrpc -> /usr/local/lib/node_modules/ethereumjs-testrpc/build/cli.node.js

> uglifyjs-webpack-plugin@0.4.6 postinstall /usr/local/lib/node_modules/ethereumjs-testrpc/node_modules/uglifyjs-webpack-plugin
> node lib/post_install.js

npm WARN optional SKIPPING OPTIONAL DEPENDENCY: fsevents@1.2.4 (node_modules/ethereumjs-testrpc/node_modules/fsevents):
npm WARN notsup SKIPPING OPTIONAL DEPENDENCY: Unsupported platform for fsevents@1.2.4: wanted {"os":"darwin","arch":"any"} (current: {"os":"linux","arch":"x64"})

+ ethereumjs-testrpc@6.0.3
added 339 packages from 279 contributors in 42.215s
启动testrpc测试网络。
> testrpc
EthereumJS TestRPC v6.0.3 (ganache-core: 2.0.2)

Available Accounts
==================
(0) 0x8dac051e949fdb323ff963f37de37345ac5a2de1
(1) 0x7ca2561b16a4181455537299ff766d4cec7cf6c3
(2) 0x7d1d40b9a015ff42d19cde1f95c0041ab1fac155
(3) 0x42730fd585a29029667274f0443ac0bb4830cb20
(4) 0xe3225679925b3790c850ec3560156aeff3fea1c2
(5) 0xd9f18fb4aa6ed92279136ddcdad73ad516fa7f7d
(6) 0xe9617966b21f20868a35d97e4abbb979f6b32431
(7) 0x15f1e3f6b1caa047281f91834530f14780b9adf7
(8) 0x53c049daad9338db54960e8620fefd3829590754
(9) 0xf6df046b0ce0d12bc978067bfcd0be209ee0b93c

Private Keys
==================
(0) 0c4cb520a02b1ea7c477e5ef028fef2da22be8589a08b5989fae5403c4fec21e
(1) 667adbcd821e183809bdf2d08cedbcd233741670cb61775ea491dd0ef862bf1f
(2) a5b0a337a7185544300f4d24e78b8a3f9d797280dc2ced40c7f3fe60ab943aa5
(3) 3e8f665924d45bcb013bff6111f3be557703ca0798ce824b14e84f5d7d2294e9
(4) 1620759f80e28a1258c18578253cade445d5d5e380a6fc12ed7cfe7e7f9ec408
(5) 60963d8c56c74d4f0cd460b7d9461581815153559ddb2eee9101eb3d2731fba9
(6) e20a5d21d0b6bdd88b143bedaab4ac94f7d1f2178236021b21991efea1ab6ee3
(7) d4d841c0430a9781bf86132db841364e92432d3c3d6ea25b5178e8a6d4c56984
(8) a98f4c3609d2c8e989a0f9bf86acdd4035bf0eac4de6b6c61545a8674f269b82
(9) d5ea07abc4cad2c9d26ebea32c67251ba7fcc3ab317739ec0a13a84cc1ccad47

HD Wallet
==================
Mnemonic:      enforce trust bridge guard memory stadium polar dignity provide alley embrace machine
Base HD Path:  m/44'/60'/0'/0/{account_index}

Listening on localhost:8545
这里生成了10个账号,和10个私钥,并模拟测试网络的打开了HTTP-RPC服务,这样就可以让智能合约的程序,基于这个测试网络进行开发了。
随着时间的,发现这个模拟的程序,还会自己模拟一些交易。
HD Wallet
==================
Mnemonic:      away lecture stuff weapon market spot infant solid capital monkey claw siege
Base HD Path:  m/44'/60'/0'/0/{account_index}

Listening on localhost:8545

eth_getBlockByNumber
eth_accounts
web3_clientVersion
net_version
eth_accounts
eth_accounts
eth_accounts
net_version
net_version
eth_sendTransaction

  Transaction: 0xd8e4638d4d2d95b2e2894fa724249cea81bdb539cf4c7b111dbefe0ea321b9eb
  Contract created: 0x0a2816a1c1ad71cda4843f57ab2c0a4a80cdfef9
  Gas usage: 277462
  Block Number: 1
  Block Time: Tue Jun 26 2018 18:49:33 GMT+0800 (CST)

eth_newBlockFilter
eth_getFilterChanges
eth_getTransactionReceipt
eth_getCode
eth_uninstallFilter
eth_sendTransaction

  Transaction: 0x27bda84efcb9a9677c17269919a00f01d7bd2c88b458bd20071c51e6e58dbd48
  Gas usage: 42008
  Block Number: 2
  Block Time: Tue Jun 26 2018 18:49:33 GMT+0800 (CST)

eth_getTransactionReceipt
eth_getBlockByNumber
eth_accounts
web3_clientVersion
eth_getBlockByNumber
eth_accounts
web3_clientVersion
eth_accounts
4. 部署合约
运行truffle migrate命令部署智能合约到测试网络上,第一次执行时出现错误Error: No network specified. Cannot determine current network,是因为没有连接到测试网络。
修改文件truffle.js,连接到测试网络上。
> vi truffle.js

module.exports = {
  networks: {
    development: {
      host: '127.0.0.1',
      port: 8545,
      network_id: '*'
    }
  }
};
再次启动truffle,完成部署的过程。
> truffle migrate
Using network 'development'.

Network up to date.
5. 自定义的智能合约
接下来,我们开始编写一个自己的智能合约,需要编写4个文件。
- contracts/Hello.sol,合约文件
- migrations/2_hello.js,部署文件
- test/Hello.js,js单元测试文件
- test/TestHello.sol,solidity单元测试文件
在contracts目录下,编写合约文件Hello.sol,提供2个函数,say()用来返回一个固定的字符串,sum()用来计算2个整书之和。
> vi ./contracts/Hello.sol

pragma solidity ^0.4.23;

contract Hello {

  function say() pure public returns (string) {
    return "Hello world";
  }


  function sum(uint a, uint b) pure public returns (uint val) {
    val = a + b ;
    return val;
  }

}
编写Hello.sol合约的部署脚本,放到migrations目录下面,文件名为2_hello.js。
> vi migrations/2_hello.js

var MyContract = artifacts.require("Hello");

module.exports = function(deployer) {
  deployer.deploy(MyContract);
};
单元测试有2种写法,一种是基于nodejs的Mocha库的写法,另一种是基本solidity的写法。
按Nodejs写法的测试用例,放到test目录下面,文件名为Hello.js。
> vi ./test/Hello.js

const Hello = artifacts.require("Hello");

contract('Hello test', async (accounts) => {

  it("say", async () => {
     let obj = await Hello.deployed();
     let val = await obj.say();
     assert.equal(val, "Hello world");
  })

  it("sum", async () => {
    let obj = await Hello.deployed();
    let val = await obj.sum(10,15);
    assert.equal(val, 25);

  });
})
按solidity写法的测试用例,放到test目录下面,文件名为TestHello.sol。
> vi ./test/TestHello.sol

pragma solidity ^0.4.24;

import "truffle/Assert.sol";
import "truffle/DeployedAddresses.sol";
import "../contracts/Hello.sol";

contract TestHello {

  function test_say() public {
    Hello obj = Hello(DeployedAddresses.Hello());
    Assert.equal(obj.say(), "Hello world","test say");
  }

  function test_sum() public {
    Hello obj = Hello(DeployedAddresses.Hello());
    Assert.equal(obj.sum(10,15), 25, "test sum");
  }
}
编译Hello.sol合约,成功通过。
> truffle compile
Compiling ./contracts/Hello.sol...
Writing artifacts to ./build/contracts
把合约再次部署到testrpc的测试网络上面,这时需要用–reset参数。
> truffle migrate --reset
Using network 'development'.

Running migration: 1_initial_migration.js
  Replacing Migrations...
  ... 0x011256fee23fe4e633c86411f35e31f539e9026302495c3d824fca6b314ae92c
  Migrations: 0x298afbabd16ca14ec870377a61f983203ac69536
Saving successful migration to network...
  ... 0x59b23e1efc5f1bfb09af05ed3c26b7338573834394a61adea4bfc69775dcbae8
Saving artifacts...
Running migration: 2_hello.js
  Replacing Hello...                                                       # 创建合约
  ... 0x0aab9dd6c5781b899b60c7fc1190d3aefaa2af68363af386a8c473d40bc9f20f   # 交易hash
  Hello: 0x98ce096564f6b459b4a09b1b204ad6e362d384b6                        # 合约地址
Saving successful migration to network...
  ... 0x164b11ea951882cf5d374c2bdb979dac9586a87d0db4b8c6c8561d4cc7a9d5ca
Saving artifacts...
部署成功之后,我们可以看到testrpc的测试网络中,也有一些对应的更新。
eth_getTransactionReceipt
eth_accounts
eth_sendTransaction

  Transaction: 0x0aab9dd6c5781b899b60c7fc1190d3aefaa2af68363af386a8c473d40bc9f20f    # 交易hash
  Contract created: 0x98ce096564f6b459b4a09b1b204ad6e362d384b6                       # 合约地址
  Gas usage: 162663
  Block Number: 63
  Block Time: Wed Jun 27 2018 23:24:14 GMT+0800 (CST)

eth_newBlockFilter
eth_getFilterChanges
eth_getTransactionReceipt
eth_getCode
eth_uninstallFilter
eth_sendTransaction

  Transaction: 0x164b11ea951882cf5d374c2bdb979dac9586a87d0db4b8c6c8561d4cc7a9d5ca
  Gas usage: 27008
  Block Number: 64
  Block Time: Wed Jun 27 2018 23:24:14 GMT+0800 (CST)

eth_getTransactionReceipt
接下来,我们就是可以运行test的命令,来测试合约的正确性。
> truffle test
Using network 'development'.

Compiling ./contracts/Hello.sol...
Compiling ./test/TestHello.sol...
Compiling truffle/Assert.sol...
Compiling truffle/DeployedAddresses.sol...

  TestHello
    ✓ test_say (119ms)
    ✓ test_sum (70ms)

  Contract: Hello test
    ✓ say
    ✓ sum

  4 passing (1s)
2种写法的单元测试文件,都通过的测试。2种写法的区别在于,Nodejs当中是异步执行测试的,solidity是同步的。
Nodejs的优势是测试与前端测试相似,可以模拟前端测试,称为整合测试,可以有更强大的语法支持。js的另一大优势可以比较简单地实现异常捕捉。
solidity测试写法简洁,适用于单元测试,另一大优势是js只能测试public的函数,soli可以测试内部function,internal的,通过继承被测试contract来获得internal function的访问权限。
6. 交互的控制台
接下来,我们在网络执行合约,可以通过控制台的交互的命令来完成,启动控制台 truffle console。
> truffle console

# 执行合约函数
truffle(development)> var contract;
undefined
truffle(development)> Hello.deployed().then(function(instance){contract= instance;});
undefined
truffle(development)> contract.say()
'Hello world'
truffle(development)> contract.sum(1,21)
BigNumber { s: 1, e: 1, c: [ 22 ] }

# 查看合约地址
truffle(development)> Hello.address
'0x98ce096564f6b459b4a09b1b204ad6e362d384b6'

# 查看合约abi
truffle(development)> JSON.stringify(Hello.abi)
'[{"constant":true,"inputs":[],"name":"say","outputs":[{"name":"","type":"string"}],"payable":false,"stateMutability":"pure","type":"function"},{"constant":true,"inputs":[{"name":"a","type":"uint256"},{"name":"b","type":"uint256"}],"name":"sum","outputs":[{"name":"","type":"uint256"}],"payable":false,"stateMutability":"pure","type":"function"}]'
7. 启动合约服务
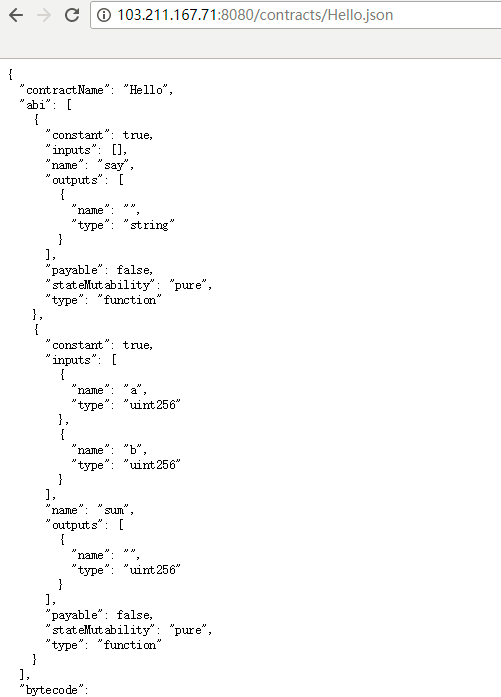
最后,启动服务程序,开放一个HTTP的端口,允许通过Http访问JSON ABI(Application Binary Interface),ABC指定了合约接口,包括可调用的合约方法、变量、事件等。
> truffle serve
Serving static assets in ./build on port 8080...
启动truffle serve时,一直会有一个报错,TypeError: fsevents is not a constructor
> truffle serve
Serving static assets in ./build on port 8080...

/usr/local/lib/node_modules/truffle/build/webpack:/Users/gnidan/src/work/truffle/~/chokidar/lib/fsevents-handler.js:26
  return (new fsevents(path)).on('fsevent', callback).start();
^
TypeError: fsevents is not a constructor
    at createFSEventsInstance (/usr/local/lib/node_modules/truffle/build/webpack:/Users/gnidan/src/work/truffle/~/chokidar/lib/fsevents-handler.js:26:1)
    at setFSEventsListener (/usr/local/lib/node_modules/truffle/build/webpack:/Users/gnidan/src/work/truffle/~/chokidar/lib/fsevents-handler.js:80:1)
    at FSWatcher.FsEventsHandler._watchWithFsEvents (/usr/local/lib/node_modules/truffle/build/webpack:/Users/gnidan/src/work/truffle/~/chokidar/lib/fsevents-handler.js:244:1)
    at FSWatcher. (/usr/local/lib/node_modules/truffle/build/webpack:/Users/gnidan/src/work/truffle/~/chokidar/lib/fsevents-handler.js:378:1)
    at gotStat (fs.js:1775:21)
    at FSReqWrap.oncomplete (fs.js:152:21)
只有修改truffle的源代码文件中,把useFsEvents 检查项去掉就可以了。
> vi /usr/local/lib/node_modules/truffle/build/cli.bundled.js

// Enable fsevents on OS X when polling isn't explicitly enabled.
//if (undef('useFsEvents')) opts.useFsEvents = !opts.usePolling;

// If we can't use fsevents, ensure the options reflect it's disabled.
//if (!FsEventsHandler.canUse()) opts.useFsEvents = false;
opts.useFsEvents = false;
最后,用浏览器访问HTTP服务,http://103.211.167.71:8080/contracts/Hello.json
如下图所示:
总结一下,在本文中我们使用了trffule工具,完成了智能合约的 代码-编译-部署-测试-打包的完事流程,操作起来还是很方便的。
本文中的所有源代码已经上传到github,请有需要的同学下载使用: https://github.com/bsspirit/truffle-demo
接下来的步骤,就是把我们自定义的Hello.sol部署到Geth的私有网络中,等下篇文章再具体说明。Geth的私有网络环境搭建,请参考文章以太坊测试区块链环境搭建。
转载请注明出处:
http://blog.fens.me/bitcoin-eth-truffle