• Posts tagged "eth"

Blog Archives

Ropsten测试网络部署自己的Token

比特币吸金之道系列文章,由计算机黑客发明的网络货币,无国界,无政府,无中心。没有政府滥发货币,没有通货膨胀。在全球计算机网络中,自由的实现货币兑换和流通。

本系列文章只讲程序和策略,不谈挖矿…

关于作者:

  • 张丹(Conan), 程序员/Quant: Java,R,Nodejs
  • blog: http://blog.fens.me
  • email: bsspirit@gmail.com

转载请注明出处:
http://blog.fens.me/bitcoin-eth-ropsten-token

前言

2017年,不断出现各种ICO项目,大量的币其实都是基于以太坊的公链,包装一个智能合约,远看很高深,近看很简单。以太坊作为区块链2.0时代的奠基者,功不可没,确实极大程度上推动了数字货币的兴起。

作为一个程序员,要关注新的领域和新的技术,区块链就是需要了解的一个新领域。自己把发币流程操作一遍,会有新的感悟。Ropsten是一个以太坊的测试网络,我们在这个网络进行发币实验。

目录

  1. 以太坊上发token
  2. 完成转账交易

1. 以太坊上发token

基于以太坊的公链发币,真的不难!工具已经被高度自动化地集成了,唯一花时间的事情,就是我们了解发token的操作原理。那么接下来,就让我们开始发token吧。

直接在正式的以太坊网络发币是要花钱的,我们先在测试网络上,把这个流程跑一遍,之后再用正式网络进行发币。

在以太坊上发token,操作步骤有如下几步进行:

  1. 打开VPN,建立国际访问通道。
  2. 打开Chrome浏览器,安装MetaMask插件
  3. 在MetaMask中,切换到Ropsten Test Network,并创建钱包
  4. 从测试网络中,获得测试的eth。
  5. 打开Remix 在线合约编程环境
  6. 编写 solidity 智能合约代码
  7. 编译,配置,提交ABI到测试网络
  8. 切换到 MetaMask 进行付费
  9. 生成合约,发币成功。

我们开始具体执行每个步骤的操作:

1.1 打开VPN,建立国际访问通道。

程序员都知道,不多说了。VPN服务器搭建,请参考文章在Ubuntu上安装IPSEC VPN服务在Ubuntu上安装PPTP VPN服务

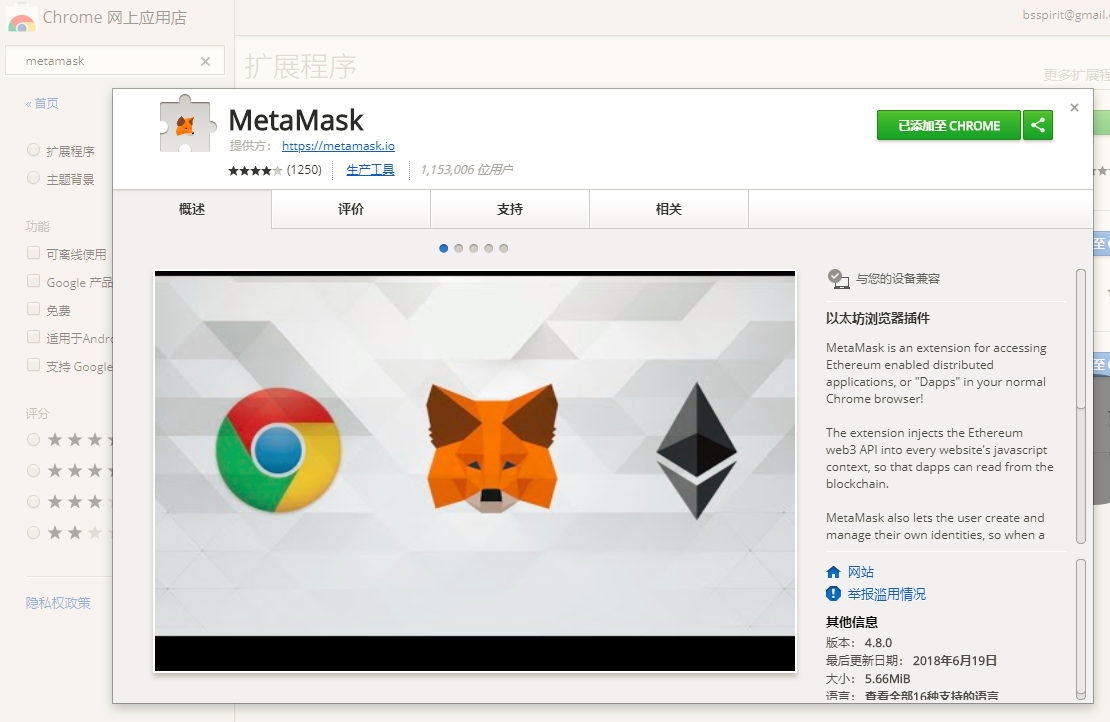
1.2 打开Chrome浏览器,安装MetaMask插件。

安装好后,启用插件就行了,在chrome浏览器右上角会出现的一个小狐狸的图标。

1.3 在MetaMask中,切换到Ropsten Test Network,并创建钱包

打开MetaMask钱包,进行注册和登录。

然后,从 Main Ethereum Network 切换到测试网络 Ropsten Test Network 连接成功。

1.4 从测试网络中,获得测试的eth。

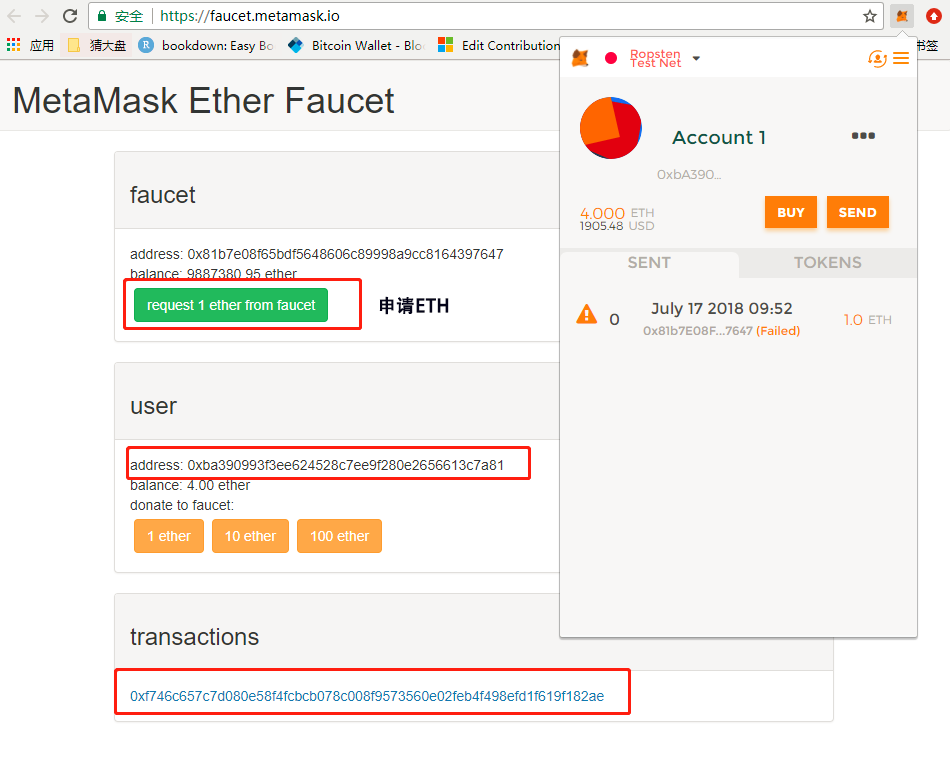
由于发token是需要进行付费(Gas),我们要先从测试网络中获得ETH。在MetaMask中,点击buy,就会弹出一个新的网页,用于获得测试网络中的token。点击faucet栏目下面的,request 1 eth from faucet的按钮,申请ETH。在user栏目中,会自动匹配我们的钱包地址(address)和余额(balnacen)。

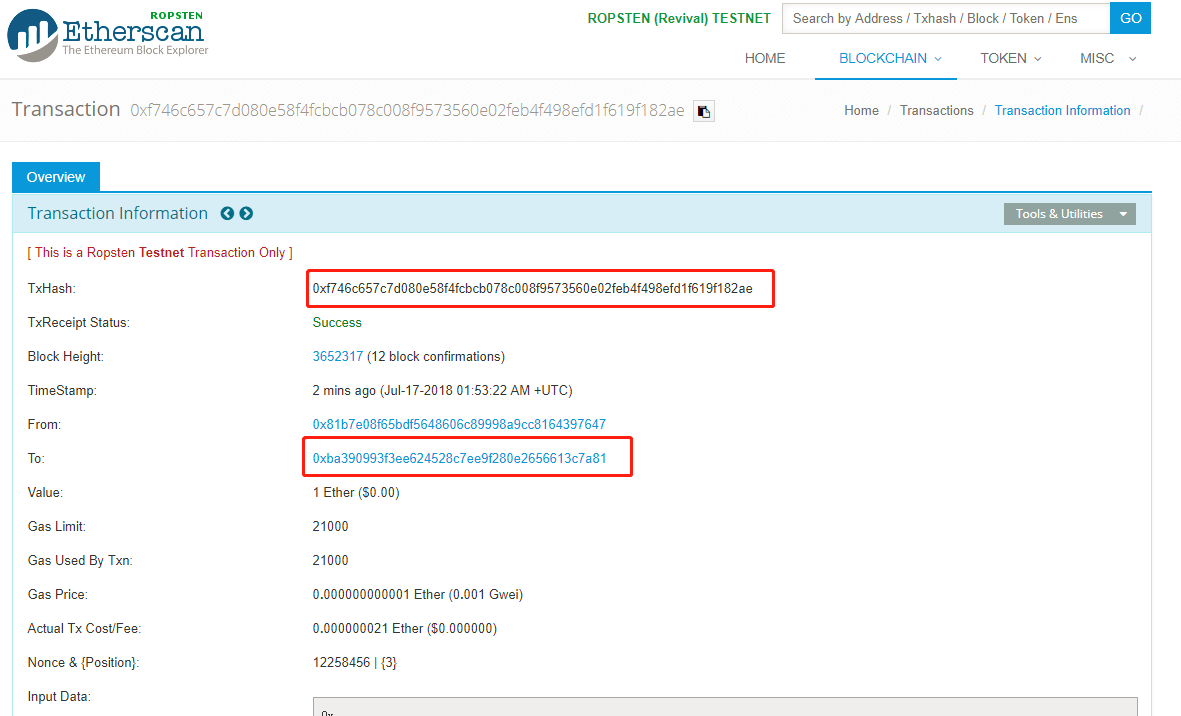
在最下面transcation栏目中,会产生一笔ETH的转账信息,从faucet测试网络中,生成一笔转账到我们自己的钱包中。同时,我们可以查看这笔的完整转账信息。

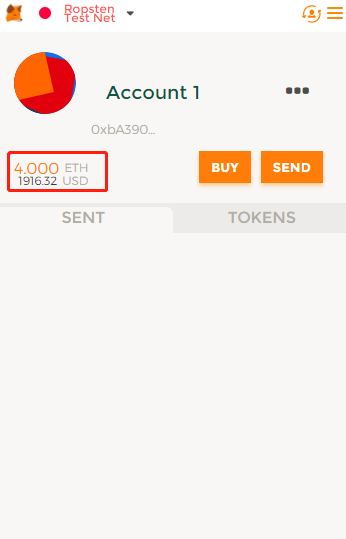
我们多点几次,在钱包中就会获得多个ETH,现在我们钱包就4个ETH了,就可以用来付发币的费用了。

1.5 打开Remix 在线合约编程环境

Remix是一个在线的以太合约的编程环境,https://remix.ethereum.org/

Remix分为4个部分:

  • 文件管理:用于管理文件结构
  • 代码编写:是一个编辑器,用于编写 solidity 代码
  • 日志输入:运行可以后,用打印出运行日志
  • 命令控制:支持各种命令,如 编译,运行,发布等

1.6 编写 solidity 智能合约代码

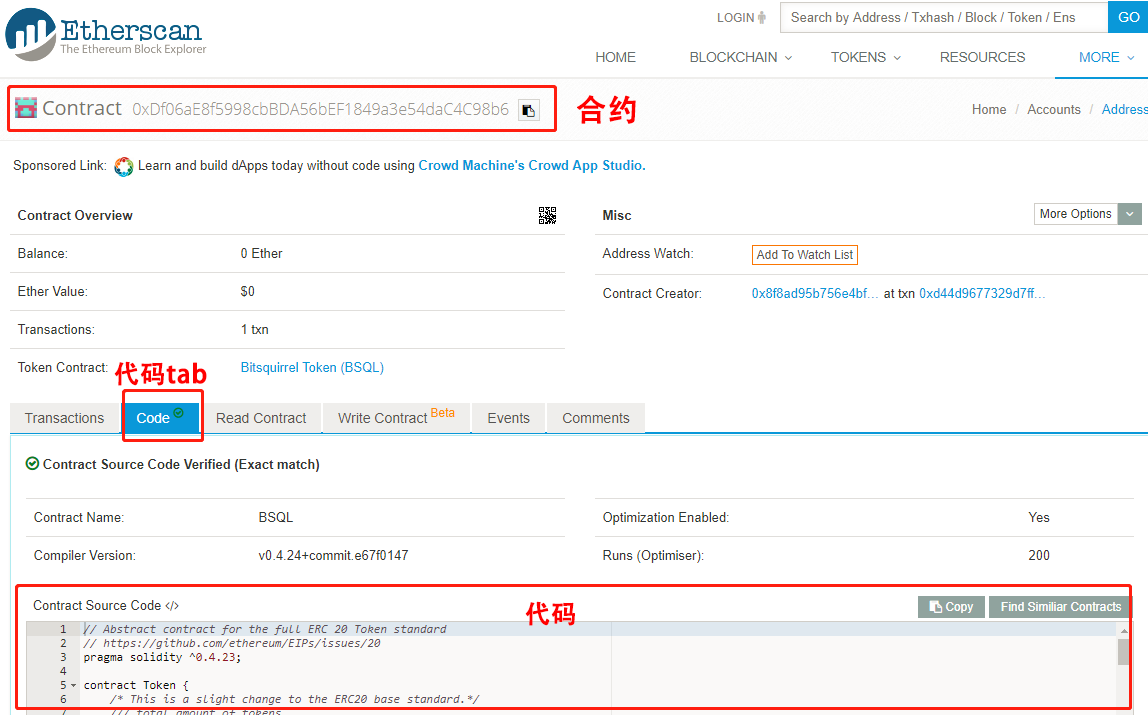
我们可以定义一个自己的智能合约,如果不熟悉,可以找到一个已经发币的合约的例子,基于他合约代码的改一下。从etherscan上找一个合约。

复制它的代码,然后改一下名字。:-) (这种做法仅限于测试用,你不知道他的合约中有没有什么漏洞,所以最好还是仔细读读代码)


// Abstract contract for the full ERC 20 Token standard
// https://github.com/ethereum/EIPs/issues/20
pragma solidity ^0.4.23;

contract Token {

    uint256 public totalSupply;  // 供给总量
    function balanceOf(address _owner) public constant returns (uint256 balance);
    function transfer(address _to, uint256 _value) public returns (bool success);
    function transferFrom(address _from, address _to, uint256 _value) public returns (bool success);
    function approve(address _spender, uint256 _value) public returns (bool success);
    function allowance(address _owner, address _spender) public constant returns (uint256 remaining);
    event Transfer(address indexed _from, address indexed _to, uint256 _value);
    event Approval(address indexed _owner, address indexed _spender, uint256 _value);
}

library SafeMath { // 安全计算函数
  function add(uint256 a, uint256 b) internal constant returns (uint256) {
    uint256 c = a + b;
    assert(c>=a && c>=b);
    return c;
  }
}

// 省略

contract FENS is StandardToken { // 符合ERC20标准

    function () public {
        revert();
    }

    using SafeMath for uint256;
    string public name = "fens.me Token";  
    uint8 public decimals = 18;
    string public symbol = "FENS";

// 省略

在代码中,contract FENS is StandardToken 这里,定义自己的合约的名字,叫FENS,同时简称symbol叫FENS。基于以太坊普遍要求遵守的规律,都符合ERC20的标准,有统一的命名规范,使用一致的变量和函数等,方便之后的交易所或钱包等其他应用的接入。

1.7 编译,配置,提交ABI到测试网络

接下来,通过reminx的命令控制的操作界面,进行是代码编译,做配置定义总发行量,然后生成ABI(Application Binary Interface)文件,用于部署到以太坊网络中。

按照上图所示,从左到右的操作顺序。

右1图,写完代码后,使用Compile标签中,点击start to compile进行代码编译,如果有错误,会直接显示错误信息。

在2图,编译完成后,切换到Run标签,看到Account对应的地址为,MetaMask中钱包的地址,这个插件让操作变得方便。FENS下拉框,显示的是这个Token的名字,在Deploy右边有一个文本框,是需要我们设置总供给量的,我在这个填入1,000,000,000,那么Token的总发行量为1亿。点击Deploy按钮,进行程序部署。

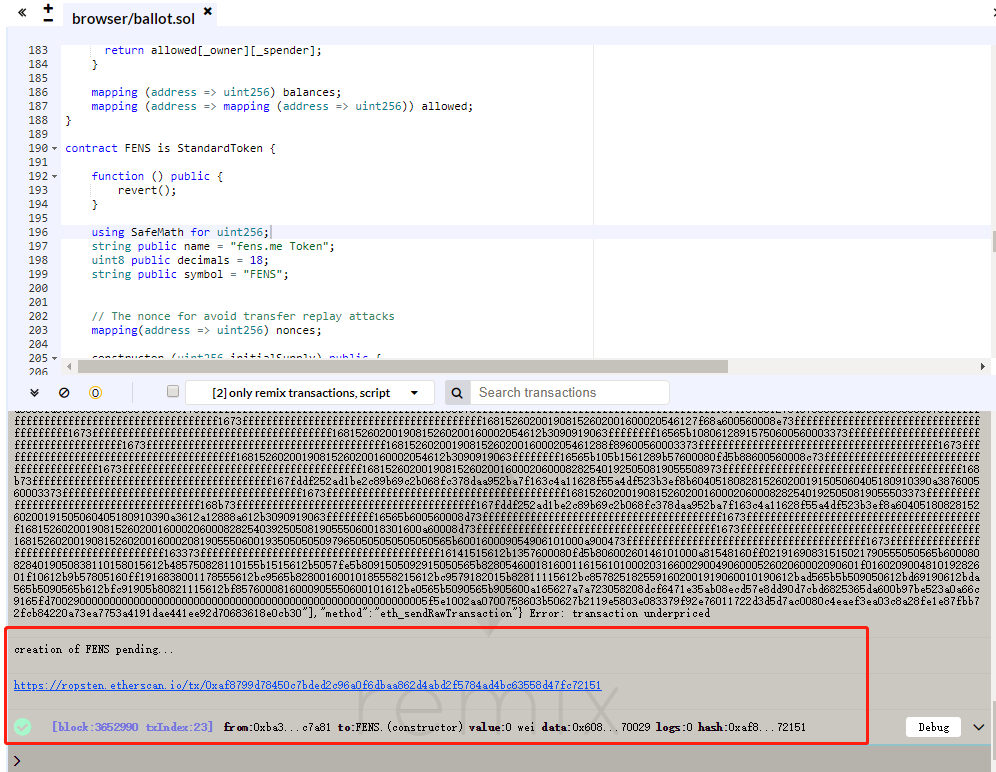
在3图,切换到 MetaMask会提示付费,这是由于我们使用ETH的网络,每一次的操作对应底层操作来说,是会经过矿工打包和确认的过程,所以不管是新发token还是转账,都是需要给矿工支付一定费用的。这里我自己输入5 GWei,以目前我的ETH市场价,这个大约值7.85USD。因为是在测试网络,所以多点少点,都无所谓啦。然后点击SUMBIT,确认支付,矿工进行打包。

在Remix的日志界面,就出现程序进行打包的日志。

1.8 生成合约,发币成功。

通过上面的链接,我们查看在以太坊测试网络中的执行情况,生成合约地址为:0xc6b08f0d67948854dff544b2093ccf726b7b17fd”

回到MetaMask界面,选择 ADD TOKEN 把刚才的生成的合约地址加入到当前创建者的钱包中,这样在钱包中就会出现已生成的token。

同时,我们也可以在以太坊的测试网络中,查到这个token的情况,0xc6b08f0d67948854dff544b2093ccf726b7b17fd”

这样就实现了,合约生成,完成了发token的整理流程。

2. 转账交易

接下来,我们就是发刚刚发的FENS代币,进行转账,转给别人的账户。由于MetaMask没有太多的转账功能,那么还需要使用一个在线转账的工具myetherwallet,用来完成转账的操作。

导出私钥 & 新建钱包

  • Account1 钱包地址:0xbA390993F3Ee624528c7EE9F280e2656613c7A81
  • Account2 钱包地址:0x35C8aEC449a8dE933C2d4beEFCc4490933F9f122

在myetherwallet,选择Network Repsten(infura.io)测试网络上进行注册和登录

选择 Send Ether & Tokens 的标签,通过私钥的方式导入账户。

接下来进行转账,输入Account2的钱包地址,和转账数量,选择FENS的代币,并设置Gas的消耗。

网页上,会弹出查看交易确认的选项。点击Yes,就开始进行交易。

完成进行交易确认后,查看2个账户的信息,FENS币,Account1账户少了50000币,Account2账户中多的50000个币。

我们可以通过以太坊网络,找到这条确认的消息。

发Token听起来很Cool,其实操作一遍还是觉得很Cool。你要不要自己也来发个Token?新的视角和新的思考方式,一起迎接新的挑战吧。

转载请注明出处:
http://blog.fens.me/bitcoin-eth-ropsten-token

打赏作者

Truffle以太坊DApp开发框架

比特币吸金之道系列文章,由计算机黑客发明的网络货币,无国界,无政府,无中心。没有政府滥发货币,没有通货膨胀。在全球计算机网络中,自由的实现货币兑换和流通。

本系列文章只讲程序和策略,不谈挖矿…

关于作者:

  • 张丹(Conan), 程序员/Quant: Java,R,Nodejs
  • blog: http://blog.fens.me
  • email: bsspirit@gmail.com

转载请注明出处:
http://blog.fens.me/bitcoin-eth-truffle
前言

区块链的开发对于大多数的人来说,都是一件很新、很难的事情,有太多不一样的技术要学习。区块链有自己的设计理念,不同于传统分布式系统架构,数据同步机制,共识算法等。以太坊作为区块链2.0的产品,最独特是智能合约的设计,是超脱于技术的思维体系。

通过 Truffle 把这些不同的理念和思路进行整合,转换为开发人员能明白的一种编程方法。本文中的所有源代码已经上传到github,请有需要的同学下载使用: https://github.com/bsspirit/truffle-demo

目录

  1. Truffle安装
  2. 初始化项目
  3. 启动测试节点
  4. 部署合约
  5. 自定义的智能合约
  6. 交互的控制台
  7. 启动合约服务

1. Truffle安装

Truffle是Dapp开发框架,他可以帮我们处理掉大量无关紧要的小事情,让我们可以迅速开始写代码-编译-部署-测试-打包DApp这个流程。Truffle是使用Nodejs开发的,我们首先需要安装Nodejs运行环境。关于Nodejs的详细使用,请参考系列文章从零开始nodejs系列文章

DApp是什么?

App我们都知道是客户端应用,DApp就是D+App,D是英文单词decentralization的缩写,即DApp为去中心化应用。

检查操作系统版本和Nodejs版本。


> cat /etc/issue
Ubuntu 16.04 LTS \n \l

# Nodejs版本
> npm -v
6.0.0
> node -v
v8.9.4

全局安装Truffle工具。


# 安装truffle工具
> npm install -g truffle
/usr/local/bin/truffle -> /usr/local/lib/node_modules/truffle/build/cli.bundled.js
+ truffle@4.1.12
added 81 packages from 309 contributors in 2.571s

查看命令行帮助


> truffle
Truffle v4.1.12 - a development framework for Ethereum

Usage: truffle  [options]

Commands:
  init      Initialize new and empty Ethereum project
  compile   Compile contract source files
  migrate   Run migrations to deploy contracts
  deploy    (alias for migrate)
  build     Execute build pipeline (if configuration present)
  test      Run JavaScript and Solidity tests
  debug     Interactively debug any transaction on the blockchain (experimental)
  opcode    Print the compiled opcodes for a given contract
  console   Run a console with contract abstractions and commands available
  develop   Open a console with a local development blockchain
  create    Helper to create new contracts, migrations and tests
  install   Install a package from the Ethereum Package Registry
  publish   Publish a package to the Ethereum Package Registry
  networks  Show addresses for deployed contracts on each network
  watch     Watch filesystem for changes and rebuild the project automatically
  serve     Serve the build directory on localhost and watch for changes
  exec      Execute a JS module within this Truffle environment
  unbox     Download a Truffle Box, a pre-built Truffle project
  version   Show version number and exit

See more at http://truffleframework.com/docs

2. 初始化项目

新建工程目录,然后用truffle初始化项目。


> cd /root/workspace
> mkdir truffle01
> cd truffle01/

# 初始化项目
> truffle init
Downloading...
Unpacking...
Setting up...
Unbox successful. Sweet!

Commands:

  Compile:        truffle compile
  Migrate:        truffle migrate
  Test contracts: truffle test

查看项目目录,目录下会生成下面的文件和目录。


> tree
.
├── contracts
│   └── Migrations.sol
├── migrations
│   └── 1_initial_migration.js
├── test
├── truffle-config.js
└── truffle.js
  • contracts/ , Truffle默认的合约文件存放地址。
  • migrations/ , 存放发布脚本文件
  • test/ , 用来测试应用和合约的测试文件
  • truffle-config.js, 配置文件
  • truffle.js, 配置文件

在contracts目录下,默认生成了一个合约文件Migrations.sol,执行编译合约。


> truffle compile
Compiling ./contracts/Migrations.sol...
Writing artifacts to ./build/contracts

成功编译后,会在build/contracts目录下,生成对于合约的Migrations.json文件,这个JSON就是

3. 启动测试节点

接下来,我们用testrpc搭建一个本地的简单的测试网络,相当于是一个mock,这样操作比较直接接入以太坊网络环境要容易的多。

安装测试网络工具testrpc


# 安装testrpc工具
> npm install -g ethereumjs-testrpc
npm WARN deprecated ethereumjs-testrpc@6.0.3: ethereumjs-testrpc has been renamed to ganache-cli, please use this package from now on.
/usr/local/bin/testrpc -> /usr/local/lib/node_modules/ethereumjs-testrpc/build/cli.node.js

> uglifyjs-webpack-plugin@0.4.6 postinstall /usr/local/lib/node_modules/ethereumjs-testrpc/node_modules/uglifyjs-webpack-plugin
> node lib/post_install.js

npm WARN optional SKIPPING OPTIONAL DEPENDENCY: fsevents@1.2.4 (node_modules/ethereumjs-testrpc/node_modules/fsevents):
npm WARN notsup SKIPPING OPTIONAL DEPENDENCY: Unsupported platform for fsevents@1.2.4: wanted {"os":"darwin","arch":"any"} (current: {"os":"linux","arch":"x64"})

+ ethereumjs-testrpc@6.0.3
added 339 packages from 279 contributors in 42.215s

启动testrpc测试网络。


> testrpc
EthereumJS TestRPC v6.0.3 (ganache-core: 2.0.2)

Available Accounts
==================
(0) 0x8dac051e949fdb323ff963f37de37345ac5a2de1
(1) 0x7ca2561b16a4181455537299ff766d4cec7cf6c3
(2) 0x7d1d40b9a015ff42d19cde1f95c0041ab1fac155
(3) 0x42730fd585a29029667274f0443ac0bb4830cb20
(4) 0xe3225679925b3790c850ec3560156aeff3fea1c2
(5) 0xd9f18fb4aa6ed92279136ddcdad73ad516fa7f7d
(6) 0xe9617966b21f20868a35d97e4abbb979f6b32431
(7) 0x15f1e3f6b1caa047281f91834530f14780b9adf7
(8) 0x53c049daad9338db54960e8620fefd3829590754
(9) 0xf6df046b0ce0d12bc978067bfcd0be209ee0b93c

Private Keys
==================
(0) 0c4cb520a02b1ea7c477e5ef028fef2da22be8589a08b5989fae5403c4fec21e
(1) 667adbcd821e183809bdf2d08cedbcd233741670cb61775ea491dd0ef862bf1f
(2) a5b0a337a7185544300f4d24e78b8a3f9d797280dc2ced40c7f3fe60ab943aa5
(3) 3e8f665924d45bcb013bff6111f3be557703ca0798ce824b14e84f5d7d2294e9
(4) 1620759f80e28a1258c18578253cade445d5d5e380a6fc12ed7cfe7e7f9ec408
(5) 60963d8c56c74d4f0cd460b7d9461581815153559ddb2eee9101eb3d2731fba9
(6) e20a5d21d0b6bdd88b143bedaab4ac94f7d1f2178236021b21991efea1ab6ee3
(7) d4d841c0430a9781bf86132db841364e92432d3c3d6ea25b5178e8a6d4c56984
(8) a98f4c3609d2c8e989a0f9bf86acdd4035bf0eac4de6b6c61545a8674f269b82
(9) d5ea07abc4cad2c9d26ebea32c67251ba7fcc3ab317739ec0a13a84cc1ccad47

HD Wallet
==================
Mnemonic:      enforce trust bridge guard memory stadium polar dignity provide alley embrace machine
Base HD Path:  m/44'/60'/0'/0/{account_index}

Listening on localhost:8545

这里生成了10个账号,和10个私钥,并模拟测试网络的打开了HTTP-RPC服务,这样就可以让智能合约的程序,基于这个测试网络进行开发了。

随着时间的,发现这个模拟的程序,还会自己模拟一些交易。


HD Wallet
==================
Mnemonic:      away lecture stuff weapon market spot infant solid capital monkey claw siege
Base HD Path:  m/44'/60'/0'/0/{account_index}

Listening on localhost:8545

eth_getBlockByNumber
eth_accounts
web3_clientVersion
net_version
eth_accounts
eth_accounts
eth_accounts
net_version
net_version
eth_sendTransaction

  Transaction: 0xd8e4638d4d2d95b2e2894fa724249cea81bdb539cf4c7b111dbefe0ea321b9eb
  Contract created: 0x0a2816a1c1ad71cda4843f57ab2c0a4a80cdfef9
  Gas usage: 277462
  Block Number: 1
  Block Time: Tue Jun 26 2018 18:49:33 GMT+0800 (CST)

eth_newBlockFilter
eth_getFilterChanges
eth_getTransactionReceipt
eth_getCode
eth_uninstallFilter
eth_sendTransaction

  Transaction: 0x27bda84efcb9a9677c17269919a00f01d7bd2c88b458bd20071c51e6e58dbd48
  Gas usage: 42008
  Block Number: 2
  Block Time: Tue Jun 26 2018 18:49:33 GMT+0800 (CST)

eth_getTransactionReceipt
eth_getBlockByNumber
eth_accounts
web3_clientVersion
eth_getBlockByNumber
eth_accounts
web3_clientVersion
eth_accounts

4. 部署合约

运行truffle migrate命令部署智能合约到测试网络上,第一次执行时出现错误Error: No network specified. Cannot determine current network,是因为没有连接到测试网络。

修改文件truffle.js,连接到测试网络上。


> vi truffle.js

module.exports = {
  networks: {
    development: {
      host: '127.0.0.1',
      port: 8545,
      network_id: '*'
    }
  }
};

再次启动truffle,完成部署的过程。


> truffle migrate
Using network 'development'.

Network up to date.

5. 自定义的智能合约

接下来,我们开始编写一个自己的智能合约,需要编写4个文件。

  • contracts/Hello.sol,合约文件
  • migrations/2_hello.js,部署文件
  • test/Hello.js,js单元测试文件
  • test/TestHello.sol,solidity单元测试文件

在contracts目录下,编写合约文件Hello.sol,提供2个函数,say()用来返回一个固定的字符串,sum()用来计算2个整书之和。


> vi ./contracts/Hello.sol

pragma solidity ^0.4.23;

contract Hello {

  function say() pure public returns (string) {
    return "Hello world";
  }


  function sum(uint a, uint b) pure public returns (uint val) {
    val = a + b ;
    return val;
  }

}

编写Hello.sol合约的部署脚本,放到migrations目录下面,文件名为2_hello.js。


> vi migrations/2_hello.js

var MyContract = artifacts.require("Hello");

module.exports = function(deployer) {
  deployer.deploy(MyContract);
};

单元测试有2种写法,一种是基于nodejs的Mocha库的写法,另一种是基本solidity的写法。

按Nodejs写法的测试用例,放到test目录下面,文件名为Hello.js。


> vi ./test/Hello.js

const Hello = artifacts.require("Hello");

contract('Hello test', async (accounts) => {

  it("say", async () => {
     let obj = await Hello.deployed();
     let val = await obj.say();
     assert.equal(val, "Hello world");
  })

  it("sum", async () => {
    let obj = await Hello.deployed();
    let val = await obj.sum(10,15);
    assert.equal(val, 25);

  });
})

按solidity写法的测试用例,放到test目录下面,文件名为TestHello.sol。


> vi ./test/TestHello.sol

pragma solidity ^0.4.24;

import "truffle/Assert.sol";
import "truffle/DeployedAddresses.sol";
import "../contracts/Hello.sol";

contract TestHello {

  function test_say() public {
    Hello obj = Hello(DeployedAddresses.Hello());
    Assert.equal(obj.say(), "Hello world","test say");
  }

  function test_sum() public {
    Hello obj = Hello(DeployedAddresses.Hello());
    Assert.equal(obj.sum(10,15), 25, "test sum");
  }
}

编译Hello.sol合约,成功通过。


> truffle compile
Compiling ./contracts/Hello.sol...
Writing artifacts to ./build/contracts

把合约再次部署到testrpc的测试网络上面,这时需要用–reset参数。


> truffle migrate --reset
Using network 'development'.

Running migration: 1_initial_migration.js
  Replacing Migrations...
  ... 0x011256fee23fe4e633c86411f35e31f539e9026302495c3d824fca6b314ae92c
  Migrations: 0x298afbabd16ca14ec870377a61f983203ac69536
Saving successful migration to network...
  ... 0x59b23e1efc5f1bfb09af05ed3c26b7338573834394a61adea4bfc69775dcbae8
Saving artifacts...
Running migration: 2_hello.js
  Replacing Hello...                                                       # 创建合约
  ... 0x0aab9dd6c5781b899b60c7fc1190d3aefaa2af68363af386a8c473d40bc9f20f   # 交易hash
  Hello: 0x98ce096564f6b459b4a09b1b204ad6e362d384b6                        # 合约地址
Saving successful migration to network...
  ... 0x164b11ea951882cf5d374c2bdb979dac9586a87d0db4b8c6c8561d4cc7a9d5ca
Saving artifacts...

部署成功之后,我们可以看到testrpc的测试网络中,也有一些对应的更新。


eth_getTransactionReceipt
eth_accounts
eth_sendTransaction

  Transaction: 0x0aab9dd6c5781b899b60c7fc1190d3aefaa2af68363af386a8c473d40bc9f20f    # 交易hash
  Contract created: 0x98ce096564f6b459b4a09b1b204ad6e362d384b6                       # 合约地址
  Gas usage: 162663
  Block Number: 63
  Block Time: Wed Jun 27 2018 23:24:14 GMT+0800 (CST)

eth_newBlockFilter
eth_getFilterChanges
eth_getTransactionReceipt
eth_getCode
eth_uninstallFilter
eth_sendTransaction

  Transaction: 0x164b11ea951882cf5d374c2bdb979dac9586a87d0db4b8c6c8561d4cc7a9d5ca
  Gas usage: 27008
  Block Number: 64
  Block Time: Wed Jun 27 2018 23:24:14 GMT+0800 (CST)

eth_getTransactionReceipt

接下来,我们就是可以运行test的命令,来测试合约的正确性。


> truffle test
Using network 'development'.

Compiling ./contracts/Hello.sol...
Compiling ./test/TestHello.sol...
Compiling truffle/Assert.sol...
Compiling truffle/DeployedAddresses.sol...

  TestHello
    ✓ test_say (119ms)
    ✓ test_sum (70ms)

  Contract: Hello test
    ✓ say
    ✓ sum

  4 passing (1s)

2种写法的单元测试文件,都通过的测试。2种写法的区别在于,Nodejs当中是异步执行测试的,solidity是同步的。

Nodejs的优势是测试与前端测试相似,可以模拟前端测试,称为整合测试,可以有更强大的语法支持。js的另一大优势可以比较简单地实现异常捕捉。

solidity测试写法简洁,适用于单元测试,另一大优势是js只能测试public的函数,soli可以测试内部function,internal的,通过继承被测试contract来获得internal function的访问权限。

6. 交互的控制台

接下来,我们在网络执行合约,可以通过控制台的交互的命令来完成,启动控制台 truffle console。


> truffle console

# 执行合约函数
truffle(development)> var contract;
undefined
truffle(development)> Hello.deployed().then(function(instance){contract= instance;});
undefined
truffle(development)> contract.say()
'Hello world'
truffle(development)> contract.sum(1,21)
BigNumber { s: 1, e: 1, c: [ 22 ] }

# 查看合约地址
truffle(development)> Hello.address
'0x98ce096564f6b459b4a09b1b204ad6e362d384b6'

# 查看合约abi
truffle(development)> JSON.stringify(Hello.abi)
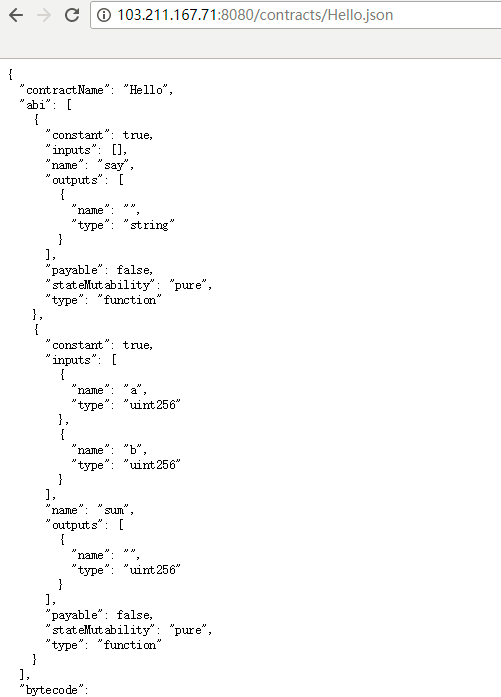
'[{"constant":true,"inputs":[],"name":"say","outputs":[{"name":"","type":"string"}],"payable":false,"stateMutability":"pure","type":"function"},{"constant":true,"inputs":[{"name":"a","type":"uint256"},{"name":"b","type":"uint256"}],"name":"sum","outputs":[{"name":"","type":"uint256"}],"payable":false,"stateMutability":"pure","type":"function"}]'

7. 启动合约服务

最后,启动服务程序,开放一个HTTP的端口,允许通过Http访问JSON ABI(Application Binary Interface),ABC指定了合约接口,包括可调用的合约方法、变量、事件等。


> truffle serve
Serving static assets in ./build on port 8080...

启动truffle serve时,一直会有一个报错,TypeError: fsevents is not a constructor


> truffle serve
Serving static assets in ./build on port 8080...

/usr/local/lib/node_modules/truffle/build/webpack:/Users/gnidan/src/work/truffle/~/chokidar/lib/fsevents-handler.js:26
  return (new fsevents(path)).on('fsevent', callback).start();
^
TypeError: fsevents is not a constructor
    at createFSEventsInstance (/usr/local/lib/node_modules/truffle/build/webpack:/Users/gnidan/src/work/truffle/~/chokidar/lib/fsevents-handler.js:26:1)
    at setFSEventsListener (/usr/local/lib/node_modules/truffle/build/webpack:/Users/gnidan/src/work/truffle/~/chokidar/lib/fsevents-handler.js:80:1)
    at FSWatcher.FsEventsHandler._watchWithFsEvents (/usr/local/lib/node_modules/truffle/build/webpack:/Users/gnidan/src/work/truffle/~/chokidar/lib/fsevents-handler.js:244:1)
    at FSWatcher. (/usr/local/lib/node_modules/truffle/build/webpack:/Users/gnidan/src/work/truffle/~/chokidar/lib/fsevents-handler.js:378:1)
    at gotStat (fs.js:1775:21)
    at FSReqWrap.oncomplete (fs.js:152:21)

只有修改truffle的源代码文件中,把useFsEvents 检查项去掉就可以了。


> vi /usr/local/lib/node_modules/truffle/build/cli.bundled.js

// Enable fsevents on OS X when polling isn't explicitly enabled.
//if (undef('useFsEvents')) opts.useFsEvents = !opts.usePolling;

// If we can't use fsevents, ensure the options reflect it's disabled.
//if (!FsEventsHandler.canUse()) opts.useFsEvents = false;
opts.useFsEvents = false;

最后,用浏览器访问HTTP服务,http://103.211.167.71:8080/contracts/Hello.json

如下图所示:
总结一下,在本文中我们使用了trffule工具,完成了智能合约的 代码-编译-部署-测试-打包的完事流程,操作起来还是很方便的。

本文中的所有源代码已经上传到github,请有需要的同学下载使用: https://github.com/bsspirit/truffle-demo

接下来的步骤,就是把我们自定义的Hello.sol部署到Geth的私有网络中,等下篇文章再具体说明。Geth的私有网络环境搭建,请参考文章以太坊测试区块链环境搭建

转载请注明出处:
http://blog.fens.me/bitcoin-eth-truffle

打赏作者

以太坊测试区块链环境搭建

比特币吸金之道系列文章,由计算机黑客发明的网络货币,无国界,无政府,无中心。没有政府滥发货币,没有通货膨胀。在全球计算机网络中,自由的实现货币兑换和流通。

本系列文章只讲程序和策略,不谈挖矿…

关于作者:

  • 张丹(Conan), 程序员/Quant: Java,R,Nodejs
  • blog: http://blog.fens.me
  • email: bsspirit@gmail.com

转载请注明出处:
http://blog.fens.me/bitcoin-geth-testnet

前言

以太坊(ETH)的出现开启了区块链的2.0时代,要进行ETH的开发和测试,我们先要搭建起来ETH的测试区块链网络。在测试环境中,我们可以直接通过参数配置,生成创世区块,设置挖矿难度,设置gas消耗,执行转账交易,定义智能合约等的操作。

目录

  1. 搭建测试区块链
  2. 开发挖矿
  3. 第一笔转账
  4. 多节点网络

1. 搭建测试区块链

由于在以太坊公链上做任何操作,都需要消耗以太币(eth),对于开发者来说,很有必要在本地自行搭建一个测试区块链网络,进行智能合约的开发,最后再将开发好的合约部署到公链上。私有区块链不同于以太坊公链,给我们很多的自由度,直接可能通过参数配置,生成创世区块,设置挖矿难度,设置gas消耗,执行转账交易,定义智能合约等的操作,这些都需要我们手动进行设置。

私有区块链的搭建,也是基于geth客户端来完成的,geth的安装过程,请参考文章 geth以太坊节点安装

下面,我们就用geth客户端,开始搭建测试区块链。创建测试节点的文件存储目录。


> mkdir /data0/eth-test/
> cd /data0/eth-test/

新建配置文件genesis.json


> vi genesis.json
{
 "nonce": "0x0000000000000042",
 "timestamp": "0x0",
 "parentHash": "0x0000000000000000000000000000000000000000000000000000000000000000",
 "mixhash": "0x0000000000000000000000000000000000000000000000000000000000000000",
 "extraData": "0x",
 "gasLimit": "0x80000000",
 "difficulty": "0x3",
 "coinbase": "0x3333333333333333333333333333333333333333",
 "config":{
    "chainId": 55,
    "homesteadBlock": 0,
    "eip155Block": 0
 },
 "alloc": {}
}

参数设置:

  • nonce:64位随机数,用于挖矿
  • timestamp:创世块的时间戳
  • parentHash:上一个区块的hash值,因为是创世块,所以这个值是0
  • mixhash:与 nonce 配合用于挖矿,由上一个区块的一部分生成的 hash。
  • extraData:附加信息,任意填写
  • gasLimit :对GAS的消耗总量限制,用来限制区块能包含的交易信息总和,因为我们就测试链,所以随意填写。
  • difficulty:难度值,越大越难
  • coinbase:矿工账号,第一个区块挖出后将给这个矿工账号发送奖励的以太币。
  • alloc: 预设账号以及账号的以太币数量,测试链挖矿比较容易可以不配置
  • chainId 指定了独立的区块链网络 ID,不同 ID 网络的节点无法互相连接。

初始化区块链,生成创世区块和初始状态。


> geth --datadir=/data0/eth-test init /data0/eth-test/genesis.json
INFO [06-26|08:10:32.943749] Maximum peer count                       ETH=25 LES=0 total=25
INFO [06-26|08:10:32.944172] Allocated cache and file handles         database=/data0/eth-test/geth/chaindata cache=16 handles=16
INFO [06-26|08:10:32.989586] Persisted trie from memory database      nodes=0 size=0.00B time=3.877µs gcnodes=0 gcsize=0.00B gctime=0s livenodes=1 livesize=0.00B
INFO [06-26|08:10:32.989983] Successfully wrote genesis state         database=chaindata                      hash=4a306e…543a63
INFO [06-26|08:10:32.990028] Allocated cache and file handles         database=/data0/eth-test/geth/lightchaindata cache=16 handles=16
INFO [06-26|08:10:33.036685] Persisted trie from memory database      nodes=0 size=0.00B time=3.258µs gcnodes=0 gcsize=0.00B gctime=0s livenodes=1 livesize=0.00B
INFO [06-26|08:10:33.037027] Successfully wrote genesis state         database=lightchaindata                      hash=4a306e…543a63

运行日志,包括了允许最大点对点连接当前节点数为total=25,普通节点连接数ETH=25,LES轻节点连接数0。数据库存储的目录在 /data0/eth-test/geth/chaindata ,当前存活的节点 livenodes=1。

参数说明

  • datadir, 设置当前区块链网络数据存放的位置
  • init,初始化,生成创世区块

接下来,启动测试节点,并进入 geth 命令行界面。


> geth --identity "TestNode" --rpc --rpcport "8545" --datadir=/data0/eth-test --port "30303" --nodiscover console
INFO [06-26|08:14:00.916738] Maximum peer count                       ETH=25 LES=0 total=25
INFO [06-26|08:14:00.918148] Starting peer-to-peer node               instance=Geth/TestNode/v1.8.12-unstable-f1986f86/linux-amd64/go1.10.3
INFO [06-26|08:14:00.918235] Allocated cache and file handles         database=/data0/eth-test/geth/chaindata cache=768 handles=512
INFO [06-26|08:14:00.979836] Initialised chain configuration          config="{ChainID: 55 Homestead: 0 DAO:  DAOSupport: false EIP150:  EIP155: 0 EIP158:  Byzantium:  Constantinople:  Engine: unknown}"
INFO [06-26|08:14:00.979915] Disk storage enabled for ethash caches   dir=/data0/eth-test/geth/ethash count=3
INFO [06-26|08:14:00.979943] Disk storage enabled for ethash DAGs     dir=/root/.ethash               count=2
INFO [06-26|08:14:00.980023] Initialising Ethereum protocol           versions="[63 62]" network=1
INFO [06-26|08:14:00.980566] Loaded most recent local header          number=0 hash=4a306e…543a63 td=3
INFO [06-26|08:14:00.980634] Loaded most recent local full block      number=0 hash=4a306e…543a63 td=3
INFO [06-26|08:14:00.980662] Loaded most recent local fast block      number=0 hash=4a306e…543a63 td=3
INFO [06-26|08:14:00.980842] Regenerated local transaction journal    transactions=0 accounts=0
INFO [06-26|08:14:00.981818] Starting P2P networking 
INFO [06-26|08:14:00.982303] RLPx listener up                         self="enode://15653a443e91b04040fe2731e0a0fa556a1d050580fa587110b17460cf471a8c3b42ac08dbc3d84a404f8c102ae35b28d9e2c1b9f2eae4c828a0dfa21c1f2117@[::]:30303?discport=0"
INFO [06-26|08:14:00.985029] IPC endpoint opened                      url=/data0/eth-test/geth.ipc
INFO [06-26|08:14:00.985503] HTTP endpoint opened                     url=http://127.0.0.1:8545    cors= vhosts=localhost
Welcome to the Geth JavaScript console!

instance: Geth/TestNode/v1.8.12-unstable-f1986f86/linux-amd64/go1.10.3
 modules: admin:1.0 debug:1.0 eth:1.0 miner:1.0 net:1.0 personal:1.0 rpc:1.0 txpool:1.0 web3:1.0

> 
  • identity, 自定义的节点名字
  • rpc , 允许 HTTP-RPC 访问
  • rpcport , HTTP_RPC的访问端口,默认为8545
  • port , 网络监听端口,默认为30303
  • datadir, 设置当前区块链网络数据存放的位置
  • console, 启动命令行模式,可以在Geth中执行命令
  • nodiscover, 私有链地址,不会被网上看到

这样我们就把一个测试网络启动起来了,由于是单节点,网络没有其他的节点,所以并没有直接的数据输出。

2. 开始挖矿

接下来,我们在自己搭建的私有网络中,开始做常规ETH的操作。

2.1 创建账号

创建一个新账号,密码为123456,账号的地址为:0x9cac40f650e2cbe459dcb32c7c23103497134467。


> personal.newAccount("123456")
"0x9cac40f650e2cbe459dcb32c7c23103497134467"

另一种方式,生成一个新账号。


> personal.newAccount()
Passphrase: 
Repeat passphrase: 
"0x762a2e28c5dbab9cd31369db5f3cbb48f421c0e3"

查看所有账号


> eth.accounts
["0x9cac40f650e2cbe459dcb32c7c23103497134467", "0x762a2e28c5dbab9cd31369db5f3cbb48f421c0e3"]

2.2 挖矿

接下来,我们开始挖矿。挖矿,就是产生以太币的过程。之前在genesis.json文件中,设置的difficulty=3,挖矿难比较低,很快就是挖出以太币来。


# 开始挖矿
> miner.start(1)
INFO [06-26|08:19:58.086688] Updated mining threads                   threads=1
INFO [06-26|08:19:58.086828] Transaction pool price threshold updated price=18000000000

# 矿工账号:如果有多个账户的情况下,挖矿获得的eth,会自动计入第一账户中。
INFO [06-26|08:19:58.086887] Etherbase automatically configured       address=0x9cac40F650E2CBE459dcb32c7c23103497134467   
INFO [06-26|08:19:58.087015] Starting mining operation 

# 开始探索新区块,没有交易内容
INFO [06-26|08:19:58.087793] Commit new mining work                   number=1 txs=0 uncles=0 elapsed=659.441µs            

# 成功发现新区块
INFO [06-26|08:19:58.451612] Successfully sealed new block            number=1 hash=c120d3…23dad2                          

#  确认挖到新区块
INFO [06-26|08:19:58.452182] 🔨 mined potential block                  number=1 hash=c120d3…23dad2                      
INFO [06-26|08:19:58.45237] Commit new mining work                   number=2 txs=0 uncles=0 elapsed=165.519µs
INFO [06-26|08:20:00.683558] Successfully sealed new block            number=2 hash=011b1c…100594
INFO [06-26|08:20:00.68399] 🔨 mined potential block                  number=2 hash=011b1c…100594
INFO [06-26|08:20:00.684181] Commit new mining work                   number=3 txs=0 uncles=0 elapsed=111.601µs
INFO [06-26|08:20:09.965339] Successfully sealed new block            number=3 hash=173ea5…c059ef
INFO [06-26|08:20:09.965789] 🔨 mined potential block                  number=3 hash=173ea5…c059ef
INFO [06-26|08:20:09.966091] Commit new mining work                   number=4 txs=0 uncles=0 elapsed=246.371µs
INFO [06-26|08:20:11.622999] Successfully sealed new block            number=4 hash=56240d…0910a3

// 省略

INFO [06-26|08:20:16.264066] Commit new mining work                   number=10 txs=0 uncles=0 elapsed=155.89µs
INFO [06-26|08:20:16.466436] Successfully sealed new block            number=10 hash=819037…fbcd88
INFO [06-26|08:20:16.466774] 🔗 block reached canonical chain          number=5  hash=7f1015…f53c57
INFO [06-26|08:20:16.466794] 🔨 mined potential block                  number=10 hash=819037…fbcd88
INFO [06-26|08:20:16.466965] Commit new mining work                   number=11 txs=0 uncles=0 elapsed=92.726µs

# 停止挖矿
> miner.stop()
true

开始挖了几秒,就产生了10个区块。查看账户资金为50000000000000000000 wei。第一个账户为矿工账号,第二个账户是一个普通账号。


> eth.getBalance(eth.accounts[0])
50000000000000000000
> eth.getBalance(eth.accounts[1])
0

由于Wei是最小的单位,我们把Wei转换为ether为单位,比较好看,就是为 50 ether = 50000000000000000000/10^18


> web3.fromWei(eth.getBalance(eth.accounts[0]), "ether")
50

转换单位

  • Wei = 10^0 Wei
  • Ada = 10^3 Wei
  • Babbage = 10^6 Wei
  • Shannon = 10^9 Weiv
  • Szabo = 10^12 Wei
  • Finney = 10^15 Wei
  • Ether = 10^18 Wei
  • Einstein = 10^21 Wei
  • Douglas = 10^42 Wei

2.3 查看区块高度

下一步,我们查看一下区块高度,并分析一下区块的细节。


# 查看区块高度
> eth.blockNumber
10

# 查看第10个区块的细节
> eth.getBlock(10)
{
  difficulty: 131648,
  extraData: "0xd88301080c846765746888676f312e31302e33856c696e7578",
  gasLimit: 2126604064,
  gasUsed: 0,
  hash: "0x819037bcc65eb789eca82fcc3d6c686852ab8297df6396cffa6cfffeaffbcd88",
  logsBloom: "0x00000000000000000000000000000000000000000000000000000000000000000000000000000000000000000000000000000000000000000000000000000000000000000000000000000000000000000000000000000000000000000000000000000000000000000000000000000000000000000000000000000000000000000000000000000000000000000000000000000000000000000000000000000000000000000000000000000000000000000000000000000000000000000000000000000000000000000000000000000000000000000000000000000000000000000000000000000000000000000000000000000000000000000000000000000000",
  miner: "0x9cac40f650e2cbe459dcb32c7c23103497134467",
  mixHash: "0x311cd5ef45d9295d8c1b1b8778fb05b0e49dc6cae5971763c2e2d7e3d20bd895",
  nonce: "0x0b1aae8070cdff77",
  number: 10,
  parentHash: "0x1c5609a70d36a460234b95116fcc391e49890c5082af41d8cba3b5b366aa0028",
  receiptsRoot: "0x56e81f171bcc55a6ff8345e692c0f86e5b48e01b996cadc001622fb5e363b421",
  sha3Uncles: "0x1dcc4de8dec75d7aab85b567b6ccd41ad312451b948a7413f0a142fd40d49347",
  size: 537,
  stateRoot: "0x0917e990c98b3daf316d0d38a4a2eefd0ad30436bab8ae61adb1ca24723eea81",
  timestamp: 1529972416,
  totalDifficulty: 1313603,
  transactions: [],
  transactionsRoot: "0x56e81f171bcc55a6ff8345e692c0f86e5b48e01b996cadc001622fb5e363b421",
  uncles: []
}

第10个区块为当前的最后一个区块,挖矿难度difficulty=131648,没有交易gasUsed=0,当前块的hash值hash: “0x819037bcc65eb789eca82fcc3d6c686852ab8297df6396cffa6cfffeaffbcd88”,,上一个块的地址parentHash: “0x819037bcc65eb789eca82fcc3d6c686852ab8297df6396cffa6cfffeaffbcd88”,矿工账号miner: “0x9cac40f650e2cbe459dcb32c7c23103497134467”,区块高度number=10。

3. 第一笔转账

接下来,让我完成第一笔转账。从矿工账号转账30ether到第二个账号。


> eth.sendTransaction({from:eth.accounts[0],to:eth.accounts[1],value:web3.toWei(30,"ether")})
Error: authentication needed: password or unlock
    at web3.js:3143:20
    at web3.js:6347:15
    at web3.js:5081:36
    at :1:1

第一次,执行转账操作时,出现错误。需要把转输eth的账号进行解锁,才能转账。


# 解锁账号
> personal.unlockAccount(eth.accounts[0])
Unlock account 0x9cac40f650e2cbe459dcb32c7c23103497134467
Passphrase: 
true

# 再次转账
> eth.sendTransaction({from:eth.accounts[0],to:eth.accounts[1],value:web3.toWei(30,"ether")})
INFO [06-26|08:26:44.060461] Submitted transaction                    fullhash=0x8d6d1eb3c1c82be1f419d8f772048644361c41362fd8de27f8252470f975d6bb recipient=0x762A2e28C5DbaB9cD31369DB5f3CBB48f421C0E3
"0x8d6d1eb3c1c82be1f419d8f772048644361c41362fd8de27f8252470f975d6bb"

交易日志,交易的hash值fullhash=0x8d6d1eb3c1c82be1f419d8f772048644361c41362fd8de27f8252470f975d6bb,收款账号recipient=0x762A2e28C5DbaB9cD31369DB5f3CBB48f421C0E3。

我们提交了第一笔的转账,查看2个账户的余额。


> eth.getBalance(eth.accounts[0])
50000000000000000000
> eth.getBalance(eth.accounts[1])
0

账户的余额并没有发生变化,这是因为基于区块链的转账操作需要矿工确认才能完成,矿工确认的过程是要经过挖矿的。我们的转账的操作的任务已经提交,但是交易并未完成,还需要矿工挖矿提交新的区块,在区块中加入这次转账交易,提交新的区块全网的节点(按百分比算,具体还没细看源代码)确认完成后,交易才正式生效。

由于链上只有我们自己,我们要重新开起挖矿程序。


# 开始挖矿
> miner.start(1)
INFO [06-26|08:27:24.712255] Updated mining threads                   threads=1
INFO [06-26|08:27:24.712434] Transaction pool price threshold updated price=18000000000
INFO [06-26|08:27:24.712617] Starting mining operation 

# 探索新的区块,包含一个操作信息txs=1
INFO [06-26|08:27:24.713512] Commit new mining work                   number=11 txs=1 uncles=0 elapsed=808.72µs
INFO [06-26|08:27:27.638518] Successfully sealed new block            number=11 hash=68495b…35d4fe
INFO [06-26|08:27:27.638986] 🔗 block reached canonical chain          number=6  hash=3617e8…0dd7f5
INFO [06-26|08:27:27.639006] 🔨 mined potential block                  number=11 hash=68495b…35d4fe
INFO [06-26|08:27:27.639245] Commit new mining work                   number=12 txs=0 uncles=0 elapsed=227.705µs
INFO [06-26|08:27:28.199602] Successfully sealed new block            number=12 hash=96fd37…37c016
INFO [06-26|08:27:28.199963] 🔗 block reached canonical chain          number=7  hash=a8d6d5…e6036d
INFO [06-26|08:27:28.19998] 🔨 mined potential block                  number=12 hash=96fd37…37c016
INFO [06-26|08:27:28.200427] Commit new mining work                   number=13 txs=0 uncles=0 elapsed=276.033µs
INFO [06-26|08:27:29.766971] Successfully sealed new block            number=13 hash=a13201…c051c8
INFO [06-26|08:27:29.767429] 🔗 block reached canonical chain          number=8  hash=16222d…7a9445
INFO [06-26|08:27:29.767447] 🔨 mined potential block                  number=13 hash=a13201…c051c8
INFO [06-26|08:27:29.767572] Commit new mining work                   number=14 txs=0 uncles=0 elapsed=110.439µs
INFO [06-26|08:27:30.302882] Successfully sealed new block            number=14 hash=e1ab15…e44665
INFO [06-26|08:27:30.303213] 🔗 block reached canonical chain          number=9  hash=1c5609…aa0028
INFO [06-26|08:27:30.303243] 🔨 mined potential block                  number=14 hash=e1ab15…e44665
INFO [06-26|08:27:30.303471] Commit new mining work                   number=15 txs=0 uncles=0 elapsed=114.85µs
INFO [06-26|08:27:35.685475] Successfully sealed new block            number=15 hash=e1b5a4…1bab9e
INFO [06-26|08:27:35.686032] 🔗 block reached canonical chain          number=10 hash=819037…fbcd88
INFO [06-26|08:27:35.686146] 🔨 mined potential block                  number=15 hash=e1b5a4…1bab9e
INFO [06-26|08:27:35.686523] Commit new mining work                   number=16 txs=0 uncles=0 elapsed=294.263µs

# 停止挖矿
> miner.stop()
true

在高度number=11的区块上,我们发现了有一笔转账信息。再次,查看账户余额,发现账户余额发生了变化。


> eth.getBalance(eth.accounts[0])
45000000000000000000
> eth.getBalance(eth.accounts[1])
30000000000000000000

第一个账户变成了 45 ether,第二个账号变成了30 ether。第二个账户余额,正是我们之前设定的转账金额。


# 查看当前块的高度
> eth.blockNumber
15

# 第11个区块的细节
> eth.getBlock(11)
  difficulty: 131072,
  extraData: "0xd88301080c846765746888676f312e31302e33856c696e7578",
  gasLimit: 2124527304,
  gasUsed: 21000,
  hash: "0x68495bf329e886a8043d1af74d145a870ae6aa2d4e42134499b3730e5c35d4fe",
  logsBloom: "0x00000000000000000000000000000000000000000000000000000000000000000000000000000000000000000000000000000000000000000000000000000000000000000000000000000000000000000000000000000000000000000000000000000000000000000000000000000000000000000000000000000000000000000000000000000000000000000000000000000000000000000000000000000000000000000000000000000000000000000000000000000000000000000000000000000000000000000000000000000000000000000000000000000000000000000000000000000000000000000000000000000000000000000000000000000000",
  miner: "0x9cac40f650e2cbe459dcb32c7c23103497134467",
  mixHash: "0xbbf5053e0409cded11f0c8f1059cad389d366723cb2f6c077d6c71c36d31a254",
  nonce: "0x3cc35610dc92f143",
  number: 11,
  parentHash: "0x819037bcc65eb789eca82fcc3d6c686852ab8297df6396cffa6cfffeaffbcd88",
  receiptsRoot: "0x170861bbc9f17f29b4c8ef046f44fa7435c3ad3a54e752591c87050345c29d31",
  sha3Uncles: "0x1dcc4de8dec75d7aab85b567b6ccd41ad312451b948a7413f0a142fd40d49347",
  size: 653,
  stateRoot: "0x6e44fbe836ebf62523a37bbbb1beaad0c0802be9ff5c4e7b19c16a1eb4c50112",
  timestamp: 1529972844,
  totalDifficulty: 1444675,
  transactions: ["0x8d6d1eb3c1c82be1f419d8f772048644361c41362fd8de27f8252470f975d6bb"],
  transactionsRoot: "0x98881bb99ed82df9a69726705fb2ac2d1371e9ba992c52ed3b4cd3ee50762d38",
  uncles: []
}

第11个区块发生了交易,消耗的gas手续费为gasUsed=21000 Wei,交易一共发生1笔transactions=0x8d6d1eb3c1c82be1f419d8f772048644361c41362fd8de27f8252470f975d6bb,矿工账号miner: “0x9cac40f650e2cbe459dcb32c7c23103497134467″。

总结一下,本文介绍了如何搭建以太坊的私有节点,实现了挖矿的过程,并完了2个账户的第一笔转账操作。下一篇文章,找我了解智能合约的编写。

转载请注明出处:
http://blog.fens.me/bitcoin-geth-testnet

打赏作者

geth以太坊节点安装

比特币吸金之道系列文章,由计算机黑客发明的网络货币,无国界,无政府,无中心。没有政府滥发货币,没有通货膨胀。在全球计算机网络中,自由的实现货币兑换和流通。

本系列文章只讲程序和策略,不谈挖矿…

关于作者:

  • 张丹(Conan), 程序员/Quant: Java,R,Nodejs
  • blog: http://blog.fens.me
  • email: bsspirit@gmail.com

转载请注明出处:
http://blog.fens.me/bitcoin-install-geth

前言

以太坊(ETH)的出现开启了区块链的2.0时代,为了获得数据,最直接的方法就是搭建一个以太坊的客户端,直接从以太坊的公链上面同步账本获得数据。通过安装和运行geth,可以连接到以太坊的公链的实时网络,并进行以下操作,包括 挖掘真的以太币,在不同地址间转移资金,创建合约发送交易,探索区块历史等。

那么,让我们从搭建geth客户端节点开始吧。如果你想知道,如何使用比特币的客户端 bitcoin 获得数据,请参考文章 bitcoin比特币节点安装

目录

  1. geth安装过程
  2. 启动geth的节点

1. geth安装过程

go-ethereum客户端通常被称为geth,它是个命令行界面,执行在Go语言的运行时环境上,实现了完整以太坊节点。以太坊的官方网站地址为:https://ethereum.github.io/go-ethereum/

1.1 go的运行环境安装

由于geth是go语言开发的,在安装geth客户端之前,我们要先把go的运行环境装好。go语言的在Ubuntu的详细安装方法,请参考文章go语言安装。

下面列出go语言的简单的安装过程脚本:


# 下载最新的go包
> wget https://dl.google.com/go/go1.10.3.linux-amd64.tar.gz

# 将下载的源码包解压至 /usr/local目录。
> tar -C /usr/local/ -xvf go1.10.3.linux-amd64.tar.gz

> 将 /usr/local/go/bin 目录添加至PATH环境变量
> export PATH=$PATH:/usr/local/go/bin

# 运行go的命令
> go
Go is a tool for managing Go source code.

Usage:

	go command [arguments]

The commands are:

	build       compile packages and dependencies
	clean       remove object files and cached files
	doc         show documentation for package or symbol
	env         print Go environment information
	bug         start a bug report
	fix         update packages to use new APIs
	fmt         gofmt (reformat) package sources
	generate    generate Go files by processing source
	get         download and install packages and dependencies
	install     compile and install packages and dependencies
	list        list packages
	run         compile and run Go program
	test        test packages
	tool        run specified go tool
	version     print Go version
	vet         report likely mistakes in packages

Use "go help [command]" for more information about a command.

Additional help topics:

	c           calling between Go and C
	buildmode   build modes
	cache       build and test caching
	filetype    file types
	gopath      GOPATH environment variable
	environment environment variables
	importpath  import path syntax
	packages    package lists
	testflag    testing flags
	testfunc    testing functions

Use "go help [topic]" for more information about that topic.

这样go的运行环境,就安装好了。

1.2 geth客户端安装

从源代码安装geth客户端的操作过程,分为以下3步:

  1. 从github下载代码库
  2. 编译geth客户端
  3. 验证geth客户端

接下来,我们就一步一步的进行操作。本文使用的Linux系统环境为:Linux Ubuntu 16.04 LTS 64bit。

1.2.1 先从geth的官方github下载代码库。

安装git的过程,就不再多说了,只需要一条命令apt install git就行了。


> git clone https://github.com/ethereum/go-ethereum.git
> cd go-ethereum

1.2.2 编译geth客户端


> make geth
build/env.sh go run build/ci.go install ./cmd/geth
>>> /usr/local/go/bin/go install -ldflags -X main.gitCommit=f1986f86f2229ea5ff587c65c9229a65f40bf591 -v ./cmd/geth
github.com/ethereum/go-ethereum/vendor/github.com/hashicorp/golang-lru/simplelru
github.com/ethereum/go-ethereum/vendor/golang.org/x/net/html/atom
github.com/ethereum/go-ethereum/vendor/golang.org/x/text/encoding/internal/identifier

// 省略

github.com/ethereum/go-ethereum/eth
github.com/ethereum/go-ethereum/les
github.com/ethereum/go-ethereum/ethstats
github.com/ethereum/go-ethereum/cmd/utils
github.com/ethereum/go-ethereum/cmd/geth
Done building.
Run "/root/go-ethereum/build/bin/geth" to launch geth.

把geth的目录,加入环境变量中。


# 将 /root/go-ethereum/build/bin 目录添加至PATH环境变量
> export PATH=$PATH:/root/go-ethereum/build/bin

1.2.3 验证geth客户端安装成功

检查geth是否安装成功,通过运行geth客户端,查看版本。


> geth version
Geth
Version: 1.8.12-unstable
Git Commit: f1986f86f2229ea5ff587c65c9229a65f40bf591
Architecture: amd64
Protocol Versions: [63 62]
Network Id: 1
Go Version: go1.10.3
Operating System: linux
GOPATH=
GOROOT=/usr/local/go

这样就完成了,geth的客户端的安装。

2. 启动geth节点

安装好后,我们就可以启动geth客户端程序了,我们可以先启动以太坊公链的测试网络,增加命令行参数–testnet。


# 测试网络中启动geth
> geth --testnet console
INFO [06-20|17:15:04.991843] Maximum peer count                       ETH=25 LES=0 total=25
INFO [06-20|17:15:04.993534] Starting peer-to-peer node               instance=Geth/v1.8.12-unstable-f1986f86/linux-amd64/go1.10.3
INFO [06-20|17:15:04.993635] Allocated cache and file handles         database=/root/.ethereum/testnet/geth/chaindata cache=768 handles=512
INFO [06-20|17:15:05.054257] Writing custom genesis block 
INFO [06-20|17:15:05.069545] Persisted trie from memory database      nodes=355 size=51.89kB time=1.935374ms gcnodes=0 gcsize=0.00B gctime=0s livenodes=1 livesize=0.00B
INFO [06-20|17:15:05.070105] Initialised chain configuration          config="{ChainID: 3 Homestead: 0 DAO:  DAOSupport: true EIP150: 0 EIP155: 10 EIP158: 10 Byzantium: 1700000 Constantinople:  Engine: ethash}"
INFO [06-20|17:15:05.070282] Disk storage enabled for ethash caches   dir=/root/.ethereum/testnet/geth/ethash count=3
INFO [06-20|17:15:05.070394] Disk storage enabled for ethash DAGs     dir=/root/.ethash                       count=2
INFO [06-20|17:15:05.070531] Initialising Ethereum protocol           versions="[63 62]" network=3
INFO [06-20|17:15:05.07101] Loaded most recent local header          number=0 hash=419410…ca4a2d td=1048576
INFO [06-20|17:15:05.071186] Loaded most recent local full block      number=0 hash=419410…ca4a2d td=1048576
INFO [06-20|17:15:05.071281] Loaded most recent local fast block      number=0 hash=419410…ca4a2d td=1048576
INFO [06-20|17:15:05.071548] Regenerated local transaction journal    transactions=0 accounts=0
INFO [06-20|17:15:05.072007] Starting P2P networking 
INFO [06-20|17:15:07.258259] UDP listener up                          self=enode://652a8e7e33f87110907f31aa0943137a5252a47508f496730780fe9bdad84bc33eddc27ac2e5404f4050b1e655dc290a2106af8e4f73a5d40ac0d473e0394656@[::]:30303
INFO [06-20|17:15:07.261285] RLPx listener up                         self=enode://652a8e7e33f87110907f31aa0943137a5252a47508f496730780fe9bdad84bc33eddc27ac2e5404f4050b1e655dc290a2106af8e4f73a5d40ac0d473e0394656@[::]:30303
INFO [06-20|17:15:07.262189] IPC endpoint opened                      url=/root/.ethereum/testnet/geth.ipc
Welcome to the Geth JavaScript console!

instance: Geth/v1.8.12-unstable-f1986f86/linux-amd64/go1.10.3
 modules: admin:1.0 debug:1.0 eth:1.0 miner:1.0 net:1.0 personal:1.0 rpc:1.0 txpool:1.0 web3:1.0

> 

由于在以太坊公链上做任何操作,都需要消耗以太币(eth),对于开发者来说,很有必要在本地自行搭建一个测试区块链网络,进行智能合约的开发,最后再将开发好的合约部署到公链上。如何搭建以太坊测试的网络进行开发,请参考文章以太坊测试区块链环境搭建

当然,我们的目标是从以太坊公链中同步数据,接下来,关掉测试网络,我们直接启动主网。


# 启动geth客户端
> geth --datadir=/data0/eth
INFO [06-20|17:41:49.295669] Maximum peer count                       ETH=25 LES=0 total=25
INFO [06-20|17:41:49.296785] Starting peer-to-peer node               instance=Geth/v1.8.12-unstable-f1986f86/linux-amd64/go1.10.3
INFO [06-20|17:41:49.296874] Allocated cache and file handles         database=/data0/eth/geth/chaindata cache=768 handles=512
INFO [06-20|17:41:49.352014] Writing default main-net genesis block 
INFO [06-20|17:41:49.75667] Persisted trie from memory database      nodes=12356 size=1.88mB time=59.845085ms gcnodes=0 gcsize=0.00B gctime=0s livenodes=1 livesize=0.00B
INFO [06-20|17:41:49.757004] Initialised chain configuration          config="{ChainID: 1 Homestead: 1150000 DAO: 1920000 DAOSupport: true EIP150: 2463000 EIP155: 2675000 EIP158: 2675000 Byzantium: 4370000 Constantinople:  Engine: ethash}"
INFO [06-20|17:41:49.757053] Disk storage enabled for ethash caches   dir=/data0/eth/geth/ethash count=3
INFO [06-20|17:41:49.757066] Disk storage enabled for ethash DAGs     dir=/root/.ethash          count=2
INFO [06-20|17:41:49.757112] Initialising Ethereum protocol           versions="[63 62]" network=1
INFO [06-20|17:41:49.757397] Loaded most recent local header          number=0 hash=d4e567…cb8fa3 td=17179869184
INFO [06-20|17:41:49.757427] Loaded most recent local full block      number=0 hash=d4e567…cb8fa3 td=17179869184
INFO [06-20|17:41:49.757438] Loaded most recent local fast block      number=0 hash=d4e567…cb8fa3 td=17179869184
INFO [06-20|17:41:49.75756] Regenerated local transaction journal    transactions=0 accounts=0
INFO [06-20|17:41:49.757872] Starting P2P networking 
INFO [06-20|17:41:51.914746] UDP listener up                          self=enode://a42c2cfd562a0edf5ec8b647b48fa3f51639ab7a37191046578777c100022fae08976a82806def07c67c11d9b24e33aaa1e2c7a039d85803dcd78724ba2a422f@[::]:30303
INFO [06-20|17:41:51.915259] RLPx listener up                         self=enode://a42c2cfd562a0edf5ec8b647b48fa3f51639ab7a37191046578777c100022fae08976a82806def07c67c11d9b24e33aaa1e2c7a039d85803dcd78724ba2a422f@[::]:30303
INFO [06-20|17:41:51.918433] IPC endpoint opened                      url=/data0/eth/geth.ipc
INFO [06-20|17:42:01.916843] Block synchronisation started 
INFO [06-20|17:42:04.015969] Imported new block headers               count=192 elapsed=1.016s number=192 hash=723899…123390 ignored=0
INFO [06-20|17:42:04.032948] Imported new block receipts              count=2   elapsed=168.99µs number=2   hash=b495a1…4698c9 size=8.00B  ignored=0
INFO [06-20|17:42:04.087556] Imported new block headers               count=192 elapsed=68.154ms number=384 hash=d3d5d5…c79cf3 ignored=0

启动参数:

  • –datadir,用于指定目录

接下来,进入/data0/eth的指定目录。


> cd /data0/eth
> ll
total 16
drwxr-xr-x 4 root root 4096 Jun 20 17:43 ./
drwxr-xr-x 5 root root 4096 Jun 20 17:41 ../
drwx------ 5 root root 4096 Jun 20 17:43 geth/
srw------- 1 root root    0 Jun 20 17:43 geth.ipc=
drwx------ 2 root root 4096 Jun 20 17:41 keystore/

有2个文件夹,分别存入不同的文件:

  • geth, 用于存储公链的数据
  • keystore, 用于存储秘钥
  • geth.ipc=, 启动时产生一个文件

接下来,我们打开一个命令工作台


> geth --datadir=/data0/eth attach
Welcome to the Geth JavaScript console!

instance: Geth/v1.8.12-unstable-f1986f86/linux-amd64/go1.10.3
 modules: admin:1.0 debug:1.0 eth:1.0 miner:1.0 net:1.0 personal:1.0 rpc:1.0 txpool:1.0 web3:1.0

# 输入eth命令
> eth
{
  accounts: [],
  blockNumber: 0,
  coinbase: undefined,
  compile: {
    lll: function(),
    serpent: function(),
    solidity: function()
  },
  defaultAccount: undefined,
  defaultBlock: "latest",
  gasPrice: 18000000000,
  hashrate: 0,
  mining: false,
  pendingTransactions: [],
  protocolVersion: "0x3f",
  syncing: {
    currentBlock: 1841355,
    highestBlock: 5822416,
    knownStates: 4513217,
    pulledStates: 4491604,
    startingBlock: 1628922
  },
  call: function(),
  contract: function(abi),
  estimateGas: function(),
  filter: function(options, callback, filterCreationErrorCallback),
  getAccounts: function(callback),
  getBalance: function(),
  getBlock: function(),
  getBlockNumber: function(callback),
  getBlockTransactionCount: function(),
  getBlockUncleCount: function(),
  getCode: function(),
  getCoinbase: function(callback),
  getCompilers: function(),
  getGasPrice: function(callback),
  getHashrate: function(callback),
  getMining: function(callback),
  getPendingTransactions: function(callback),
  getProtocolVersion: function(callback),
  getRawTransaction: function(),
  getRawTransactionFromBlock: function(),
  getStorageAt: function(),
  getSyncing: function(callback),
  getTransaction: function(),
  getTransactionCount: function(),
  getTransactionFromBlock: function(),
  getTransactionReceipt: function(),
  getUncle: function(),
  getWork: function(),
  iban: function(iban),
  icapNamereg: function(),
  isSyncing: function(callback),
  namereg: function(),
  resend: function(),
  sendIBANTransaction: function(),
  sendRawTransaction: function(),
  sendTransaction: function(),
  sign: function(),
  signTransaction: function(),
  submitTransaction: function(),
  submitWork: function()
}

新建一个账户,test.dan


# 查看我的账户 
> eth.accounts
[]

# 新建一个账户
> personal.newAccount("test.dan")
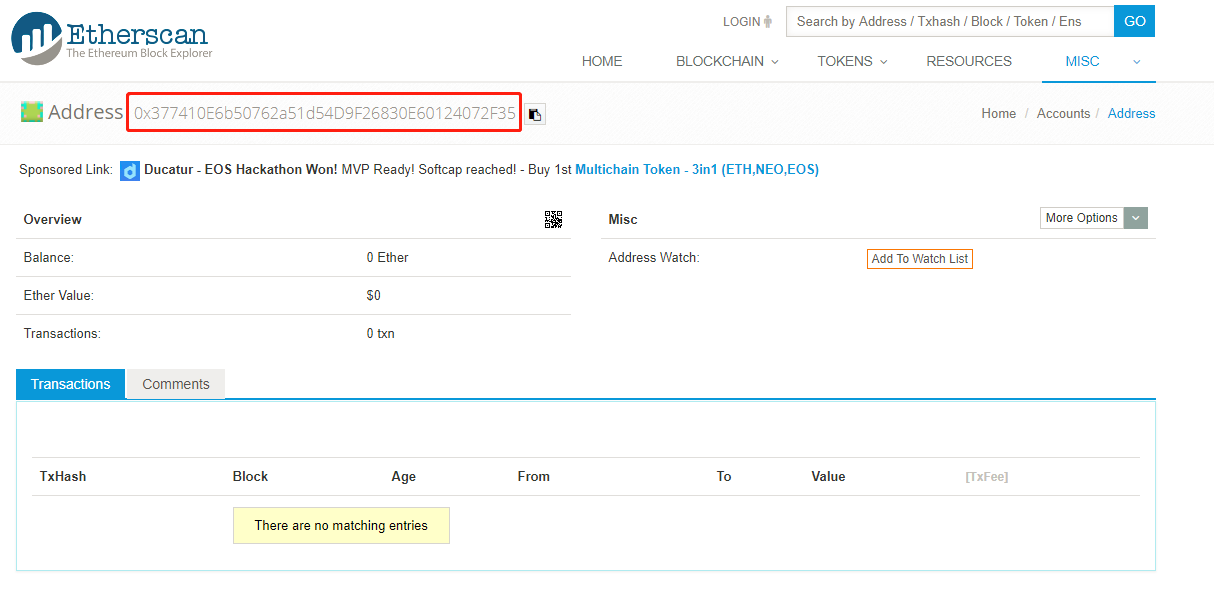
"0x377410e6b50762a51d54d9f26830e60124072f35"

# 再查看我的账户
> eth.accounts
["0x377410e6b50762a51d54d9f26830e60124072f35"]

# 查看账号余额
> eth.getBalance(eth.accounts[0])
0

同时,我们也可以直接通过etherscan,以太坊的区块浏览器来查询这个新建的账号的情况。

从网页上,我们可以看到这个地址已经生效,只是没有金额。看到这些信息,代表你的geth程序已经启动了。有几十G的数据,需要同步!

安装geth相比bitcoin安装复杂度差不多,按照官方文档的介绍基本能走通的,安装过程对于技术人来不是什么大问题。不同的公链,有不同的节点软件,安装方法也不同,下一篇文章将介绍EOS的客户端EOSIO的安装。

转载请注明出处:
http://blog.fens.me/bitcoin-install-geth

打赏作者