比特币吸金之道系列文章,由计算机黑客发明的网络货币,无国界,无政府,无中心。没有政府滥发货币,没有通货膨胀。在全球计算机网络中,自由的实现货币兑换和流通。
本系列文章只讲程序和策略,不谈挖矿…
关于作者:
- 张丹(Conan), 程序员/Quant: Java,R,Nodejs
- blog: http://blog.fens.me
- email: bsspirit@gmail.com
转载请注明出处:
http://blog.fens.me/bitcoin-install-geth
前言
以太坊(ETH)的出现开启了区块链的2.0时代,为了获得数据,最直接的方法就是搭建一个以太坊的客户端,直接从以太坊的公链上面同步账本获得数据。通过安装和运行geth,可以连接到以太坊的公链的实时网络,并进行以下操作,包括 挖掘真的以太币,在不同地址间转移资金,创建合约发送交易,探索区块历史等。
那么,让我们从搭建geth客户端节点开始吧。如果你想知道,如何使用比特币的客户端 bitcoin 获得数据,请参考文章 bitcoin比特币节点安装
目录
- geth安装过程
- 启动geth的节点
1. geth安装过程
go-ethereum客户端通常被称为geth,它是个命令行界面,执行在Go语言的运行时环境上,实现了完整以太坊节点。以太坊的官方网站地址为:https://ethereum.github.io/go-ethereum/。
1.1 go的运行环境安装
由于geth是go语言开发的,在安装geth客户端之前,我们要先把go的运行环境装好。go语言的在Ubuntu的详细安装方法,请参考文章go语言安装。
下面列出go语言的简单的安装过程脚本:
# 下载最新的go包
> wget https://dl.google.com/go/go1.10.3.linux-amd64.tar.gz

# 将下载的源码包解压至 /usr/local目录。
> tar -C /usr/local/ -xvf go1.10.3.linux-amd64.tar.gz

> 将 /usr/local/go/bin 目录添加至PATH环境变量
> export PATH=$PATH:/usr/local/go/bin

# 运行go的命令
> go
Go is a tool for managing Go source code.

Usage:

	go command [arguments]

The commands are:

	build       compile packages and dependencies
	clean       remove object files and cached files
	doc         show documentation for package or symbol
	env         print Go environment information
	bug         start a bug report
	fix         update packages to use new APIs
	fmt         gofmt (reformat) package sources
	generate    generate Go files by processing source
	get         download and install packages and dependencies
	install     compile and install packages and dependencies
	list        list packages
	run         compile and run Go program
	test        test packages
	tool        run specified go tool
	version     print Go version
	vet         report likely mistakes in packages

Use "go help [command]" for more information about a command.

Additional help topics:

	c           calling between Go and C
	buildmode   build modes
	cache       build and test caching
	filetype    file types
	gopath      GOPATH environment variable
	environment environment variables
	importpath  import path syntax
	packages    package lists
	testflag    testing flags
	testfunc    testing functions

Use "go help [topic]" for more information about that topic.
这样go的运行环境,就安装好了。
1.2 geth客户端安装
从源代码安装geth客户端的操作过程,分为以下3步:
- 从github下载代码库
- 编译geth客户端
- 验证geth客户端
接下来,我们就一步一步的进行操作。本文使用的Linux系统环境为:Linux Ubuntu 16.04 LTS 64bit。
1.2.1 先从geth的官方github下载代码库。
安装git的过程,就不再多说了,只需要一条命令apt install git就行了。
> git clone https://github.com/ethereum/go-ethereum.git
> cd go-ethereum
1.2.2 编译geth客户端
> make geth
build/env.sh go run build/ci.go install ./cmd/geth
>>> /usr/local/go/bin/go install -ldflags -X main.gitCommit=f1986f86f2229ea5ff587c65c9229a65f40bf591 -v ./cmd/geth
github.com/ethereum/go-ethereum/vendor/github.com/hashicorp/golang-lru/simplelru
github.com/ethereum/go-ethereum/vendor/golang.org/x/net/html/atom
github.com/ethereum/go-ethereum/vendor/golang.org/x/text/encoding/internal/identifier

// 省略

github.com/ethereum/go-ethereum/eth
github.com/ethereum/go-ethereum/les
github.com/ethereum/go-ethereum/ethstats
github.com/ethereum/go-ethereum/cmd/utils
github.com/ethereum/go-ethereum/cmd/geth
Done building.
Run "/root/go-ethereum/build/bin/geth" to launch geth.
把geth的目录,加入环境变量中。
# 将 /root/go-ethereum/build/bin 目录添加至PATH环境变量
> export PATH=$PATH:/root/go-ethereum/build/bin
1.2.3 验证geth客户端安装成功
检查geth是否安装成功,通过运行geth客户端,查看版本。
> geth version
Geth
Version: 1.8.12-unstable
Git Commit: f1986f86f2229ea5ff587c65c9229a65f40bf591
Architecture: amd64
Protocol Versions: [63 62]
Network Id: 1
Go Version: go1.10.3
Operating System: linux
GOPATH=
GOROOT=/usr/local/go
这样就完成了,geth的客户端的安装。
2. 启动geth节点
安装好后,我们就可以启动geth客户端程序了,我们可以先启动以太坊公链的测试网络,增加命令行参数–testnet。
# 测试网络中启动geth
> geth --testnet console
INFO [06-20|17:15:04.991843] Maximum peer count                       ETH=25 LES=0 total=25
INFO [06-20|17:15:04.993534] Starting peer-to-peer node               instance=Geth/v1.8.12-unstable-f1986f86/linux-amd64/go1.10.3
INFO [06-20|17:15:04.993635] Allocated cache and file handles         database=/root/.ethereum/testnet/geth/chaindata cache=768 handles=512
INFO [06-20|17:15:05.054257] Writing custom genesis block
INFO [06-20|17:15:05.069545] Persisted trie from memory database      nodes=355 size=51.89kB time=1.935374ms gcnodes=0 gcsize=0.00B gctime=0s livenodes=1 livesize=0.00B
INFO [06-20|17:15:05.070105] Initialised chain configuration          config="{ChainID: 3 Homestead: 0 DAO:  DAOSupport: true EIP150: 0 EIP155: 10 EIP158: 10 Byzantium: 1700000 Constantinople:  Engine: ethash}"
INFO [06-20|17:15:05.070282] Disk storage enabled for ethash caches   dir=/root/.ethereum/testnet/geth/ethash count=3
INFO [06-20|17:15:05.070394] Disk storage enabled for ethash DAGs     dir=/root/.ethash                       count=2
INFO [06-20|17:15:05.070531] Initialising Ethereum protocol           versions="[63 62]" network=3
INFO [06-20|17:15:05.07101] Loaded most recent local header          number=0 hash=419410…ca4a2d td=1048576
INFO [06-20|17:15:05.071186] Loaded most recent local full block      number=0 hash=419410…ca4a2d td=1048576
INFO [06-20|17:15:05.071281] Loaded most recent local fast block      number=0 hash=419410…ca4a2d td=1048576
INFO [06-20|17:15:05.071548] Regenerated local transaction journal    transactions=0 accounts=0
INFO [06-20|17:15:05.072007] Starting P2P networking
INFO [06-20|17:15:07.258259] UDP listener up                          self=enode://652a8e7e33f87110907f31aa0943137a5252a47508f496730780fe9bdad84bc33eddc27ac2e5404f4050b1e655dc290a2106af8e4f73a5d40ac0d473e0394656@[::]:30303
INFO [06-20|17:15:07.261285] RLPx listener up                         self=enode://652a8e7e33f87110907f31aa0943137a5252a47508f496730780fe9bdad84bc33eddc27ac2e5404f4050b1e655dc290a2106af8e4f73a5d40ac0d473e0394656@[::]:30303
INFO [06-20|17:15:07.262189] IPC endpoint opened                      url=/root/.ethereum/testnet/geth.ipc
Welcome to the Geth JavaScript console!

instance: Geth/v1.8.12-unstable-f1986f86/linux-amd64/go1.10.3
 modules: admin:1.0 debug:1.0 eth:1.0 miner:1.0 net:1.0 personal:1.0 rpc:1.0 txpool:1.0 web3:1.0

>
由于在以太坊公链上做任何操作,都需要消耗以太币(eth),对于开发者来说,很有必要在本地自行搭建一个测试区块链网络,进行智能合约的开发,最后再将开发好的合约部署到公链上。如何搭建以太坊测试的网络进行开发,请参考文章以太坊测试区块链环境搭建
当然,我们的目标是从以太坊公链中同步数据,接下来,关掉测试网络,我们直接启动主网。
# 启动geth客户端
> geth --datadir=/data0/eth
INFO [06-20|17:41:49.295669] Maximum peer count                       ETH=25 LES=0 total=25
INFO [06-20|17:41:49.296785] Starting peer-to-peer node               instance=Geth/v1.8.12-unstable-f1986f86/linux-amd64/go1.10.3
INFO [06-20|17:41:49.296874] Allocated cache and file handles         database=/data0/eth/geth/chaindata cache=768 handles=512
INFO [06-20|17:41:49.352014] Writing default main-net genesis block
INFO [06-20|17:41:49.75667] Persisted trie from memory database      nodes=12356 size=1.88mB time=59.845085ms gcnodes=0 gcsize=0.00B gctime=0s livenodes=1 livesize=0.00B
INFO [06-20|17:41:49.757004] Initialised chain configuration          config="{ChainID: 1 Homestead: 1150000 DAO: 1920000 DAOSupport: true EIP150: 2463000 EIP155: 2675000 EIP158: 2675000 Byzantium: 4370000 Constantinople:  Engine: ethash}"
INFO [06-20|17:41:49.757053] Disk storage enabled for ethash caches   dir=/data0/eth/geth/ethash count=3
INFO [06-20|17:41:49.757066] Disk storage enabled for ethash DAGs     dir=/root/.ethash          count=2
INFO [06-20|17:41:49.757112] Initialising Ethereum protocol           versions="[63 62]" network=1
INFO [06-20|17:41:49.757397] Loaded most recent local header          number=0 hash=d4e567…cb8fa3 td=17179869184
INFO [06-20|17:41:49.757427] Loaded most recent local full block      number=0 hash=d4e567…cb8fa3 td=17179869184
INFO [06-20|17:41:49.757438] Loaded most recent local fast block      number=0 hash=d4e567…cb8fa3 td=17179869184
INFO [06-20|17:41:49.75756] Regenerated local transaction journal    transactions=0 accounts=0
INFO [06-20|17:41:49.757872] Starting P2P networking
INFO [06-20|17:41:51.914746] UDP listener up                          self=enode://a42c2cfd562a0edf5ec8b647b48fa3f51639ab7a37191046578777c100022fae08976a82806def07c67c11d9b24e33aaa1e2c7a039d85803dcd78724ba2a422f@[::]:30303
INFO [06-20|17:41:51.915259] RLPx listener up                         self=enode://a42c2cfd562a0edf5ec8b647b48fa3f51639ab7a37191046578777c100022fae08976a82806def07c67c11d9b24e33aaa1e2c7a039d85803dcd78724ba2a422f@[::]:30303
INFO [06-20|17:41:51.918433] IPC endpoint opened                      url=/data0/eth/geth.ipc
INFO [06-20|17:42:01.916843] Block synchronisation started
INFO [06-20|17:42:04.015969] Imported new block headers               count=192 elapsed=1.016s number=192 hash=723899…123390 ignored=0
INFO [06-20|17:42:04.032948] Imported new block receipts              count=2   elapsed=168.99µs number=2   hash=b495a1…4698c9 size=8.00B  ignored=0
INFO [06-20|17:42:04.087556] Imported new block headers               count=192 elapsed=68.154ms number=384 hash=d3d5d5…c79cf3 ignored=0
启动参数:
- –datadir,用于指定目录
接下来,进入/data0/eth的指定目录。
> cd /data0/eth
> ll
total 16
drwxr-xr-x 4 root root 4096 Jun 20 17:43 ./
drwxr-xr-x 5 root root 4096 Jun 20 17:41 ../
drwx------ 5 root root 4096 Jun 20 17:43 geth/
srw------- 1 root root    0 Jun 20 17:43 geth.ipc=
drwx------ 2 root root 4096 Jun 20 17:41 keystore/
有2个文件夹,分别存入不同的文件:
- geth, 用于存储公链的数据
- keystore, 用于存储秘钥
- geth.ipc=, 启动时产生一个文件
接下来,我们打开一个命令工作台
> geth --datadir=/data0/eth attach
Welcome to the Geth JavaScript console!

instance: Geth/v1.8.12-unstable-f1986f86/linux-amd64/go1.10.3
 modules: admin:1.0 debug:1.0 eth:1.0 miner:1.0 net:1.0 personal:1.0 rpc:1.0 txpool:1.0 web3:1.0

# 输入eth命令
> eth
{
  accounts: [],
  blockNumber: 0,
  coinbase: undefined,
  compile: {
    lll: function(),
    serpent: function(),
    solidity: function()
  },
  defaultAccount: undefined,
  defaultBlock: "latest",
  gasPrice: 18000000000,
  hashrate: 0,
  mining: false,
  pendingTransactions: [],
  protocolVersion: "0x3f",
  syncing: {
    currentBlock: 1841355,
    highestBlock: 5822416,
    knownStates: 4513217,
    pulledStates: 4491604,
    startingBlock: 1628922
  },
  call: function(),
  contract: function(abi),
  estimateGas: function(),
  filter: function(options, callback, filterCreationErrorCallback),
  getAccounts: function(callback),
  getBalance: function(),
  getBlock: function(),
  getBlockNumber: function(callback),
  getBlockTransactionCount: function(),
  getBlockUncleCount: function(),
  getCode: function(),
  getCoinbase: function(callback),
  getCompilers: function(),
  getGasPrice: function(callback),
  getHashrate: function(callback),
  getMining: function(callback),
  getPendingTransactions: function(callback),
  getProtocolVersion: function(callback),
  getRawTransaction: function(),
  getRawTransactionFromBlock: function(),
  getStorageAt: function(),
  getSyncing: function(callback),
  getTransaction: function(),
  getTransactionCount: function(),
  getTransactionFromBlock: function(),
  getTransactionReceipt: function(),
  getUncle: function(),
  getWork: function(),
  iban: function(iban),
  icapNamereg: function(),
  isSyncing: function(callback),
  namereg: function(),
  resend: function(),
  sendIBANTransaction: function(),
  sendRawTransaction: function(),
  sendTransaction: function(),
  sign: function(),
  signTransaction: function(),
  submitTransaction: function(),
  submitWork: function()
}
新建一个账户,test.dan
# 查看我的账户
> eth.accounts
[]

# 新建一个账户
> personal.newAccount("test.dan")
"0x377410e6b50762a51d54d9f26830e60124072f35"

# 再查看我的账户
> eth.accounts
["0x377410e6b50762a51d54d9f26830e60124072f35"]

# 查看账号余额
> eth.getBalance(eth.accounts[0])
0
同时,我们也可以直接通过etherscan,以太坊的区块浏览器来查询这个新建的账号的情况。
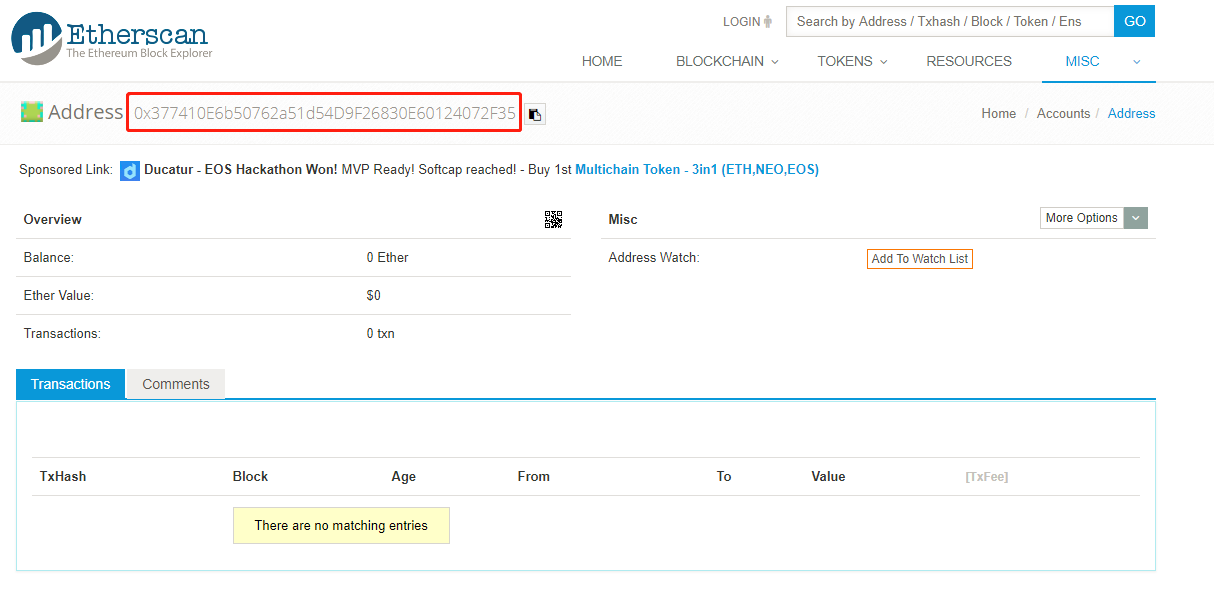
从网页上,我们可以看到这个地址已经生效,只是没有金额。看到这些信息,代表你的geth程序已经启动了。有几十G的数据,需要同步!
安装geth相比bitcoin安装复杂度差不多,按照官方文档的介绍基本能走通的,安装过程对于技术人来不是什么大问题。不同的公链,有不同的节点软件,安装方法也不同,下一篇文章将介绍EOS的客户端EOSIO的安装。
转载请注明出处:
http://blog.fens.me/bitcoin-install-geth

[…] 安装bitcoin相比用apt安装要复杂一些,不过按照官方文档的介绍基本能走通的,安装过程对于技术人来不是什么大问题。不同的公链,有不同的节点软件,安装方法也不同,下一篇文章将介绍以太坊的客户端Geth的安装。 […]
[…] 私有区块链的搭建,也是基于geth客户端来完成的,geth的安装过程,请参考文章 geth以太坊节点安装。 […]