从零开始nodejs系列文章,将介绍如何利Javascript做为服务端脚本,通过Nodejs框架web开发。Nodejs框架是基于V8的引擎,是目前速度最快的Javascript引擎。chrome浏览器就基于V8,同时打开20-30个网页都很流畅。Nodejs标准的web开发框架Express,可以帮助我们迅速建立web站点,比起PHP的开发效率更高,而且学习曲线更低。非常适合小型网站,个性化网站,我们自己的Geek网站!!
关于作者
- 张丹(Conan), 程序员Java,R,PHP,Javascript
- weibo:@Conan_Z
- blog: http://blog.fens.me
- email: bsspirit@gmail.com
转载请注明出处:
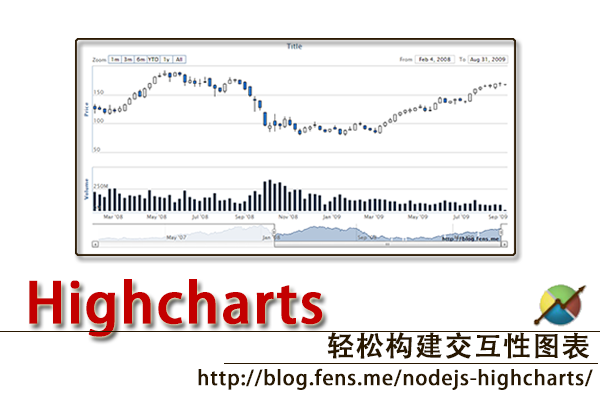
http://blog.fens.me/nodejs-highcharts/
前言
在大数据时代,数据可视化技术显得至关重要。一个设计优雅的信息图,能在一个600px*400px的画布上,显示出各种行业的全球市场的几百万条数据。
“如果图像能通过数据驱动,如果图像能动起来,如果图像支持交互,如果还能画股票K线图”,那才我想要的。Highchart是一个基于Javascript的跨浏览器的图形可视化工具,能满足我的需求。
目录
- highchart介绍
- highchart项目构建
- highchart使用
- highstock使用
- 项目源代码
1. highchart介绍
Highcharts是一个非常流行界面美观的纯Javascript图表库。它主要包括两个部分:Highcharts和Highstock。
Highcharts能够很简单便捷的在web网站或是web应用程序添加有交互性的图表,并且免费提供给个人学习、个人网站和非商业用途使用。目前HighCharts支持的图表类型有曲线图、区域图、柱状图、饼状图、散状点图和综合图表。
Highstock可以为您方便地建立股票或一般的时间轴图表。它包括先进的导航选项,预设的日期范围,日期选择器,滚动和平移等等。
官方网站:http://www.highcharts.com
2. highchart项目构建
系统环境
- win7 64bit
- Nodejs:v0.10.5
- Npm:1.2.19
初始化项目
~ D:\workspace\javascript>mkdir highchart && cd highchart

~ D:\workspace\javascript\highchart>bower search highchart
Search results:

    highcharts git://github.com/ewen/bower-highcharts.git
    highcharts.com git://github.com/highslide-software/highcharts.com.git
    angular-highcharts-directive git://github.com/rootux/angular-highcharts-directive.git
    highcharts-components git://github.com/nesbert/highcharts.git
    highcharts-ng git://github.com/pablojim/highcharts-ng.git
    angular-highcharts git://github.com/frapontillo/angular-highcharts.git

~ D:\workspace\javascript\highchart>bower install highcharts.com
bower highcharts.com#*      not-cached git://github.com/highslide-software/highcharts.com.git#*
bower highcharts.com#*         resolve git://github.com/highslide-software/highcharts.com.git#*
bower highcharts.com#*        download https://github.com/highslide-software/highcharts.com/archive/v3.0.7.tar.gz
bower highcharts.com#*         extract archive.tar.gz
bower highcharts.com#*        resolved git://github.com/highslide-software/highcharts.com.git#3.0.7
bower highcharts.com#~3.0.7    install highcharts.com#3.0.7

highcharts.com#3.0.7 bower_components\highcharts.com
我们通过bower来下载highchart库,有关bower的安装和使用,请参考文章:bower解决js的依赖管理
通过Ant工具构建highcharts. Ant是一个用Java开发的自动化构建工具。
~ cd bower_components\highcharts.com

~ ant build
Buildfile: D:\workspace\javascript\highchart\bower_components\highcharts.com\build.xml

set.properties:

clean:
    [mkdir] Created dir: D:\workspace\javascript\highchart\bower_components\highcharts.com\build
    [mkdir] Created dir: D:\workspace\javascript\highchart\bower_components\highcharts.com\build\dist\js\adapters
    [mkdir] Created dir: D:\workspace\javascript\highchart\bower_components\highcharts.com\build\dist\js\modules
    [mkdir] Created dir: D:\workspace\javascript\highchart\bower_components\highcharts.com\build\dist\highcharts\gfx
    [mkdir] Created dir: D:\workspace\javascript\highchart\bower_components\highcharts.com\build\dist\highcharts\js\adapters
    [mkdir] Created dir: D:\workspace\javascript\highchart\bower_components\highcharts.com\build\dist\highcharts\js\modules
    [mkdir] Created dir: D:\workspace\javascript\highchart\bower_components\highcharts.com\build\dist\highstock\gfx
    [mkdir] Created dir: D:\workspace\javascript\highchart\bower_components\highcharts.com\build\dist\highstock\js\adapters
    [mkdir] Created dir: D:\workspace\javascript\highchart\bower_components\highcharts.com\build\dist\highstock\js\modules
    [mkdir] Created dir: D:\workspace\javascript\highchart\bower_components\highcharts.com\build\tests
    [mkdir] Created dir: D:\workspace\javascript\highchart\bower_components\highcharts.com\build\coverage-report

assemble:

check-crlf:

do-lint:

lint:

minify:

compile:
     [echo] Minifying D:\workspace\javascript\highchart\bower_components\highcharts.com/js/highcharts.src.js
     [echo] Google Closure compiler: 463267 bytes -> 141575 bytes (52163 bytes zipped).
     [echo] Yahoo YUI Compressor: 463267 bytes -> 155872 bytes (57484 bytes zipped).
     [echo]
     [echo] Minifying D:\workspace\javascript\highchart\bower_components\highcharts.com/js/highstock.src.js
     [echo] Google Closure compiler: 579013 bytes -> 176349 bytes (64166 bytes zipped).
     [echo] Yahoo YUI Compressor: 579013 bytes -> 194135 bytes (70231 bytes zipped).
     [echo]
     [echo] Minifying D:\workspace\javascript\highchart\bower_components\highcharts.com/js/highcharts-more.src.js
     [echo] Google Closure compiler: 62849 bytes -> 21926 bytes (8265 bytes zipped).
     [echo] Yahoo YUI Compressor: 62849 bytes -> 22532 bytes (8682 bytes zipped).
     [echo]
     [echo] Minifying D:\workspace\javascript\highchart\bower_components\highcharts.com/js/highcharts-more.src.js
     [echo] Google Closure compiler: 62849 bytes -> 21926 bytes (8265 bytes zipped).
     [echo] Yahoo YUI Compressor: 62849 bytes -> 22532 bytes (8682 bytes zipped).
     [echo]
     [echo] Minifying D:\workspace\javascript\highchart\bower_components\highcharts.com/js/adapters/mootools-adapter.src.js
     [echo] Google Closure compiler: 8270 bytes -> 2406 bytes (1230 bytes zipped).
     [echo] Yahoo YUI Compressor: 8270 bytes -> 2338 bytes (1189 bytes zipped).
     [echo]
     [echo] Minifying D:\workspace\javascript\highchart\bower_components\highcharts.com/js/adapters/prototype-adapter.src.js
     [echo] Google Closure compiler: 9270 bytes -> 3330 bytes (1487 bytes zipped).
     [echo] Yahoo YUI Compressor: 9270 bytes -> 3251 bytes (1407 bytes zipped).
     [echo]
     [echo] Minifying D:\workspace\javascript\highchart\bower_components\highcharts.com/js/adapters/standalone-framework.src.js
     [echo] Google Closure compiler: 12261 bytes -> 5087 bytes (2328 bytes zipped).
     [echo] Yahoo YUI Compressor: 12261 bytes -> 5223 bytes (2318 bytes zipped).
     [echo]
     [echo] Minifying D:\workspace\javascript\highchart\bower_components\highcharts.com/js/modules/exporting.src.js
     [echo] Google Closure compiler: 18002 bytes -> 7264 bytes (3266 bytes zipped).
     [echo] Yahoo YUI Compressor: 18002 bytes -> 7204 bytes (3332 bytes zipped).
     [echo]
     [echo] Minifying D:\workspace\javascript\highchart\bower_components\highcharts.com/js/modules/data.src.js
     [echo] Google Closure compiler: 16086 bytes -> 4436 bytes (2048 bytes zipped).
     [echo] Yahoo YUI Compressor: 16086 bytes -> 4486 bytes (2066 bytes zipped).
     [echo]
     [echo] Minifying D:\workspace\javascript\highchart\bower_components\highcharts.com/js/modules/drilldown.src.js
     [echo] Google Closure compiler: 11421 bytes -> 5553 bytes (2109 bytes zipped).
     [echo] Yahoo YUI Compressor: 11421 bytes -> 5678 bytes (2161 bytes zipped).
     [echo]
     [echo] Minifying D:\workspace\javascript\highchart\bower_components\highcharts.com/js/modules/funnel.src.js
     [echo] Google Closure compiler: 6824 bytes -> 1974 bytes (1226 bytes zipped).
     [echo] Yahoo YUI Compressor: 6824 bytes -> 1885 bytes (1180 bytes zipped).
     [echo]
     [echo] Minifying D:\workspace\javascript\highchart\bower_components\highcharts.com/js/modules/no-data-to-display.src.js
     [echo] Google Closure compiler: 3009 bytes -> 1379 bytes (846 bytes zipped).
     [echo] Yahoo YUI Compressor: 3009 bytes -> 1185 bytes (729 bytes zipped).
     [echo]
     [echo] Minifying D:\workspace\javascript\highchart\bower_components\highcharts.com/js/modules/map.src.js
     [echo] Google Closure compiler: 34651 bytes -> 12719 bytes (5188 bytes zipped).
     [echo] Yahoo YUI Compressor: 34651 bytes -> 12889 bytes (5350 bytes zipped).
     [echo]
     [echo] Minifying D:\workspace\javascript\highchart\bower_components\highcharts.com/js/modules/heatmap.src.js
     [echo] Google Closure compiler: 1195 bytes -> 579 bytes (511 bytes zipped).
     [echo] Yahoo YUI Compressor: 1195 bytes -> 594 bytes (519 bytes zipped).
     [echo]
     [echo] Minifying D:\workspace\javascript\highchart\bower_components\highcharts.com/js/modules/annotations.src.js
     [echo] Google Closure compiler: 8776 bytes -> 3398 bytes (1668 bytes zipped).
     [echo] Yahoo YUI Compressor: 8776 bytes -> 3535 bytes (1777 bytes zipped).
     [echo]
     [echo] Minifying build/canvas-tools.src.js
     [echo] Google Closure compiler: 100698 bytes -> 57894 bytes (15848 bytes zipped).
     [echo] Yahoo YUI Compressor: 100698 bytes -> 59764 bytes (16054 bytes zipped).
     [echo]

BUILD SUCCESSFUL
Total time: 1 minute 19 seconds
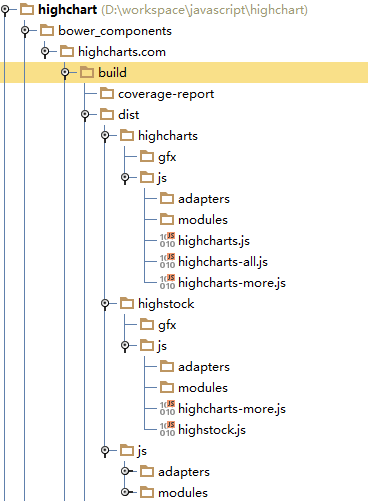
在新生成的build/dist文件夹中,就能找到highchart.js, highstock.js,这两个用于发布的文件了。
用grunt创建一个静态服务器,grunt的使用说明,请参考文章:grunt让Nodejs规范起来
grunt的运行时环境,新建文件:package.json,Gruntfile.js
~ npm install grunt
~ npm install grunt-contrib-connect

~ vi packages.json
{
    "name": "nodejs-highcharts",
    "version": "0.0.1",
    "private": true,
    "scripts": {
        "start": "node app.js"
    },
    "dependencies": {
    },
    "devDependencies": {
        "grunt": "~0.4.1",
        "grunt-contrib-connect": "~0.4.1"
    }
}

~ vi Gruntfile.js
'use strict';
module.exports = function(grunt) {
    grunt.initConfig({
      connect: {
        server: {
          options: {
            port: 9001,
            base: './',
            keepalive: true
          }
        }
      }
    });

    grunt.loadNpmTasks('grunt-contrib-connect');
    grunt.registerTask('server', ['connect']);
};
新建一个测试文件:demo1.html
<!DOCTYPE html>
<html>
<head>
<title>HighCharts</title>
<script src="bower_components/highcharts.com/lib/jquery-1.10.1.js"></script>
<script src="bower_components/highcharts.com/build/dist/highcharts/js/highcharts.js"></script>
</head>
<body>

<div id="container" style="height: 400px"></div>
<script>
$(function () {
Highcharts.setOptions({
colors: ['#058DC7', '#50B432', '#ED561B', '#DDDF00', '#24CBE5', '#64E572', '#FF9655', '#FFF263', '#6AF9C4']
});

$('#container').highcharts({
chart: {
type: 'pie'
},

series: [{
data: [29.9, 71.5, 106.4, 129.2, 144.0, 176.0, 135.6, 148.5, 216.4, 194.1, 95.6, 54.4]
}]
});
});
</script>
</body>
</html>
由于highcharts是依赖于jQuery的,所以我们也需要引入jquery.js
启动grunt server
~ D:\workspace\javascript\highchart>grunt server
Running "connect:server" (connect) task
Waiting forever...
Started connect web server on 127.0.0.1:9001.
浏览器打开:http://localhost:9001/demo1.html
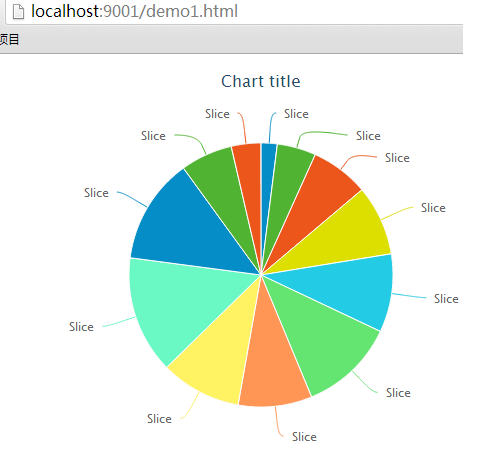
3. highchart使用
找到highchart的官网,查看demo:http://www.highcharts.com/demo/,支持好几十种可视化图形。
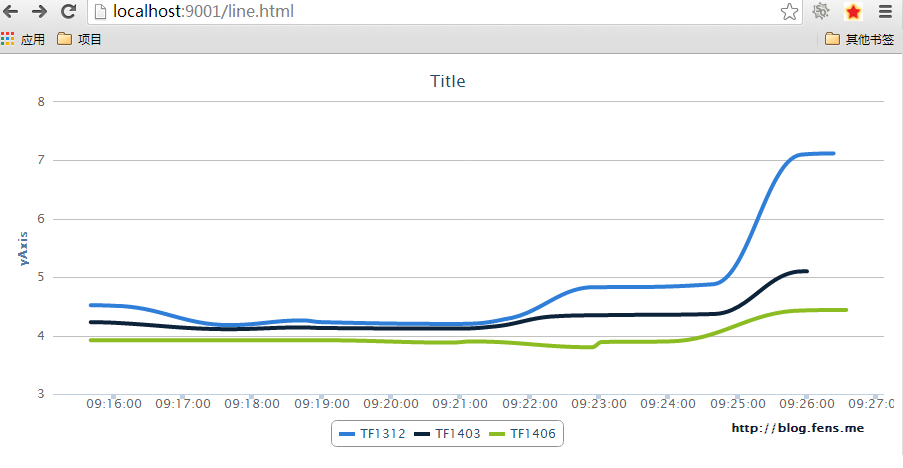
我最常用的是曲线图:
新建文件
- line.html:网页文件
- line.js:脚本文件,进行简单封装
- line.json:数据文件
安装moment类库,用于时常日期转换
~ bower install momentjson/line.json
[
    {
        "name": "TF1312",
        "data": [
            [20131104091540,4.52],
            [20131104091600,4.51],
            [20131104091740,4.18],
            [20131104091843,4.26],
            [20131104091900,4.23],
            [20131104092053,4.2],
            [20131104092138,4.28],
            [20131104092256,4.83],
            [20131104092307,4.83],
            [20131104092439,4.88],
            [20131104092556,7.1],
            [20131104092623,7.12]
        ]
    },
    {
        "name": "TF1403",
        "data": [
            [20131104091540,4.23],
            [20131104091600,4.22],
            [20131104091740,4.11],
            [20131104091843,4.14],
            [20131104091900,4.13],
            [20131104092052,4.12],
            [20131104092126,4.15],
            [20131104092222,4.33],
            [20131104092306,4.35],
            [20131104092440,4.37],
            [20131104092556,5.1],
            [20131104092600,5.1]
        ]
    },
    {
        "name": "TF1406",
        "data": [
            [20131104091540,3.92],
            [20131104091600,3.92],
            [20131104091700,3.92],
            [20131104091800,3.92],
            [20131104091900,3.92],
            [20131104092052,3.88],
            [20131104092110,3.9 ],
            [20131104092254,3.8],
            [20131104092302,3.89],
            [20131104092400,3.9],
            [20131104092556,4.43],
            [20131104092634,4.44]
        ]
    }
]
line.html
<!DOCTYPE html>
<html>
<head>
<title>HighCharts - SplineChart</title>
<script src="bower_components/highcharts.com/lib/jquery-1.10.1.js"></script>
<script src="bower_components/moment/moment.js"></script>
<script src="bower_components/highcharts.com/build/dist/highcharts/js/highcharts.js"></script>
</head>
<body>
<div id="container" style="height: 400px"></div>
<script src="js/line.js"></script>
<script>
createSpline('#container','json/line.json',true);
</script>
</body>
</html>
js/line.js
/**
 * hightcharts global
 */
Highcharts.setOptions({
    global: {useUTC: false}
});

/**
 * my credits
 */
var defaultCredits = {
    href: 'http://blog.fens.me',
    position: {x: -30, y: -30},
    style: {color: '#191a37', fontWeight: 'bold'},
    text: 'http://blog.fens.me'
}

/**
 * transfer Datetime: 20130101101010 to time
 */
function transferDate(json) {
    for (var i = 0; i < json.length; i++) {
        var obj = json[i].data;
        for (var j = 0; j < obj.length; j++) {
            obj[j][0] = moment(obj[j][0], 'YYYYMMDDHHmmss').toDate().getTime();
        }
    }
    return json;
}

/**
 * Spline Chart Template
 */
function getSplineChart(series) {
    return {
        chart: {
            type: 'spline',
            animation: Highcharts.svg,
            marginRight: 10
        },
        title: {
            text: 'Title'
        },
        credits: defaultCredits,
        xAxis: {
            maxPadding: 0.05, minPadding: 0.05, type: 'datetime', tickWidth: 5,
            labels: {
                formatter: function() {
                    return Highcharts.dateFormat('%H:%M:%S', this.value);
                }
            }
        },
        yAxis: {
            title: {text: 'yAxis'},
            plotLines: [
                {value: 0, width: 1, color: '#808080'}
            ]
        },
        tooltip: {
            formatter: function () {
                return '<b>' + this.series.name + '</b><br/>' +
                    Highcharts.dateFormat('%H:%M:%S', this.x) + '<br/>' +
                    Highcharts.numberFormat(this.y, 2);
            }
        },
        legend: {enabled: true},
        exporting: {enabled: false},
        plotOptions: {
            spline: {
                lineWidth: 4, states: {hover: {lineWidth: 5}},
                marker: {enabled: false},
                pointInterval: 3600000,
                pointStart: Date.UTC(2009, 9, 6, 0, 0, 0)
            }
        },
        series: series
    };
}

/**
 * Create a spline
 */
function createSpline(id,url,transDate){
    $.get(url, function (json) {
        if(transDate||false) json=transferDate(json);
        $(id).highcharts(getSplineChart(json));
    });
}
查看效果图
4. highstock使用
到highchart的官网,查看stock demo:http://www.highcharts.com/stock/demo/,同样支持好多种可视化图形。
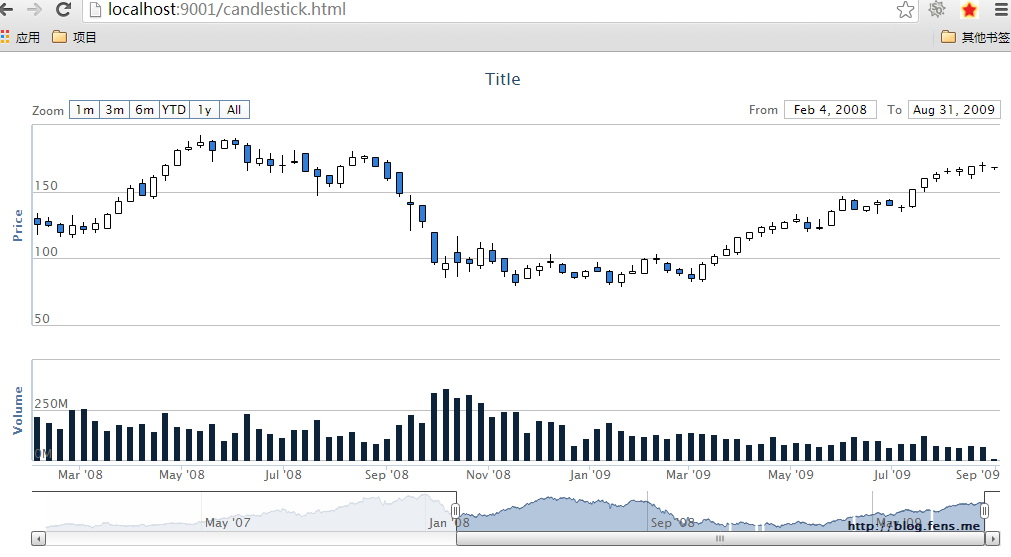
选择K线图(candlestick)实验:
新建文件:
- candlestick.html:网页文件
- candlestick.js:脚本文件,进行简单封装
- candlestick.json:数据文件
json/candlestick.json, 部分数据
[
[1162771200000,78.95,80.06,78.43,79.71,15525782],
[1162857600000,80.45,81.00,80.13,80.51,18788494],
[1162944000000,80.02,82.69,79.89,82.45,24699702],
[1163030400000,82.90,84.69,82.12,83.34,32973747],
[1163116800000,83.55,83.60,82.50,83.12,13358721],
[1163376000000,83.22,84.45,82.64,84.35,16105532],
[1163462400000,84.80,85.00,83.90,85.00,21054939],
[1163548800000,85.05,85.90,84.00,84.05,23522893],
[1163635200000,84.87,86.30,84.62,85.61,24796743],
[1163721600000,85.14,85.94,85.00,85.85,16667310],
[1163980800000,85.40,87.00,85.20,86.47,20394365],
[1164067200000,87.42,88.60,87.11,88.60,22274133],
[1164153600000,88.99,90.75,87.85,90.31,24013531],
[1164326400000,89.53,93.08,89.50,91.63,18538136],
[1164585600000,92.51,93.16,89.50,89.54,38411382],
[1164672000000,90.36,91.97,89.91,91.81,37039840]
]
candlestick.html
<!DOCTYPE html>
<html>
<head>
<title>HighStock - Candlestick</title>
<script src="bower_components/highcharts.com/lib/jquery-1.10.1.js"></script>
<script src="bower_components/moment/moment.js"></script>
<script src="bower_components/highcharts.com/build/dist/highstock/js/highstock.js"></script>
</head>
<body>
<div id="container" style="height: 500px"></div>
<script src="js/candlestick.js"></script>
<script>
createCandlestick('#container','json/candlestick.json');
</script>
</body>
</html>
js/candlestick.js
/**
 * my credits
 */
var defaultCredits = {
    href: 'http://blog.fens.me',
    position: {x: -30, y: -30},
    style: {color: '#191a37', fontWeight: 'bold'},
    text: 'http://blog.fens.me'
}
/**
 * Paser Origin Data to Chart
 */
function paserStockData(data,transferDate){
    var ohlc = [],
        volume = [];

    for (var i = 0; i < data.length; i++) {
        if(transferDate||false){
            data[i][0] = moment(data[i][0], 'YYYYMMDDHHmmss').toDate().getTime();
        }

        ohlc.push([
            data[i][0], // the date
            data[i][1], // open
            data[i][2], // high
            data[i][3], // low
            data[i][4] // close
        ]);

        volume.push([
            data[i][0], // the date
            data[i][5] // the volume
        ])
    }

    var groupingUnits = [
        ['week',[1]],
        ['month',[1, 2, 3, 4, 5, 6]]
    ];

    var series=[{
        type: 'candlestick',
        name: 'Stock',
        data: ohlc,
        dataGrouping: {
            units: groupingUnits
        }
    }, {
        type: 'column',
        name: 'Volume',
        data: volume,
        yAxis: 1,
        dataGrouping: {
            units: groupingUnits
        }
    }];
    return series;
}

/**
 * Spline Chart Template
 */
function getCandlestick(series) {
    return {
        rangeSelector: {
            selected: 1
        },
        credits:defaultCredits,
        title: {
            text: 'Title'
        },
        yAxis: [{
            title: {
                text: 'Price'
            },
            height: 200,
            lineWidth: 2
        }, {
            title: {
                text: 'Volume'
            },
            top: 300,
            height: 100,
            offset: 0,
            lineWidth: 2
        }],
        series:series
    }
}

/**
* Create a Candlestick
*/
function createCandlestick(id,url,transDate){
    $.get(url, function (json) {
        json=paserStockData(json,transDate);
        $(id).highcharts('StockChart',getCandlestick(json));
    });
}
查看效果图
5. 项目源代码
项目已经上传到github,感兴趣的同学自行下载。
https://github.com/bsspirit/highcharts-demo
转载请注明出处:
http://blog.fens.me/nodejs-highcharts/