操作系统实用工具系列文章,将介绍基于Linux ubuntu的各种工具软件的配置和使用。有些工具大家早已耳熟能详,有些工具经常用到但确依然陌生。我将记录我在使用操作系统时,安装及配置工具上面的一些方法,把使用心得记录下来也便于自己的以后查找和回忆。
关于作者
- 张丹(Conan), 程序员Java,R,PHP,Javascript
- weibo:@Conan_Z
- blog: http://blog.fens.me
- email: bsspirit@gmail.com
转载请注明出处:
http://blog.fens.me/vpn-pptp-client-ubuntu/

前言
GFW给大家的生活事带来了各种不便,只有靠我们自己才能改变这种不便。像facebook, twitter, youtube, google+, bitbucket, slideside…. 这些世界知名的网站,我们都没有办法直接访问,有时候你很难联想到为什么要屏蔽这些网站。特别是纯技术社区!
不过我们也有很多的技术,可以穿越这条封锁线。今天我们聊一下,ubuntu通过PPTP协议使用VPN(Virtual Private Network),如何看到外面的世界。
关于PPTP的服务器端配置:请参考 在Ubuntu上安装PPTP VPN服务 文章
win7通过PPTP协议使用VPN:请参考 win7通过PPTP协议使用VPN 文章
目录
- 获得VPN账号
- ubuntu客户端界面配置
- ubuntu命令行配置
- 看看外面的世界youtube
1. 获得VPN账号
当你有了基于PPTP协议的VPN账号后,怎么在ubuntu中配置!
VPN账号包括3个部分:IP,用户名,密码
比如:(只为演示说明,此账号不可用)
ip: 123.123.123.123
用户名:xx1
密码: xx2
2. ubuntu客户端界面配置
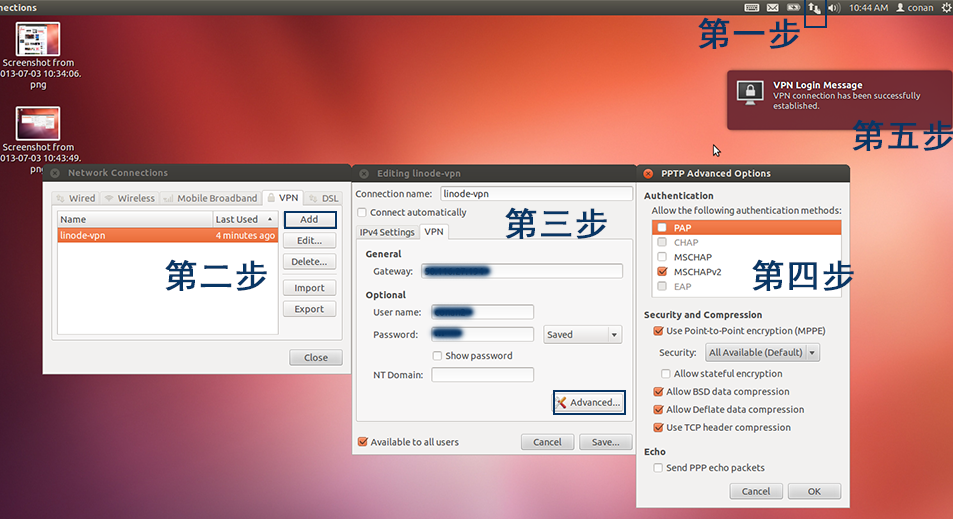
1. 点击右上角网络 –》VPN Connections –》Configure VPN
2. 新建一个VPN连接–》Add
3. 输入VPN账号:–》Advanced
Connection name: 连接号
Gateway: VPN服务器IP
Username: 用户名
Password: 密码
4. 高级选项 –》 Use Point-to-Point encryption(MPPE)
5. 选择VPN连接 –》 连接成功提示。
3. ubuntu命令行配置
安装pptp客户端软件
~ sudo apt-get install pptp-linux
查看网络配置
~ ifconfig
eth0      Link encap:Ethernet  HWaddr 08:00:27:90:e8:19
          inet addr:192.168.1.200  Bcast:192.168.1.255  Mask:255.255.255.0
          inet6 addr: fe80::a00:27ff:fe90:e819/64 Scope:Link
          UP BROADCAST RUNNING MULTICAST  MTU:1500  Metric:1
          RX packets:74 errors:0 dropped:0 overruns:0 frame:0
          TX packets:64 errors:0 dropped:0 overruns:0 carrier:0
          collisions:0 txqueuelen:1000
          RX bytes:8112 (8.1 KB)  TX bytes:8542 (8.5 KB)

lo        Link encap:Local Loopback
          inet addr:127.0.0.1  Mask:255.0.0.0
          inet6 addr: ::1/128 Scope:Host
          UP LOOPBACK RUNNING  MTU:16436  Metric:1
          RX packets:0 errors:0 dropped:0 overruns:0 frame:0
          TX packets:0 errors:0 dropped:0 overruns:0 carrier:0
          collisions:0 txqueuelen:0
          RX bytes:0 (0.0 B)  TX bytes:0 (0.0 B)

~ route -n
Kernel IP routing table
Destination     Gateway         Genmask         Flags Metric Ref    Use Iface
0.0.0.0         192.168.1.1     0.0.0.0         UG    100    0        0 eth0
192.168.1.0     0.0.0.0         255.255.255.0   U     0      0        0 eth0

~ ip route
default via 192.168.1.1 dev eth0  metric 100
192.168.1.0/24 dev eth0  proto kernel  scope link  src 192.168.1.200
初始化一个VPN的连接通道:myvpn
~ sudo pptpsetup --create myvpn --server xxx.xxx.xxx.xxx --username xx1--password xx2--encrypt --start

Using interface ppp0
Connect: ppp0  /dev/pts/1
CHAP authentication succeeded
MPPE 128-bit stateless compression enabled
local  IP address 10.10.10.3
remote IP address 10.10.10.1
成功连接到远程VPN服务器。
通过刚才的创建脚步:
在/etc/ppp/peers目录下面,会生成一个叫myvpn的文件。
在/etc/ppp目录下面,用户名和密码会写在chap-secrets文件中。
~ sudo vi /etc/ppp/peers/myvpn

# written by pptpsetup
pty "pptp xxx.xxx.xxx.xxx --nolaunchpppd"
lock
noauth
nobsdcomp
nodeflate
name conan2
remotename myvpn
ipparam myvpn
require-mppe-128

#生成用户名和密码
~ sudo vi /etc/ppp/chap-secrets
xx1 myvpn "xx2" *
通过网站路由功能,测试VPN
#安装traceroute
~ sudo apt-get install traceroute

~ traceroute www.163.com
traceroute to www.163.com (101.23.128.17), 30 hops max, 60 byte packets
 1  localhost (192.168.1.1)  2.222 ms  3.144 ms  3.132 ms
 2  111.192.144.1 (111.192.144.1)  80.279 ms  80.632 ms  80.624 ms
 3  61.148.185.69 (61.148.185.69)  9.026 ms  9.492 ms  9.479 ms
 4  124.65.61.157 (124.65.61.157)  9.469 ms  9.459 ms  9.447 ms
 5  202.96.12.185 (202.96.12.185)  9.829 ms  9.783 ms  9.771 ms
 6  219.158.96.110 (219.158.96.110)  17.160 ms  17.210 ms  17.158 ms
 7  61.182.176.178 (61.182.176.178)  30.222 ms  28.589 ms  28.077 ms
 8  60.5.194.58 (60.5.194.58)  29.293 ms  29.287 ms  29.276 ms
 9  60.5.197.214 (60.5.197.214)  26.617 ms  26.724 ms  26.668 ms
10  101.23.255.45 (101.23.255.45)  27.672 ms  28.147 ms  26.811 ms
11  101.23.128.17 (101.23.128.17)  25.890 ms  28.065 ms  28.420 ms
我们发现虽然VPN已经连接成功,但是路由没有通过VPN上网,第1跳还是localhost (192.168.1.1)
再次查看网络连接配置
~ ifconfig
eth0      Link encap:Ethernet  HWaddr 08:00:27:90:e8:19
          inet addr:192.168.1.200  Bcast:192.168.1.255  Mask:255.255.255.0
          inet6 addr: fe80::a00:27ff:fe90:e819/64 Scope:Link
          UP BROADCAST RUNNING MULTICAST  MTU:1500  Metric:1
          RX packets:175 errors:0 dropped:0 overruns:0 frame:0
          TX packets:162 errors:0 dropped:0 overruns:0 carrier:0
          collisions:0 txqueuelen:1000
          RX bytes:16817 (16.8 KB)  TX bytes:19723 (19.7 KB)

lo        Link encap:Local Loopback
          inet addr:127.0.0.1  Mask:255.0.0.0
          inet6 addr: ::1/128 Scope:Host
          UP LOOPBACK RUNNING  MTU:16436  Metric:1
          RX packets:0 errors:0 dropped:0 overruns:0 frame:0
          TX packets:0 errors:0 dropped:0 overruns:0 carrier:0
          collisions:0 txqueuelen:0
          RX bytes:0 (0.0 B)  TX bytes:0 (0.0 B)

ppp0      Link encap:Point-to-Point Protocol
          inet addr:10.10.10.3  P-t-P:10.10.10.1  Mask:255.255.255.255
          UP POINTOPOINT RUNNING NOARP MULTICAST  MTU:1496  Metric:1
          RX packets:7 errors:0 dropped:0 overruns:0 frame:0
          TX packets:7 errors:0 dropped:0 overruns:0 carrier:0
          collisions:0 txqueuelen:3
          RX bytes:70 (70.0 B)  TX bytes:76 (76.0 B)

~ route -n
Kernel IP routing table
Destination     Gateway         Genmask         Flags Metric Ref    Use Iface
0.0.0.0         192.168.1.1     0.0.0.0         UG    100    0        0 eth0
10.10.10.1      0.0.0.0         255.255.255.255 UH    0      0        0 ppp0
50.116.27.194   192.168.1.1     255.255.255.255 UGH   0      0        0 eth0
192.168.1.0     0.0.0.0         255.255.255.0   U     0      0        0 eth0

~ ip route
default via 192.168.1.1 dev eth0  metric 100
10.10.10.1 dev ppp0  proto kernel  scope link  src 10.10.10.3
50.116.27.194 via 192.168.1.1 dev eth0  src 192.168.1.200
192.168.1.0/24 dev eth0  proto kernel  scope link  src 192.168.1.200
我们发现默认路由是指向eth0。
下面修改路由配置:
#修改路由命令
~ sudo ip route del default
~ sudo ip route add default dev ppp0

~ route -n
Kernel IP routing table
Destination     Gateway         Genmask         Flags Metric Ref    Use Iface
0.0.0.0         0.0.0.0         0.0.0.0         U     0      0        0 ppp0
10.10.10.1      0.0.0.0         255.255.255.255 UH    0      0        0 ppp0
50.116.27.194   192.168.1.1     255.255.255.255 UGH   0      0        0 eth0
192.168.1.0     0.0.0.0         255.255.255.0   U     0      0        0 eth0

~ ip route
default dev ppp0  scope link
10.10.10.1 dev ppp0  proto kernel  scope link  src 10.10.10.3
50.116.27.194 via 192.168.1.1 dev eth0  src 192.168.1.200
192.168.1.0/24 dev eth0  proto kernel  scope link  src 192.168.1.200

~ traceroute www.163.com
traceroute to www.163.com (101.23.128.17), 30 hops max, 60 byte packets
 1  localhost (10.10.10.1)  281.093 ms  281.414 ms  280.941 ms
 2  router2-dal.linode.com (67.18.7.162)  281.225 ms  281.109 ms  281.841 ms
 3  xe-2-0-0.car04.dllstx2.networklayer.com (67.18.7.93)  280.882 ms  284.002 ms  283.913 ms
 4  po102.dsr01.dllstx2.networklayer.com (70.87.254.81)  284.123 ms  284.087 ms  283.979 ms
 5  po21.dsr01.dllstx3.networklayer.com (70.87.255.65)  284.000 ms  283.921 ms  283.839 ms
 6  ae16.bbr01.eq01.dal03.networklayer.com (173.192.18.224)  283.542 ms  279.296 ms  290.455 ms
 7  dls-bb1-link.telia.net (213.248.102.173)  301.426 ms  302.092 ms  302.085 ms
 8  las-bb1-link.telia.net (213.155.131.77)  327.192 ms  327.350 ms  327.344 ms
 9  chinaunicom-ic-151188-las-bb1.telia.net (213.248.94.126)  478.941 ms  479.089 ms  479.083 ms
10  219.158.30.173 (219.158.30.173)  496.679 ms  496.673 ms  496.667 ms
11  219.158.97.57 (219.158.97.57)  516.819 ms  517.035 ms  517.011 ms
12  219.158.5.129 (219.158.5.129)  491.084 ms  490.018 ms  497.472 ms
13  219.158.100.130 (219.158.100.130)  518.239 ms  518.216 ms  518.192 ms
14  61.182.176.186 (61.182.176.186)  533.695 ms  533.673 ms  533.666 ms
15  101.23.255.230 (101.23.255.230)  512.212 ms  512.500 ms  512.479 ms
16  60.5.194.74 (60.5.194.74)  519.246 ms  519.815 ms  519.791 ms
17  101.23.255.45 (101.23.255.45)  526.522 ms  526.907 ms  526.844 ms
18  101.23.128.17 (101.23.128.17)  522.068 ms  517.535 ms  517.240 ms
查看第一跳,localhost (10.10.10.1),已经通过VPN实现路由。
停止VPN
~ sudo poff myvpn

~ ifconfig
eth0      Link encap:Ethernet  HWaddr 08:00:27:90:e8:19
          inet addr:192.168.1.200  Bcast:192.168.1.255  Mask:255.255.255.0
          inet6 addr: fe80::a00:27ff:fe90:e819/64 Scope:Link
          UP BROADCAST RUNNING MULTICAST  MTU:1500  Metric:1
          RX packets:2270 errors:0 dropped:0 overruns:0 frame:0
          TX packets:1991 errors:0 dropped:0 overruns:0 carrier:0
          collisions:0 txqueuelen:1000
          RX bytes:207578 (207.5 KB)  TX bytes:184147 (184.1 KB)

lo        Link encap:Local Loopback
          inet addr:127.0.0.1  Mask:255.0.0.0
          inet6 addr: ::1/128 Scope:Host
          UP LOOPBACK RUNNING  MTU:16436  Metric:1
          RX packets:0 errors:0 dropped:0 overruns:0 frame:0
          TX packets:0 errors:0 dropped:0 overruns:0 carrier:0
          collisions:0 txqueuelen:0
          RX bytes:0 (0.0 B)  TX bytes:0 (0.0 B)
再ping网站,发现网络出现问题。Network is unreachable
~ ping www.163.com
connect: Network is unreachable

~ route -n
Kernel IP routing table
Destination     Gateway         Genmask         Flags Metric Ref    Use Iface
50.116.27.194   192.168.1.1     255.255.255.255 UGH   0      0        0 eth0
192.168.1.0     0.0.0.0         255.255.255.0   U     0      0        0 eth0

~ ip route
50.116.27.194 via 192.168.1.1 dev eth0  src 192.168.1.200
192.168.1.0/24 dev eth0  proto kernel  scope link  src 192.168.1.200
重置路由
~ sudo ip route add default via 192.168.1.1

~ route -n
Kernel IP routing table
Destination     Gateway         Genmask         Flags Metric Ref    Use Iface
0.0.0.0         192.168.1.1     0.0.0.0         UG    0      0        0 eth0
50.116.27.194   192.168.1.1     255.255.255.255 UGH   0      0        0 eth0
192.168.1.0     0.0.0.0         255.255.255.0   U     0      0        0 eth0

~ ip route
default via 192.168.1.1 dev eth0
50.116.27.194 via 192.168.1.1 dev eth0  src 192.168.1.200
192.168.1.0/24 dev eth0  proto kernel  scope link  src 192.168.1.200

#再次ping网站,访问成功!
~ ping www.163.com
PING 163.xdwscache.glb0.lxdns.com (101.23.128.17) 56(84) bytes of data.
64 bytes from 101.23.128.17: icmp_req=1 ttl=54 time=25.6 ms
64 bytes from 101.23.128.17: icmp_req=2 ttl=54 time=25.5 ms
64 bytes from 101.23.128.17: icmp_req=3 ttl=54 time=27.8 ms
通过ip-up, ip-down配置路由
~ sudo vi /etc/ppp/ip-up.d/route-traffic

#!/bin/bash
/sbin/ip route add 50.116.27.194 via 192.168.1.1
/sbin/ip route del default
/sbin/ip route add default dev ppp0

~ sudo vi /etc/ppp/ip-down.d/disableroute

#!/bin/bash
/sbin/ip route add default via 192.168.1.1
重启VPN连接
~ sudo pon myvpn
#路由跟踪正确
~ traceroute www.163.com
traceroute to www.163.com (123.125.34.30), 30 hops max, 60 byte packets
 1  localhost (10.10.10.1)  293.397 ms  293.782 ms  293.668 ms
 2  router2-dal.linode.com (67.18.7.162)  293.530 ms  293.721 ms  294.223 ms
 3  xe-2-0-0.car04.dllstx2.networklayer.com (67.18.7.93)  293.454 ms  293.358 ms  293.239 ms
 4  po102.dsr02.dllstx2.networklayer.com (70.87.254.85)  293.749 ms  293.650 ms  293.544 ms
 5  po22.dsr02.dllstx3.networklayer.com (70.87.255.69)  293.444 ms  293.339 ms  293.242 ms
 6  ae17.bbr02.eq01.dal03.networklayer.com (173.192.18.230)  293.117 ms  293.525 ms  300.406 ms
 7  dls-bb1-link.telia.net (80.239.195.177)  300.850 ms  300.667 ms  300.320 ms

#正常退出
~ sudo poff myvpn
#测试网络连接正常
~ ping www.163.com
PING 163.xdwscache.glb0.lxdns.com (101.23.128.17) 56(84) bytes of data.
64 bytes from 101.23.128.17: icmp_req=1 ttl=54 time=28.2 ms
64 bytes from 101.23.128.17: icmp_req=2 ttl=54 time=28.1 ms
4. 看看外面的世界youtube

技术性文章,帮助大家更好的了解互联网。
转载请注明出处:
http://blog.fens.me/vpn-pptp-client-ubuntu/