• Posts tagged "VPN"

Blog Archives

在Ubuntu上安装IPSEC VPN服务

操作系统实用工具系列文章,将介绍基于Linux ubuntu的各种工具软件的配置和使用。有些工具大家早已耳熟能详,有些工具经常用到但确依然陌生。我将记录我在使用操作系统时,安装及配置工具上面的一些方法,把使用心得记录下来也便于自己的以后查找和回忆。

关于作者:

  • 张丹(Conan), 程序员R,Nodejs,Java
  • weibo:@Conan_Z
  • blog: http://blog.fens.me
  • email: bsspirit@gmail.com

转载请注明出处:
http://blog.fens.me/ubuntu-vpn-ipsec

前言

随着iphone的IOS版本升级到了10以后,PPTP协议的VPN不再支持了。为了能够继续使用Google的服务,提升对信息的准确查询,那么只能基于新的标准,再重新搭建一套的环境。用PPTP搭建VPN请参考文章:在Ubuntu上安装PPTP VPN服务

本文只是在纯技术层面进行介绍,如何使用IPSEC协议来搭建VPN服务。

目录

  1. IPSEC协议
  2. 服务器端程序搭建
  3. 客户端测试
  4. 剖析脚本

1. IPSEC协议

IPSec(Internet Protocol Security)是一种开放标准的框架结构,通过使用加密的安全服务以确保在 Internet 协议 (IP) 网络上进行保密而安全的通讯。它通过端对端的安全性来提供主动的保护以防止专用网络与 Internet 的攻击。在通信中,只有发送方和接收方才是唯一必须了解 IPSec 保护的计算机。

IPSEC包封装过程

我们有一个生活中简单的例子,来说明一下IPSEC包封装过程。

假设2个小朋友A和B要邮寄包裹,A要寄东西给B,A的爸爸和B的爸爸正巧在一家公司工作,所以A就把给B的包裹,交给了A的爸爸,再由A的爸爸转交给B的爸爸,B的爸爸最后把包裹给B的手中。回寄也一样,通过B的父亲发回给A的父亲再回给A。
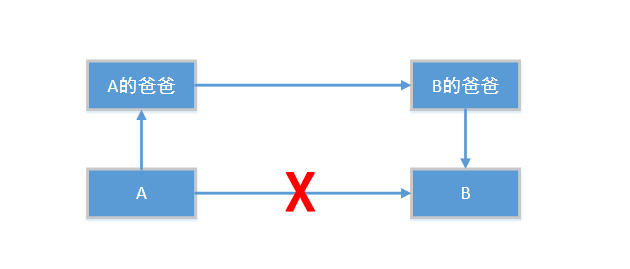
这种通讯实现方式要依赖以下几个因素:

  • A的爸爸和B的爸爸可以见到。
  • A发包裹,把包裹交给A的爸爸。
  • A的爸爸收到儿子的包裹后,能够正确的处理,并且重新包装过的包裹能够正确送出去。
  • 另外一端,B的爸爸收到包裹开以后,能够正确地交给B。
  • 反过来的流程一样。

2. 服务器端程序搭建

本来安装和配置IPSEC服务,不是一件容易,但无意中发现了 IPsec VPN 服务器一键安装脚本 项目,让这一切都变得非常简单。感谢项目作者 Lin Song

我的服务器环境是Ubuntu 16.04 LTS,主机在香港。

一键安装,只需要3个步骤。

  1. 从网上下载一个shell脚步。
  2. 修改登录的用户名、密码、秘钥。
  3. 运行脚本

1. 从网上下载一个shell脚步。


~ wget https://git.io/vpnsetup -O vpnsetup.sh

2. 修改登录的用户名、密码、秘钥。


~ vi vpnsetup.sh

# Define your own values for these variables
# - IPsec pre-shared key, VPN username and password
# - All values MUST be placed inside 'single quotes'
# - DO NOT use these characters within values:  \ " '
    
YOUR_IPSEC_PSK='abc'       # 设置密钥
YOUR_USERNAME='conan'      # 设置用户名
YOUR_PASSWORD='12345678'   # 设置密码

# 省略...

3. 运行脚本


~ sudo sh vpnsetup.sh

3. 客户端测试

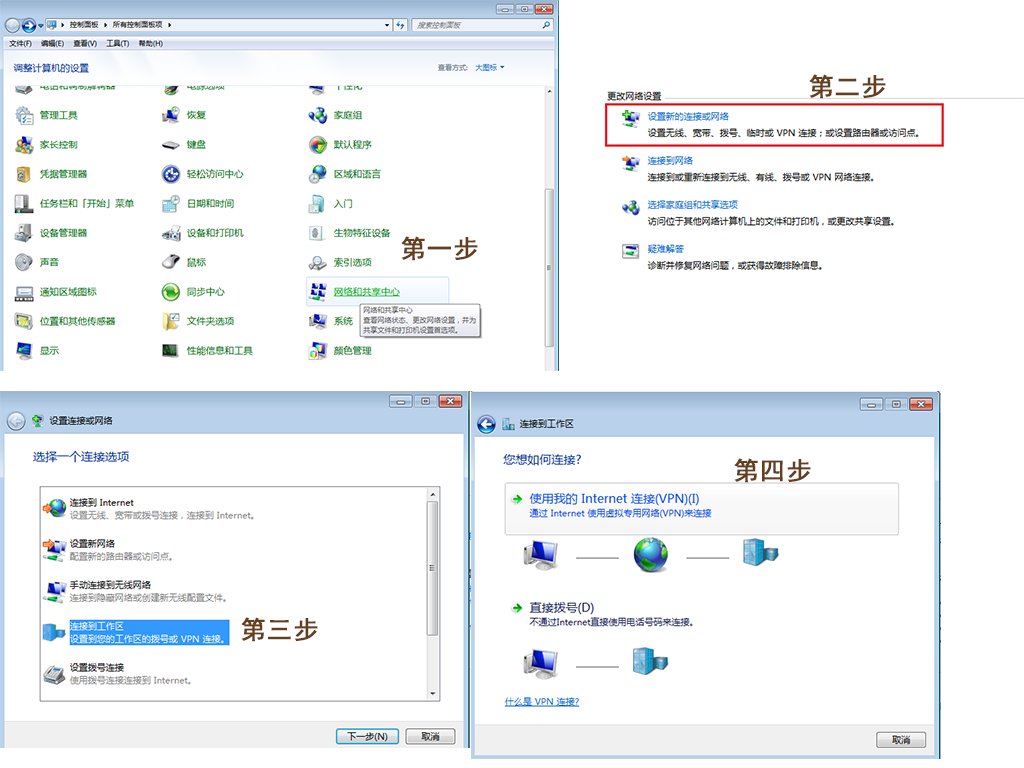
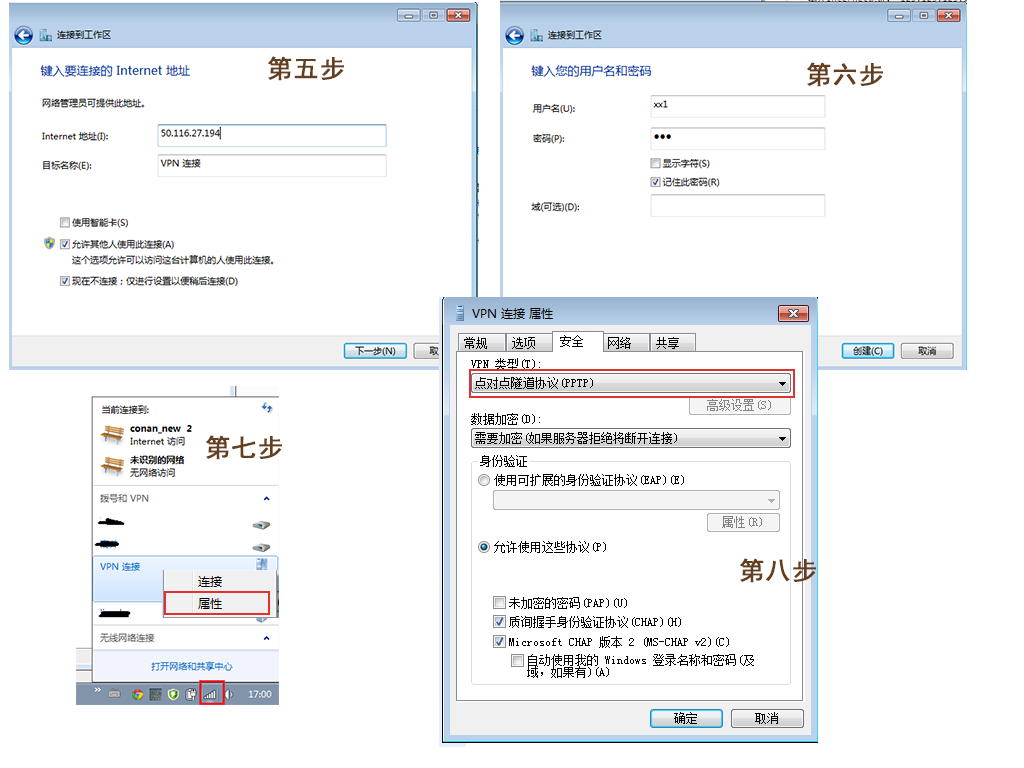
我的iphone-7手机,OS的版本为10.3.3,打开VPN的设置界面。设置–>通用–>VPN–>添加VPN配置。

具体配置

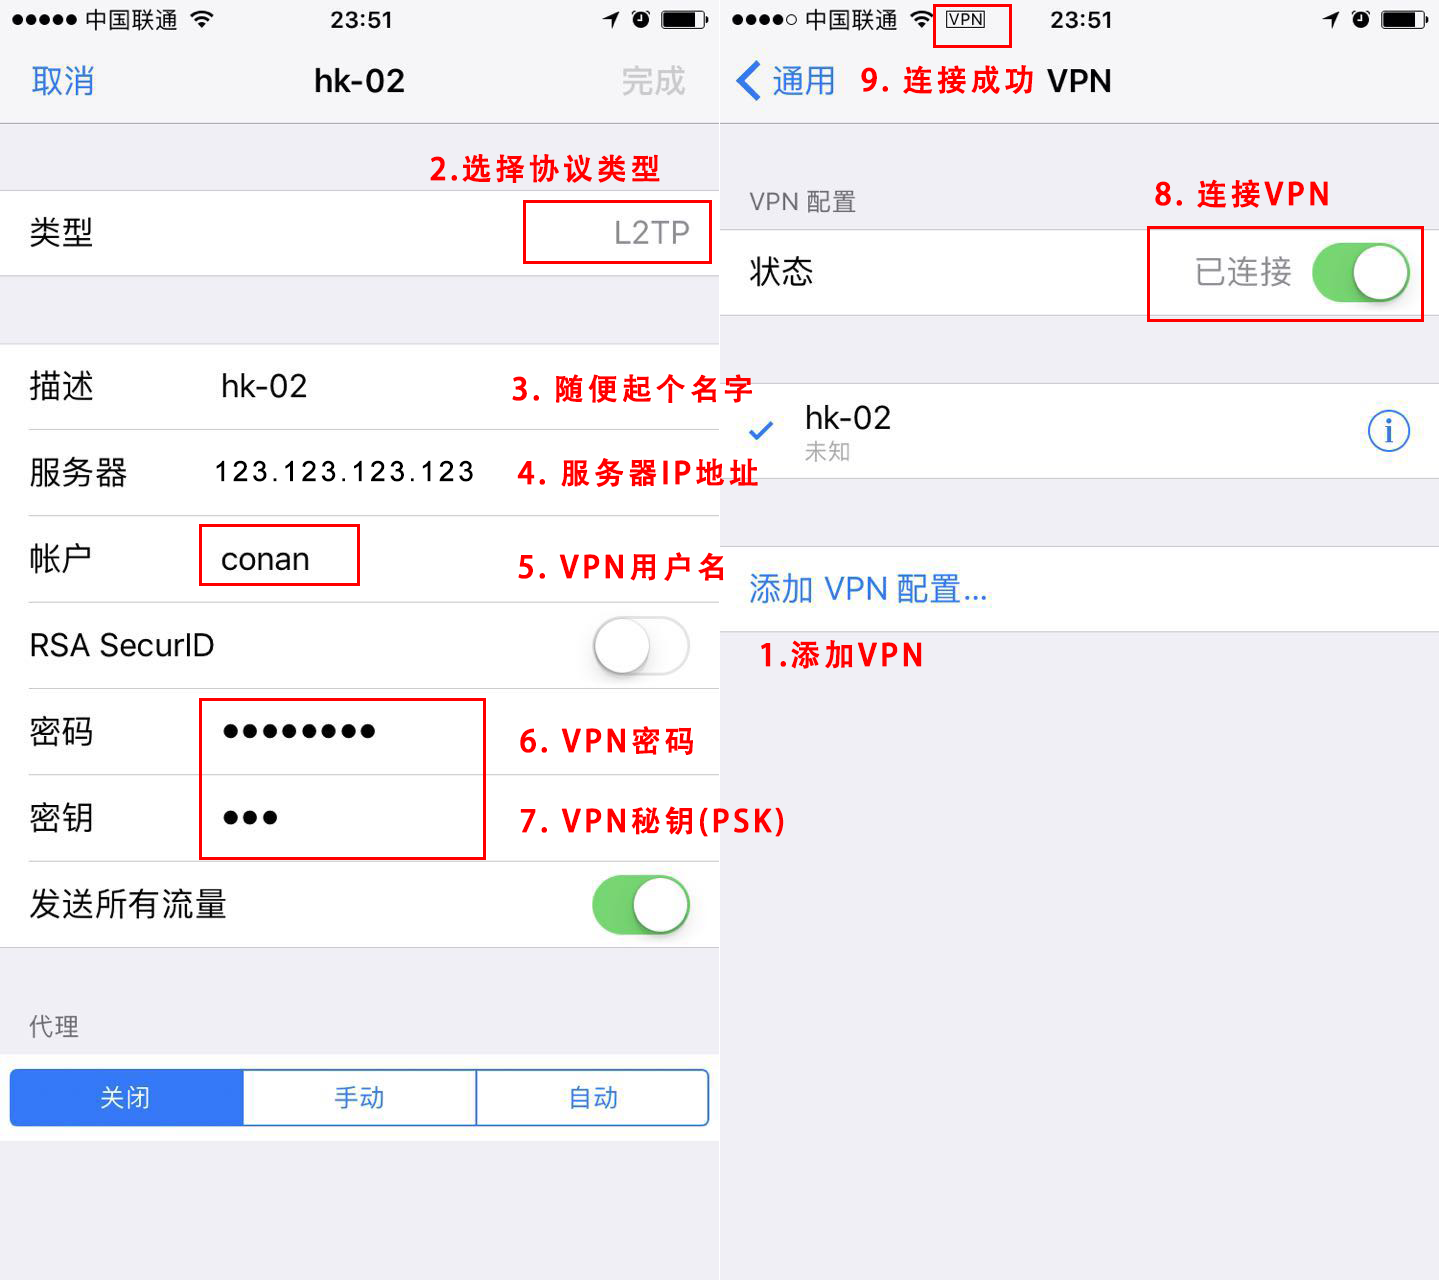
测试VPN是否正常工作,打开浏览器,访问www.google.com网页。

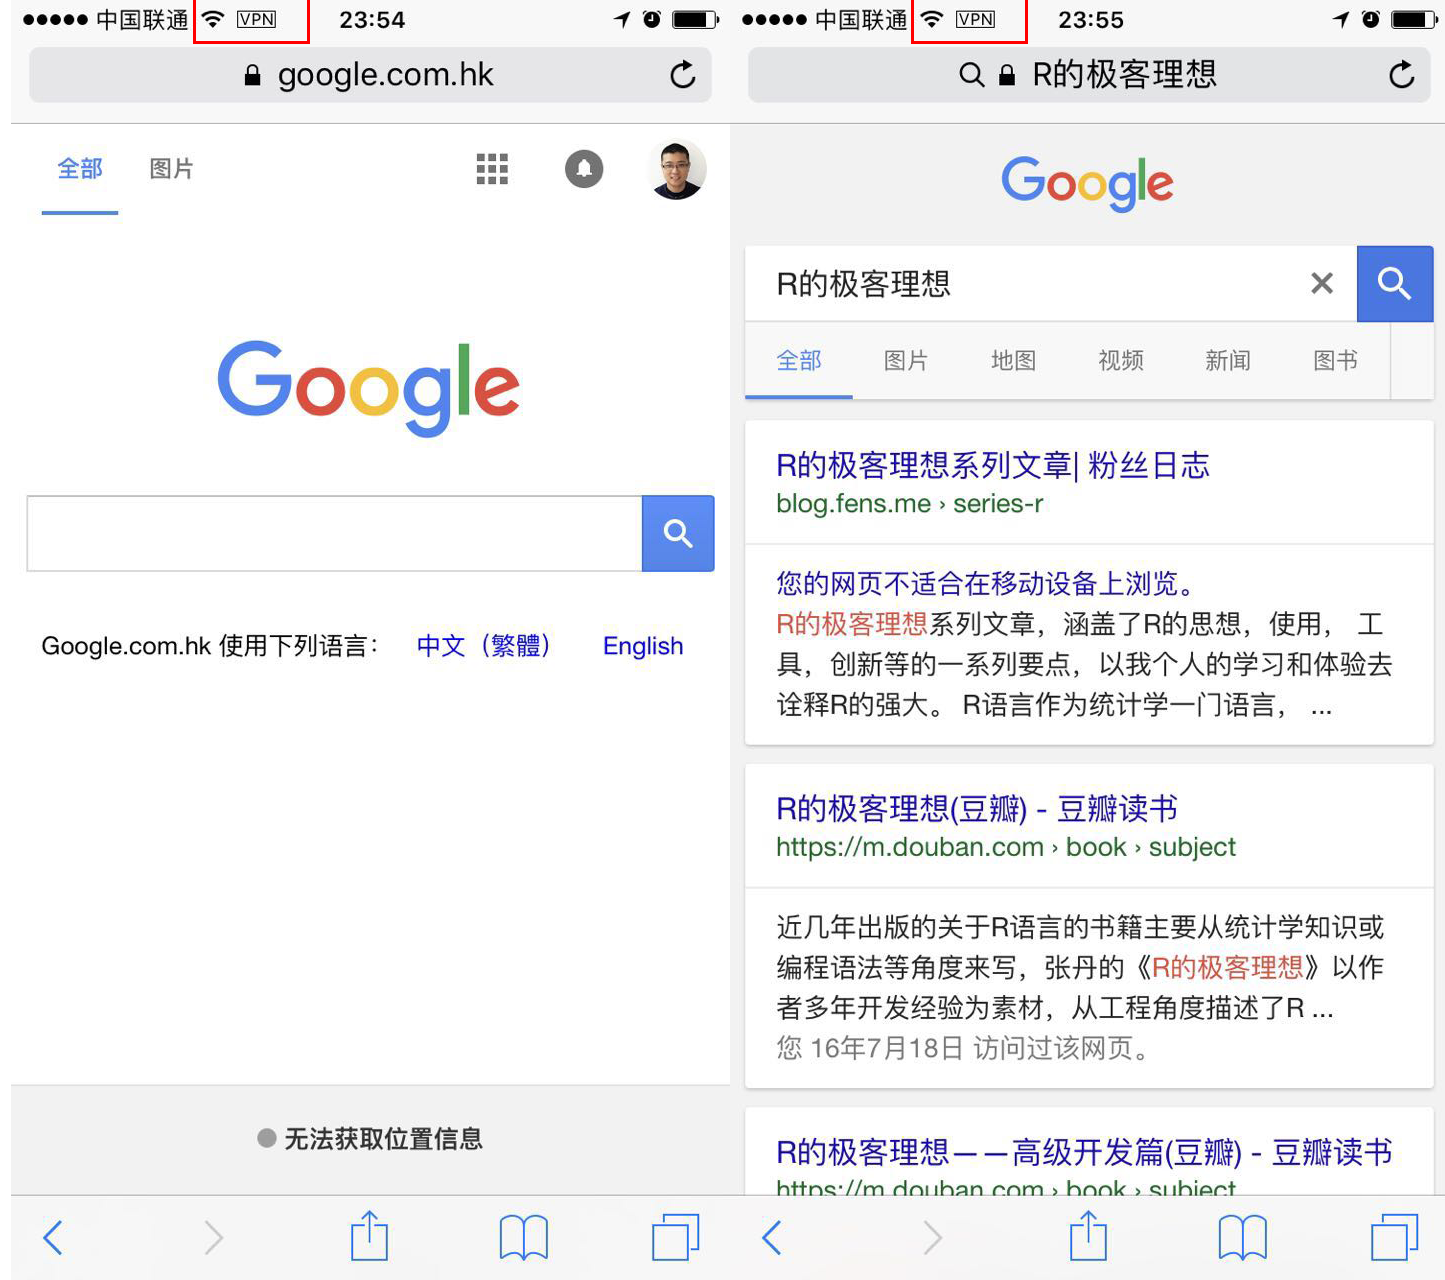
如果你也看到google,那么恭喜你就配置成功了!!

4. 剖析脚本

通过上面的操作,我们已经完成了VPN服务器的搭建,那么为什么还要有剖析脚本这个部分呢。我本来也自己尝试着参考网上的一些文章,以及一些开源VPN服务器的说明去配置,但花了几天的时间,一直都没有完全调通。这里其实有不少的网络知识点,是需要我们理解和掌握的。

正好可以查看 vpnsetup.sh 文件,一步一步的分析。

4.1 安装依赖包。


// 更新源
~ apt-get update

// 基础工具包
~ apt-get -yq install wget dnsutils openssl 
~ apt-get -yq install iproute gawk grep sed net-tools

// VPN相关的包
~ apt-get -yq install libnss3-dev libnspr4-dev pkg-config libpam0g-dev \
  libcap-ng-dev libcap-ng-utils libselinux1-dev \
  libcurl4-nss-dev flex bison gcc make \
  libunbound-dev libnss3-tools libevent-dev 
~ apt-get -yq --no-install-recommends install xmlto 
~ apt-get -yq install ppp xl2tpd 

// SSH相关的包
~ apt-get -yq install fail2ban
~ apt-get -yq install libsystemd-dev 

4.2 下载及安装libreswan包


~ wget https://download.libreswan.org/libreswan-3.21.tar.gz
~ tar xzf libreswan-3.21.tar.gz && cd libreswan-3.21
~ make -s programs && make -s install

4.3 修改配置文件

  • /etc/ipsec.conf
  • /etc/ipsec.secrets
  • /etc/xl2tpd/xl2tpd.conf
  • /etc/ppp/options.xl2tpd
  • /etc/ppp/chap-secrets
  • /etc/ipsec.d/passwd
  • /etc/sysctl.conf
  • /etc/iptables.rules

4.3.1 查看/etc/ipsec.conf


~ vi /etc/ipsec.conf

version 2.0

config setup
  virtual_private=%v4:10.0.0.0/8,%v4:192.168.0.0/16,%v4:172.16.0.0/12,%v4:!192.168.42.0/24,%v4:!192.168.43.0/24
  protostack=netkey
  nhelpers=0
  interfaces=%defaultroute
  uniqueids=no

conn shared
  left=%defaultroute
  leftid=123.123.123.123   # 当前服务器的IP
  right=%any
  encapsulation=yes
  authby=secret
  pfs=no
  rekey=no
  keyingtries=5
  dpddelay=30
  dpdtimeout=120
  dpdaction=clear
  ike=3des-sha1,3des-sha2,aes-sha1,aes-sha1;modp1024,aes-sha2,aes-sha2;modp1024,aes256-sha2_512
  phase2alg=3des-sha1,3des-sha2,aes-sha1,aes-sha2,aes256-sha2_512
  sha2-truncbug=yes

conn l2tp-psk
  auto=add
  leftprotoport=17/1701
  rightprotoport=17/%any
  type=transport
  phase2=esp
  also=shared

conn xauth-psk
  auto=add
  leftsubnet=0.0.0.0/0
  rightaddresspool=192.168.43.10-192.168.43.250
  modecfgdns1=8.8.8.8               # DNS 解析1
  modecfgdns2=8.8.4.4               # DNS 解析2
  leftxauthserver=yes
  rightxauthclient=yes
  leftmodecfgserver=yes
  rightmodecfgclient=yes
  modecfgpull=yes
  xauthby=file
  ike-frag=yes
  ikev2=never
  cisco-unity=yes
  also=shared
                   

4.3.2 查看/etc/ipsec.secrets


~ vi /etc/ipsec.secrets

%any  %any  : PSK "abc"                    # 设置ipsec的登录权限,秘钥为abc

4.3.3 查看/etc/xl2tpd/xl2tpd.conf


~ vi /etc/xl2tpd/xl2tpd.conf

[global]
port = 1701                                 # 连接端口

[lns default]
ip range = 192.168.42.10-192.168.42.250     # VPN内网IP段
local ip = 192.168.42.1                     # 主机的内网IP
require chap = yes                          # 要求chap身份认证模式
refuse pap = yes                            # 拒绝pap身份认证模式
require authentication = yes                # 要求认证登录
name = l2tpd                                # 服务名称为l2tpd
pppoptfile = /etc/ppp/options.xl2tpd        # ppp的配置文件
length bit = yes

4.3.4 查看/etc/ppp/options.xl2tpd


~ vi /etc/ppp/options.xl2tpd

ipcp-accept-local
ipcp-accept-remote
ms-dns 8.8.8.8                  # DNS 解析1
ms-dns 8.8.4.4                  # DNS 解析2
noccp
auth
mtu 1280
mru 1280
proxyarp                        # arp代理
lcp-echo-failure 4
lcp-echo-interval 30
connect-delay 5000

4.3.5 查看 /etc/ppp/chap-secrets


~ vi /etc/ppp/chap-secrets

# Secrets for authentication using CHAP
# client  server  secret  IP addresses
# 用户名  服务类型   密码   分配的ip地址
"conan" l2tpd "12345678" *                          # 设置客户端登录账户和密码,4个字段用空格分隔, *表示任意类型

4.3.6 查看 /etc/ipsec.d/passwd


~ vi  /etc/ipsec.d/passwd

conan:$1$rkrg5ssz$3lTGfeeazreqrR79pAoggh1:xauth-psk    # 使用秘钥加密后的密码

4.3.7 查看 /etc/sysctl.conf


~ vi /etc/sysctl.conf

kernel.msgmnb = 65536
kernel.msgmax = 65536
kernel.shmmax = 68719476736
kernel.shmall = 4294967296

net.ipv4.ip_forward = 1
net.ipv4.tcp_syncookies = 1
net.ipv4.conf.all.accept_source_route = 0
net.ipv4.conf.default.accept_source_route = 0
net.ipv4.conf.all.accept_redirects = 0
net.ipv4.conf.default.accept_redirects = 0
net.ipv4.conf.all.send_redirects = 0
net.ipv4.conf.default.send_redirects = 0
net.ipv4.conf.lo.send_redirects = 0
net.ipv4.conf.eth0.send_redirects = 0
net.ipv4.conf.all.rp_filter = 0
net.ipv4.conf.default.rp_filter = 0
net.ipv4.conf.lo.rp_filter = 0
net.ipv4.conf.eth0.rp_filter = 0
net.ipv4.icmp_echo_ignore_broadcasts = 1
net.ipv4.icmp_ignore_bogus_error_responses = 1

net.core.wmem_max = 12582912
net.core.rmem_max = 12582912
net.ipv4.tcp_rmem = 10240 87380 12582912
net.ipv4.tcp_wmem = 10240 87380 12582912

4.3.8 查看/etc/iptables.rules


~ vi /etc/iptables.rules

# Modified by hwdsl2 VPN script
# Generated by iptables-save v1.6.0 on Mon Sep 18 22:36:46 2017
*nat
:PREROUTING ACCEPT [0:0]
:INPUT ACCEPT [0:0]
:OUTPUT ACCEPT [0:0]
:POSTROUTING ACCEPT [0:0]
-A POSTROUTING -s 192.168.42.0/24 -o eth0 -j MASQUERADE
-A POSTROUTING -s 192.168.43.0/24 -o eth0 -m policy --dir out --pol none -j MASQUERADE
COMMIT
# Completed on Mon Sep 18 22:36:46 2017
# Generated by iptables-save v1.6.0 on Mon Sep 18 22:36:46 2017
*filter
:INPUT ACCEPT [0:0]
:FORWARD ACCEPT [0:0]
:OUTPUT ACCEPT [0:0]
-A INPUT -p udp -m udp --dport 1701 -m policy --dir in --pol none -j DROP
-A INPUT -m conntrack --ctstate INVALID -j DROP
-A INPUT -m conntrack --ctstate RELATED,ESTABLISHED -j ACCEPT
-A INPUT -p udp -m multiport --dports 500,4500 -j ACCEPT
-A INPUT -p udp -m udp --dport 1701 -m policy --dir in --pol ipsec -j ACCEPT
-A INPUT -p udp -m udp --dport 1701 -j DROP
-A FORWARD -m conntrack --ctstate INVALID -j DROP
-A FORWARD -i eth0 -o ppp+ -m conntrack --ctstate RELATED,ESTABLISHED -j ACCEPT
-A FORWARD -i ppp+ -o eth0 -j ACCEPT
-A FORWARD -s 192.168.42.0/24 -d 192.168.42.0/24 -i ppp+ -o ppp+ -j ACCEPT
-A FORWARD -d 192.168.43.0/24 -i eth0 -m conntrack --ctstate RELATED,ESTABLISHED -j ACCEPT
-A FORWARD -s 192.168.43.0/24 -o eth0 -j ACCEPT
-A FORWARD -s 10.1.20.0/24 -j ACCEPT
-A FORWARD -j DROP
COMMIT
# Completed on Mon Sep 18 22:36:46 2017

4.4 查看连接日志

接下来,我们用手机连接VPN,然后查看日志输出 。

连接日志


~ tail -f /var/log/syslog

Sep 19 13:54:28 i-vtnhoxsp xl2tpd[20115]: Connection established to 36.102.226.172, 65287.  Local: 21666, Remote: 20 (ref=0/0).  LNS session is 'default'
Sep 19 13:54:28 i-vtnhoxsp xl2tpd[20115]: start_pppd: I'm running:
Sep 19 13:54:28 i-vtnhoxsp xl2tpd[20115]: "/usr/sbin/pppd"
Sep 19 13:54:28 i-vtnhoxsp xl2tpd[20115]: "passive"
Sep 19 13:54:28 i-vtnhoxsp xl2tpd[20115]: "nodetach"
Sep 19 13:54:28 i-vtnhoxsp xl2tpd[20115]: "192.168.42.1:192.168.42.10"
Sep 19 13:54:28 i-vtnhoxsp xl2tpd[20115]: "refuse-pap"
Sep 19 13:54:28 i-vtnhoxsp xl2tpd[20115]: "auth"
Sep 19 13:54:28 i-vtnhoxsp xl2tpd[20115]: "require-chap"
Sep 19 13:54:28 i-vtnhoxsp xl2tpd[20115]: "name"
Sep 19 13:54:28 i-vtnhoxsp xl2tpd[20115]: "l2tpd"
Sep 19 13:54:28 i-vtnhoxsp xl2tpd[20115]: "file"
Sep 19 13:54:28 i-vtnhoxsp xl2tpd[20115]: "/etc/ppp/options.xl2tpd"
Sep 19 13:54:28 i-vtnhoxsp xl2tpd[20115]: "plugin"
Sep 19 13:54:28 i-vtnhoxsp xl2tpd[20115]: "pppol2tp.so"
Sep 19 13:54:28 i-vtnhoxsp xl2tpd[20115]: "pppol2tp"
Sep 19 13:54:28 i-vtnhoxsp xl2tpd[20115]: "8"
Sep 19 13:54:28 i-vtnhoxsp xl2tpd[20115]: "pppol2tp_lns_mode"
Sep 19 13:54:28 i-vtnhoxsp xl2tpd[20115]: "pppol2tp_tunnel_id"
Sep 19 13:54:28 i-vtnhoxsp xl2tpd[20115]: "21666"
Sep 19 13:54:28 i-vtnhoxsp xl2tpd[20115]: "pppol2tp_session_id"
Sep 19 13:54:28 i-vtnhoxsp xl2tpd[20115]: "21136"
Sep 19 13:54:28 i-vtnhoxsp xl2tpd[20115]: Call established with 36.102.226.172, Local: 21136, Remote: 10537, Serial: 1
Sep 19 13:54:28 i-vtnhoxsp pppd[23553]: Plugin pppol2tp.so loaded.
Sep 19 13:54:28 i-vtnhoxsp pppd[23553]: pppd 2.4.7 started by root, uid 0
Sep 19 13:54:28 i-vtnhoxsp pppd[23553]: Using interface ppp0
Sep 19 13:54:28 i-vtnhoxsp pppd[23553]: Connect: ppp0 <-->
Sep 19 13:54:28 i-vtnhoxsp pppd[23553]: Overriding mtu 1500 to 1280
Sep 19 13:54:28 i-vtnhoxsp pppd[23553]: Overriding mru 1500 to mtu value 1280
Sep 19 13:54:28 i-vtnhoxsp pppd[23553]: Overriding mtu 1500 to 1280
Sep 19 13:54:32 i-vtnhoxsp charon: 05[KNL] 192.168.42.1 appeared on ppp0
Sep 19 13:54:32 i-vtnhoxsp charon: 03[KNL] 192.168.42.1 disappeared from ppp0
Sep 19 13:54:32 i-vtnhoxsp charon: 07[KNL] 192.168.42.1 appeared on ppp0
Sep 19 13:54:32 i-vtnhoxsp pppd[23553]: Cannot determine ethernet address for proxy ARP
Sep 19 13:54:32 i-vtnhoxsp pppd[23553]: local  IP address 192.168.42.1
Sep 19 13:54:32 i-vtnhoxsp pppd[23553]: remote IP address 192.168.42.10
Sep 19 13:54:32 i-vtnhoxsp charon: 10[KNL] interface ppp0 activated

断开手机的VPN连接,查看日志。


~ tail -f /var/log/syslog

Sep 19 13:55:53 i-vtnhoxsp xl2tpd[20115]: result_code_avp: result code endianness fix for buggy Apple client. network=768, le=3
Sep 19 13:55:53 i-vtnhoxsp xl2tpd[20115]: control_finish: Connection closed to 36.102.226.172, serial 1 ()
Sep 19 13:55:53 i-vtnhoxsp pppd[23553]: LCP terminated by peer (User request)
Sep 19 13:55:53 i-vtnhoxsp xl2tpd[20115]: Terminating pppd: sending TERM signal to pid 23553
Sep 19 13:55:53 i-vtnhoxsp pppd[23553]: Connect time 1.4 minutes.
Sep 19 13:55:53 i-vtnhoxsp pppd[23553]: Sent 93199 bytes, received 34500 bytes.
Sep 19 13:55:53 i-vtnhoxsp charon: 06[KNL] interface ppp0 deactivated
Sep 19 13:55:53 i-vtnhoxsp xl2tpd[20115]: result_code_avp: result code endianness fix for buggy Apple client. network=256, le=1
Sep 19 13:55:53 i-vtnhoxsp xl2tpd[20115]: control_finish: Connection closed to 36.102.226.172, port 65287 (), Local: 21666, Remote: 20
Sep 19 13:55:53 i-vtnhoxsp charon: 03[KNL] 192.168.42.1 disappeared from ppp0
Sep 19 13:55:53 i-vtnhoxsp pppd[23553]: Overriding mtu 1500 to 1280
Sep 19 13:55:53 i-vtnhoxsp pppd[23553]: Overriding mru 1500 to mtu value 1280
Sep 19 13:55:53 i-vtnhoxsp pppd[23553]: Terminating on signal 15
Sep 19 13:55:56 i-vtnhoxsp pppd[23553]: Connection terminated.
Sep 19 13:55:56 i-vtnhoxsp charon: 11[KNL] interface ppp0 deleted
Sep 19 13:55:56 i-vtnhoxsp pppd[23553]: Modem hangup
Sep 19 13:55:56 i-vtnhoxsp pppd[23553]: Exit.

对于脚本的分析,虽然没有给出结论,而且很多配置我还是不太理解。不过要坚持学习,不断的提升自己的能力,不然永远都要等着大牛们提供一键安装的脚本。

转载请注明出处:
http://blog.fens.me/ubuntu-vpn-ipsec

打赏作者

用阿里云配置VPN

操作系统实用工具系列文章,将介绍基于Linux ubuntu的各种工具软件的配置和使用。有些工具大家早已耳熟能详,有些工具经常用到但确依然陌生。我将记录我在使用操作系统时,安装及配置工具上面的一些方法,把使用心得记录下来也便于自己的以后查找和回忆。

关于作者

  • 张丹(Conan), 程序员Java,R,PHP,Javascript
  • weibo:@Conan_Z
  • blog: http://blog.fens.me
  • email: bsspirit@gmail.com

转载请注明出处:
http://blog.fens.me/vpn-aliyun/

aliyun-vpn

前言

每次配置虚拟机的网络环境,都要花不少的时间,这次在阿里云上捣鼓VPN又出了岔子,VPN映射的网段和阿里云的虚拟机内网网段重叠了,而且阿里云自动做了路由,导致VPN路由失效。

本文将总结一下阿里云配置VPN的问题,估计自己以后也会经常回来翻看的。

目录

  1. 网络架构
  2. 遇到的问题
  3. 如何解决问题

1. 网络架构

要开发一个互联网应用,通常我们都需要购买服务器,部署自己应用然后托管到机房。对于刚起步的小公司来说,买服务器到托管到机房成本有点高,而且可能资源用不完,这时我们就有了一个更便宜的选择就是先租虚拟主机,阿里云就提供了这种服务。当然,和国外的主机服务商比阿里云还是很贵的,而且服务还有一些差距,但和国外的其他服务商比,也只能选阿里云了。

通常在阿里云租的虚拟主机,都会包括一个外网IP(121.x.x.x)和一个内网IP(10.x.x.x),外网IP主要面向互联网的访问,内网IP可以让内网的多台计算机通过内网进行通信。

接下来,我们会对应用进行分层,有用于数据存储的服务器(大硬盘),有用于计算的服务器(CPU密集型),有用于用户访问服务器(IO密集型)。另外,对于私密性比较高的数据或应用,我们通常用到VPN进行加密访问,从而保证传输过程的安全。

aliyun

我们一旦建立VPN连接,所有外网网络访问都将走VPN的加密通道,VPN通常只是小型私密网络,所以互联网的访问连接将会被切断。那么当互联网的访问被切掉到了,我们用Putty远程连接VPN的主机,也会访问不到了,这时就需要通过内网其他主机进行代理连接。比如,当Aliyun1打开VPN后,我们就不能直接通过Putty连接了,需要先用Putty登陆Aliyun2,再通过Aliyun2走内网登陆到Aliyun1。

对于虚拟主机来说,即使只租用一台服务器也可以实现VPN的连接。当服务器进行了VPN连接,你可以从宿主机管理控制台,对连接VPN的计算机进行操作。阿里云也提供了这个功能,可以通过网页直接登陆。

aliyun-2

2. 遇到的问题

上面我们介绍的,都是标准的VPN访问流程。那么,我其实遇到了一个问题,就是阿里云的内网IP网段是10.x.x.x,连接VPN生成的私密网络的网段也是10.x.x.x,这时就造成了IP网段冲突。每个网卡都需要配置IP地址,网关,子网掩码,DNS服务器等,如果内网和外网的网段或IP发生冲突,而且两边的网络服务都不能进行修改,那么就直接无解了。幸运的是,只是A类的地址冲突了,而且B类,C类,D类的地址没有冲突。那么,可以通过把网断进行不同的映射,配置网关和路由。

其实,发现上面的问题,也是花了一些时间的。

我们先看阿里云主机的默认网络配置。


~ ifconfig
eth0      Link encap:Ethernet  HWaddr 00:16:3e:00:36:37
          inet addr:10.169.0.162  Bcast:10.169.7.255  Mask:255.255.248.0
          UP BROADCAST RUNNING MULTICAST  MTU:1500  Metric:1
          RX packets:109 errors:0 dropped:0 overruns:0 frame:0
          TX packets:43 errors:0 dropped:0 overruns:0 carrier:0
          collisions:0 txqueuelen:1000
          RX bytes:9597 (9.5 KB)  TX bytes:6767 (6.7 KB)

eth1      Link encap:Ethernet  HWaddr 00:16:3e:00:3d:3b
          inet addr:121.41.77.206  Bcast:121.41.79.255  Mask:255.255.252.0
          UP BROADCAST RUNNING MULTICAST  MTU:1500  Metric:1
          RX packets:2294 errors:0 dropped:0 overruns:0 frame:0
          TX packets:151 errors:0 dropped:0 overruns:0 carrier:0
          collisions:0 txqueuelen:1000
          RX bytes:108919 (108.9 KB)  TX bytes:12624 (12.6 KB)

lo        Link encap:Local Loopback
          inet addr:127.0.0.1  Mask:255.0.0.0
          UP LOOPBACK RUNNING  MTU:65536  Metric:1
          RX packets:0 errors:0 dropped:0 overruns:0 frame:0
          TX packets:0 errors:0 dropped:0 overruns:0 carrier:0
          collisions:0 txqueuelen:0
          RX bytes:0 (0.0 B)  TX bytes:0 (0.0 B)

~ cat /etc/resolv.conf
options timeout:1 attempts:1 rotate
nameserver 10.202.72.118
nameserver 10.202.72.116

~ route
Kernel IP routing table
Destination     Gateway         Genmask         Flags Metric Ref    Use Iface
default         121.41.79.247   0.0.0.0         UG    0      0        0 eth1
10.0.0.0        10.169.7.247    255.0.0.0       UG    0      0        0 eth0
10.169.0.0      *               255.255.248.0   U     0      0        0 eth0
100.64.0.0      10.169.7.247    255.192.0.0     UG    0      0        0 eth0
121.41.76.0     *               255.255.252.0   U     0      0        0 eth1
172.16.0.0      10.169.7.247    255.240.0.0     UG    0      0        0 eth0

安装及配置VPNC


# 安装VPNC
~ apt-get install vpnc

# 配置文件
~ vi /etc/vpnc/default.conf

IPSec gateway xxx.com
IPSec ID xxx
IPSec obfuscated secret xxxxxxxxx
Xauth username xxx
Xauth password xxxxxx

启动VPN连接。


~ vpnc
Stopped Name Service Cache Daemon: nscd.
 * Starting Name Service Cache Daemon nscd                                             [ OK ]
VPNC started in background (pid: 1543)...

查看网站连接,会多出tun0的网卡,分配的IP地址为10.1.15.228。


~ ifconfig
eth0      Link encap:Ethernet  HWaddr 00:16:3e:00:36:37
          inet addr:10.169.0.162  Bcast:10.169.7.255  Mask:255.255.248.0
          UP BROADCAST RUNNING MULTICAST  MTU:1500  Metric:1
          RX packets:1727 errors:0 dropped:0 overruns:0 frame:0
          TX packets:551 errors:0 dropped:0 overruns:0 carrier:0
          collisions:0 txqueuelen:1000
          RX bytes:103050 (103.0 KB)  TX bytes:70120 (70.1 KB)

eth1      Link encap:Ethernet  HWaddr 00:16:3e:00:3d:3b
          inet addr:121.41.77.206  Bcast:121.41.79.255  Mask:255.255.252.0
          UP BROADCAST RUNNING MULTICAST  MTU:1500  Metric:1
          RX packets:128289 errors:0 dropped:0 overruns:0 frame:0
          TX packets:649 errors:0 dropped:0 overruns:0 carrier:0
          collisions:0 txqueuelen:1000
          RX bytes:5435081 (5.4 MB)  TX bytes:82302 (82.3 KB)

lo        Link encap:Local Loopback
          inet addr:127.0.0.1  Mask:255.0.0.0
          UP LOOPBACK RUNNING  MTU:65536  Metric:1
          RX packets:0 errors:0 dropped:0 overruns:0 frame:0
          TX packets:0 errors:0 dropped:0 overruns:0 carrier:0
          collisions:0 txqueuelen:0
          RX bytes:0 (0.0 B)  TX bytes:0 (0.0 B)

tun0      Link encap:UNSPEC  HWaddr 00-00-00-00-00-00-00-00-00-00-00-00-00-00-00-00
          inet addr:10.1.15.228  P-t-P:10.1.15.228  Mask:255.255.255.255
          UP POINTOPOINT RUNNING NOARP MULTICAST  MTU:1412  Metric:1
          RX packets:40 errors:0 dropped:0 overruns:0 frame:0
          TX packets:82 errors:0 dropped:0 overruns:0 carrier:0
          collisions:0 txqueuelen:500
          RX bytes:3328 (3.3 KB)  TX bytes:11016 (11.0 KB)

通过情况下,这样的配置已经生效了,VPN也连接正常,但VPN网络确无法访问。


~ ping testvpn
ping: unknown host testvpn

第一感觉是DNS出问题了,查看DNS还是原来的内容,没有发生变化。


~ cat /etc/resolv.conf
options timeout:1 attempts:1 rotate
nameserver 10.202.72.118
nameserver 10.202.72.116

通常VPN连接的时候,都会配置一个新的DNS,那么我们把这个DNS设置成自动更新的。


~ dpkg-reconfigure resolvconf

同时,修改tail文件,设置一个更快速的阿里云DNS服务器。


vi /etc/resolvconf/resolv.conf.d/tail

nameserver 223.5.5.5
nameserver 223.6.6.6

断开VPN再重连接VPN


~ vpnc-disconnect
Terminating vpnc daemon (pid: 1543)

~ vpnc
Stopped Name Service Cache Daemon: nscd.
 * Starting Name Service Cache Daemon nscd                                             [ OK ]
VPNC started in background (pid: 2111)...

再次查看DNS的配置,我们看到/etc/resolv.conf已经会自动更新了。


cat /etc/resolv.conf
# Dynamic resolv.conf(5) file for glibc resolver(3) generated by resolvconf(8)
#     DO NOT EDIT THIS FILE BY HAND -- YOUR CHANGES WILL BE OVERWRITTEN
nameserver 10.1.1.1
nameserver 10.1.1.2
search xxx.test.cn
nameserver 223.5.5.5
nameserver 223.6.6.6

但通过VPN网络还是无法访问。


~ ping testvpn
ping: unknown host testvpn

检查路由表


 route
Kernel IP routing table
Destination     Gateway         Genmask         Flags Metric Ref    Use Iface
default         *               0.0.0.0         U     0      0        0 tun0
10.0.0.0        10.169.7.247    255.0.0.0       UG    0      0        0 eth0
10.1.15.0       *               255.255.255.0   U     0      0        0 tun0
10.169.0.0      *               255.255.248.0   U     0      0        0 eth0
100.64.0.0      10.169.7.247    255.192.0.0     UG    0      0        0 eth0
121.41.76.0     *               255.255.252.0   U     0      0        0 eth1
172.16.0.0      10.169.7.247    255.240.0.0     UG    0      0        0 eth0
vpn.test.com    121.41.79.247     255.255.255.255 UGH   0      0        0 eth1

这个时候就发现了,由VPN生成的10.1.15.0被强制使用了阿里云的10.0.0.0 的路由10.169.7.247,检查网卡配置文件/etc/network/interfaces。


~  cat /etc/network/interfaces
auto lo
iface lo inet loopback

auto eth1
iface eth1 inet static
address 121.41.77.206
netmask 255.255.252.0
up route add -net 0.0.0.0 netmask 0.0.0.0 gw 121.41.79.247 dev eth1

auto eth0
iface eth0 inet static
address 10.169.0.162
netmask 255.255.248.0

up route add -net 172.16.0.0 netmask 255.240.0.0 gw 10.169.7.247 dev eth0
up route add -net 100.64.0.0 netmask 255.192.0.0 gw 10.169.7.247 dev eth0
up route add -net 10.0.0.0 netmask 255.0.0.0 gw 10.169.7.247 dev eth0

最后一行发现了问题。

up route add -net 10.0.0.0 netmask 255.0.0.0 gw 10.169.7.247 dev eth0

这个网段的10.0.0.0所有IP统一会使用10.169.7.247的网关,怪不得VPN始终不通,原来是阿里云服务器默认的配置造成的问题。

3. 如何解决问题

只要定位到了问题,解决就不难。

我们看到由于阿里云的内网是10.x.x.x的,我们的几台服务器也分别是10.168.x.x, 10.169.x.x, 10.200.x.x, 10.251.x.x,我估计它是从10.1.x.x到10.255.x.x都配置了网络,所以直接对A类网段进行了配置。通过VPN生成的IP为10.1.15.228,从B类网段开始刚好与阿里云租的机器不重合,那么我们重新定义阿里云的网段配置就行了,对B类网段做映射。

修改文件 /etc/network/interfaces。


~ vi /etc/network/interfaces
auto lo
iface lo inet loopback

auto eth1
iface eth1 inet static
address 121.41.77.206
netmask 255.255.252.0
up route add -net 0.0.0.0 netmask 0.0.0.0 gw 121.41.79.247 dev eth1

auto eth0
iface eth0 inet static
address 10.169.0.162
netmask 255.255.248.0

up route add -net 172.16.0.0 netmask 255.240.0.0 gw 10.169.7.247 dev eth0
up route add -net 100.64.0.0 netmask 255.192.0.0 gw 10.169.7.247 dev eth0
#up route add -net 10.0.0.0 netmask 255.0.0.0 gw 10.169.7.247 dev eth0

up route add -net 10.200.0.0 netmask 255.255.0.0 gw 10.169.7.247 dev eth0
up route add -net 10.168.0.0 netmask 255.255.0.0 gw 10.169.7.247 dev eth0
up route add -net 10.169.0.0 netmask 255.255.0.0 gw 10.169.7.247 dev eth0
up route add -net 10.251.0.0 netmask 255.255.0.0 gw 10.169.7.247 dev eth0

重启网卡


~ /etc/init.d/networking restart

竟然是无效的命令,只能重启计算机了。


~ reboot

重启后,查看路由表。


~ route
Kernel IP routing table
Destination     Gateway         Genmask         Flags Metric Ref    Use Iface
default         121.41.79.247   0.0.0.0         UG    0      0        0 eth1
10.168.0.0      10.169.7.247    255.255.0.0     UG    0      0        0 eth0
10.169.0.0      *               255.255.248.0   U     0      0        0 eth0
10.169.0.0      10.169.7.247    255.255.0.0     UG    0      0        0 eth0
10.200.0.0      10.169.7.247    255.255.0.0     UG    0      0        0 eth0
10.251.0.0      10.169.7.247    255.255.0.0     UG    0      0        0 eth0
100.64.0.0      10.169.7.247    255.192.0.0     UG    0      0        0 eth0
121.41.76.0     *               255.255.252.0   U     0      0        0 eth1
172.16.0.0      10.169.7.247    255.240.0.0     UG    0      0        0 eth0

对B类网段的配置已经生效,已经去除了对A类10网段的配置。

连接VPN。


~ vpnc
Stopped Name Service Cache Daemon: nscd.
 * Starting Name Service Cache Daemon nscd                                             [ OK ]
VPNC started in background (pid: 1368)...

查看路由表


~ route
Kernel IP routing table
Destination     Gateway         Genmask         Flags Metric Ref    Use Iface
default         *               0.0.0.0         U     0      0        0 tun0
10.1.15.0       *               255.255.255.0   U     0      0        0 tun0
10.168.0.0      10.169.7.247    255.255.0.0     UG    0      0        0 eth0
10.169.0.0      *               255.255.248.0   U     0      0        0 eth0
10.169.0.0      10.169.7.247    255.255.0.0     UG    0      0        0 eth0
10.200.0.0      10.169.7.247    255.255.0.0     UG    0      0        0 eth0
10.251.0.0      10.169.7.247    255.255.0.0     UG    0      0        0 eth0
100.64.0.0      10.169.7.247    255.192.0.0     UG    0      0        0 eth0
121.41.76.0     *               255.255.252.0   U     0      0        0 eth1
172.16.0.0      10.169.7.247    255.240.0.0     UG    0      0        0 eth0
vpn.test.com    121.41.79.247   255.255.255.255 UGH   0      0        0 eth1

10.1.15.0由VPN生成的IP,没有被强制路由。

连接VPN内网计算机


~ ping testvpn
PING testvpn.xxx.com.cn (10.1.1.13) 56(84) bytes of data.
64 bytes from testvpn.xxx.com.cn (10.1.1.13): icmp_seq=1 ttl=127 time=39.5 ms
64 bytes from testvpn.xxx.com.cn (10.1.1.13): icmp_seq=2 ttl=127 time=40.4 ms

终于访问正常了,这样就完成了,通过阿里云连接VPN服务的网络配置。

本文主要记录了网络调试的一系列操作,阿里云在方便易用的同时,也会有一些额外的问题,需要大家有更多的Linux使用经验,从而有能力解决各种的VM技术问题。

转载请注明出处:
http://blog.fens.me/vpn-aliyun/

打赏作者

Ubuntu通过PPTP协议使用VPN

操作系统实用工具系列文章,将介绍基于Linux ubuntu的各种工具软件的配置和使用。有些工具大家早已耳熟能详,有些工具经常用到但确依然陌生。我将记录我在使用操作系统时,安装及配置工具上面的一些方法,把使用心得记录下来也便于自己的以后查找和回忆。

关于作者

  • 张丹(Conan), 程序员Java,R,PHP,Javascript
  • weibo:@Conan_Z
  • blog: http://blog.fens.me
  • email: bsspirit@gmail.com

转载请注明出处:
http://blog.fens.me/vpn-pptp-client-ubuntu/

vpn-pptp-client

前言

GFW给大家的生活事带来了各种不便,只有靠我们自己才能改变这种不便。像facebook, twitter, youtube, google+, bitbucket, slideside…. 这些世界知名的网站,我们都没有办法直接访问,有时候你很难联想到为什么要屏蔽这些网站。特别是纯技术社区!

不过我们也有很多的技术,可以穿越这条封锁线。今天我们聊一下,ubuntu通过PPTP协议使用VPN(Virtual Private Network),如何看到外面的世界。

关于PPTP的服务器端配置:请参考 在Ubuntu上安装PPTP VPN服务 文章
win7通过PPTP协议使用VPN:请参考 win7通过PPTP协议使用VPN 文章

目录

  1. 获得VPN账号
  2. ubuntu客户端界面配置
  3. ubuntu命令行配置
  4. 看看外面的世界youtube

1. 获得VPN账号

当你有了基于PPTP协议的VPN账号后,怎么在ubuntu中配置!
VPN账号包括3个部分:IP,用户名,密码

比如:(只为演示说明,此账号不可用)
ip: 123.123.123.123
用户名:xx1
密码: xx2

2. ubuntu客户端界面配置

vpn-ubuntu

1. 点击右上角网络 –》VPN Connections –》Configure VPN
2. 新建一个VPN连接–》Add
3. 输入VPN账号:–》Advanced
Connection name: 连接号
Gateway: VPN服务器IP
Username: 用户名
Password: 密码
4. 高级选项 –》 Use Point-to-Point encryption(MPPE)
5. 选择VPN连接 –》 连接成功提示。

3. ubuntu命令行配置

安装pptp客户端软件

~ sudo apt-get install pptp-linux

查看网络配置

~ ifconfig
eth0      Link encap:Ethernet  HWaddr 08:00:27:90:e8:19
          inet addr:192.168.1.200  Bcast:192.168.1.255  Mask:255.255.255.0
          inet6 addr: fe80::a00:27ff:fe90:e819/64 Scope:Link
          UP BROADCAST RUNNING MULTICAST  MTU:1500  Metric:1
          RX packets:74 errors:0 dropped:0 overruns:0 frame:0
          TX packets:64 errors:0 dropped:0 overruns:0 carrier:0
          collisions:0 txqueuelen:1000
          RX bytes:8112 (8.1 KB)  TX bytes:8542 (8.5 KB)

lo        Link encap:Local Loopback
          inet addr:127.0.0.1  Mask:255.0.0.0
          inet6 addr: ::1/128 Scope:Host
          UP LOOPBACK RUNNING  MTU:16436  Metric:1
          RX packets:0 errors:0 dropped:0 overruns:0 frame:0
          TX packets:0 errors:0 dropped:0 overruns:0 carrier:0
          collisions:0 txqueuelen:0
          RX bytes:0 (0.0 B)  TX bytes:0 (0.0 B)

~ route -n
Kernel IP routing table
Destination     Gateway         Genmask         Flags Metric Ref    Use Iface
0.0.0.0         192.168.1.1     0.0.0.0         UG    100    0        0 eth0
192.168.1.0     0.0.0.0         255.255.255.0   U     0      0        0 eth0

~ ip route 
default via 192.168.1.1 dev eth0  metric 100
192.168.1.0/24 dev eth0  proto kernel  scope link  src 192.168.1.200

初始化一个VPN的连接通道:myvpn

~ sudo pptpsetup --create myvpn --server xxx.xxx.xxx.xxx --username xx1--password xx2--encrypt --start

Using interface ppp0
Connect: ppp0  /dev/pts/1
CHAP authentication succeeded
MPPE 128-bit stateless compression enabled
local  IP address 10.10.10.3
remote IP address 10.10.10.1

成功连接到远程VPN服务器。

通过刚才的创建脚步:
在/etc/ppp/peers目录下面,会生成一个叫myvpn的文件。
在/etc/ppp目录下面,用户名和密码会写在chap-secrets文件中。


~ sudo vi /etc/ppp/peers/myvpn

# written by pptpsetup
pty "pptp xxx.xxx.xxx.xxx --nolaunchpppd"
lock
noauth
nobsdcomp
nodeflate
name conan2
remotename myvpn
ipparam myvpn
require-mppe-128

#生成用户名和密码
~ sudo vi /etc/ppp/chap-secrets
xx1 myvpn "xx2" *

通过网站路由功能,测试VPN


#安装traceroute 
~ sudo apt-get install traceroute 

~ traceroute www.163.com
traceroute to www.163.com (101.23.128.17), 30 hops max, 60 byte packets
 1  localhost (192.168.1.1)  2.222 ms  3.144 ms  3.132 ms
 2  111.192.144.1 (111.192.144.1)  80.279 ms  80.632 ms  80.624 ms
 3  61.148.185.69 (61.148.185.69)  9.026 ms  9.492 ms  9.479 ms
 4  124.65.61.157 (124.65.61.157)  9.469 ms  9.459 ms  9.447 ms
 5  202.96.12.185 (202.96.12.185)  9.829 ms  9.783 ms  9.771 ms
 6  219.158.96.110 (219.158.96.110)  17.160 ms  17.210 ms  17.158 ms
 7  61.182.176.178 (61.182.176.178)  30.222 ms  28.589 ms  28.077 ms
 8  60.5.194.58 (60.5.194.58)  29.293 ms  29.287 ms  29.276 ms
 9  60.5.197.214 (60.5.197.214)  26.617 ms  26.724 ms  26.668 ms
10  101.23.255.45 (101.23.255.45)  27.672 ms  28.147 ms  26.811 ms
11  101.23.128.17 (101.23.128.17)  25.890 ms  28.065 ms  28.420 ms

我们发现虽然VPN已经连接成功,但是路由没有通过VPN上网,第1跳还是localhost (192.168.1.1)

再次查看网络连接配置


~ ifconfig
eth0      Link encap:Ethernet  HWaddr 08:00:27:90:e8:19
          inet addr:192.168.1.200  Bcast:192.168.1.255  Mask:255.255.255.0
          inet6 addr: fe80::a00:27ff:fe90:e819/64 Scope:Link
          UP BROADCAST RUNNING MULTICAST  MTU:1500  Metric:1
          RX packets:175 errors:0 dropped:0 overruns:0 frame:0
          TX packets:162 errors:0 dropped:0 overruns:0 carrier:0
          collisions:0 txqueuelen:1000
          RX bytes:16817 (16.8 KB)  TX bytes:19723 (19.7 KB)

lo        Link encap:Local Loopback
          inet addr:127.0.0.1  Mask:255.0.0.0
          inet6 addr: ::1/128 Scope:Host
          UP LOOPBACK RUNNING  MTU:16436  Metric:1
          RX packets:0 errors:0 dropped:0 overruns:0 frame:0
          TX packets:0 errors:0 dropped:0 overruns:0 carrier:0
          collisions:0 txqueuelen:0
          RX bytes:0 (0.0 B)  TX bytes:0 (0.0 B)

ppp0      Link encap:Point-to-Point Protocol
          inet addr:10.10.10.3  P-t-P:10.10.10.1  Mask:255.255.255.255
          UP POINTOPOINT RUNNING NOARP MULTICAST  MTU:1496  Metric:1
          RX packets:7 errors:0 dropped:0 overruns:0 frame:0
          TX packets:7 errors:0 dropped:0 overruns:0 carrier:0
          collisions:0 txqueuelen:3
          RX bytes:70 (70.0 B)  TX bytes:76 (76.0 B)

~ route -n
Kernel IP routing table
Destination     Gateway         Genmask         Flags Metric Ref    Use Iface
0.0.0.0         192.168.1.1     0.0.0.0         UG    100    0        0 eth0
10.10.10.1      0.0.0.0         255.255.255.255 UH    0      0        0 ppp0
50.116.27.194   192.168.1.1     255.255.255.255 UGH   0      0        0 eth0
192.168.1.0     0.0.0.0         255.255.255.0   U     0      0        0 eth0

~ ip route
default via 192.168.1.1 dev eth0  metric 100
10.10.10.1 dev ppp0  proto kernel  scope link  src 10.10.10.3
50.116.27.194 via 192.168.1.1 dev eth0  src 192.168.1.200
192.168.1.0/24 dev eth0  proto kernel  scope link  src 192.168.1.200

我们发现默认路由是指向eth0。

下面修改路由配置:

#修改路由命令
~ sudo ip route del default 
~ sudo ip route add default dev ppp0

~ route -n
Kernel IP routing table
Destination     Gateway         Genmask         Flags Metric Ref    Use Iface
0.0.0.0         0.0.0.0         0.0.0.0         U     0      0        0 ppp0
10.10.10.1      0.0.0.0         255.255.255.255 UH    0      0        0 ppp0
50.116.27.194   192.168.1.1     255.255.255.255 UGH   0      0        0 eth0
192.168.1.0     0.0.0.0         255.255.255.0   U     0      0        0 eth0

~ ip route
default dev ppp0  scope link
10.10.10.1 dev ppp0  proto kernel  scope link  src 10.10.10.3
50.116.27.194 via 192.168.1.1 dev eth0  src 192.168.1.200
192.168.1.0/24 dev eth0  proto kernel  scope link  src 192.168.1.200

~ traceroute www.163.com
traceroute to www.163.com (101.23.128.17), 30 hops max, 60 byte packets
 1  localhost (10.10.10.1)  281.093 ms  281.414 ms  280.941 ms
 2  router2-dal.linode.com (67.18.7.162)  281.225 ms  281.109 ms  281.841 ms
 3  xe-2-0-0.car04.dllstx2.networklayer.com (67.18.7.93)  280.882 ms  284.002 ms  283.913 ms
 4  po102.dsr01.dllstx2.networklayer.com (70.87.254.81)  284.123 ms  284.087 ms  283.979 ms
 5  po21.dsr01.dllstx3.networklayer.com (70.87.255.65)  284.000 ms  283.921 ms  283.839 ms
 6  ae16.bbr01.eq01.dal03.networklayer.com (173.192.18.224)  283.542 ms  279.296 ms  290.455 ms
 7  dls-bb1-link.telia.net (213.248.102.173)  301.426 ms  302.092 ms  302.085 ms
 8  las-bb1-link.telia.net (213.155.131.77)  327.192 ms  327.350 ms  327.344 ms
 9  chinaunicom-ic-151188-las-bb1.telia.net (213.248.94.126)  478.941 ms  479.089 ms  479.083 ms
10  219.158.30.173 (219.158.30.173)  496.679 ms  496.673 ms  496.667 ms
11  219.158.97.57 (219.158.97.57)  516.819 ms  517.035 ms  517.011 ms
12  219.158.5.129 (219.158.5.129)  491.084 ms  490.018 ms  497.472 ms
13  219.158.100.130 (219.158.100.130)  518.239 ms  518.216 ms  518.192 ms
14  61.182.176.186 (61.182.176.186)  533.695 ms  533.673 ms  533.666 ms
15  101.23.255.230 (101.23.255.230)  512.212 ms  512.500 ms  512.479 ms
16  60.5.194.74 (60.5.194.74)  519.246 ms  519.815 ms  519.791 ms
17  101.23.255.45 (101.23.255.45)  526.522 ms  526.907 ms  526.844 ms
18  101.23.128.17 (101.23.128.17)  522.068 ms  517.535 ms  517.240 ms

查看第一跳,localhost (10.10.10.1),已经通过VPN实现路由。

停止VPN


~ sudo poff myvpn

~ ifconfig
eth0      Link encap:Ethernet  HWaddr 08:00:27:90:e8:19
          inet addr:192.168.1.200  Bcast:192.168.1.255  Mask:255.255.255.0
          inet6 addr: fe80::a00:27ff:fe90:e819/64 Scope:Link
          UP BROADCAST RUNNING MULTICAST  MTU:1500  Metric:1
          RX packets:2270 errors:0 dropped:0 overruns:0 frame:0
          TX packets:1991 errors:0 dropped:0 overruns:0 carrier:0
          collisions:0 txqueuelen:1000
          RX bytes:207578 (207.5 KB)  TX bytes:184147 (184.1 KB)

lo        Link encap:Local Loopback
          inet addr:127.0.0.1  Mask:255.0.0.0
          inet6 addr: ::1/128 Scope:Host
          UP LOOPBACK RUNNING  MTU:16436  Metric:1
          RX packets:0 errors:0 dropped:0 overruns:0 frame:0
          TX packets:0 errors:0 dropped:0 overruns:0 carrier:0
          collisions:0 txqueuelen:0
          RX bytes:0 (0.0 B)  TX bytes:0 (0.0 B)

再ping网站,发现网络出现问题。Network is unreachable


~ ping www.163.com
connect: Network is unreachable

~ route -n
Kernel IP routing table
Destination     Gateway         Genmask         Flags Metric Ref    Use Iface
50.116.27.194   192.168.1.1     255.255.255.255 UGH   0      0        0 eth0
192.168.1.0     0.0.0.0         255.255.255.0   U     0      0        0 eth0

~ ip route
50.116.27.194 via 192.168.1.1 dev eth0  src 192.168.1.200
192.168.1.0/24 dev eth0  proto kernel  scope link  src 192.168.1.200

重置路由


~ sudo ip route add default via 192.168.1.1

~ route -n
Kernel IP routing table
Destination     Gateway         Genmask         Flags Metric Ref    Use Iface
0.0.0.0         192.168.1.1     0.0.0.0         UG    0      0        0 eth0
50.116.27.194   192.168.1.1     255.255.255.255 UGH   0      0        0 eth0
192.168.1.0     0.0.0.0         255.255.255.0   U     0      0        0 eth0

~ ip route
default via 192.168.1.1 dev eth0
50.116.27.194 via 192.168.1.1 dev eth0  src 192.168.1.200
192.168.1.0/24 dev eth0  proto kernel  scope link  src 192.168.1.200

#再次ping网站,访问成功!
~ ping www.163.com
PING 163.xdwscache.glb0.lxdns.com (101.23.128.17) 56(84) bytes of data.
64 bytes from 101.23.128.17: icmp_req=1 ttl=54 time=25.6 ms
64 bytes from 101.23.128.17: icmp_req=2 ttl=54 time=25.5 ms
64 bytes from 101.23.128.17: icmp_req=3 ttl=54 time=27.8 ms

通过ip-up, ip-down配置路由


~ sudo vi /etc/ppp/ip-up.d/route-traffic

#!/bin/bash
/sbin/ip route add 50.116.27.194 via 192.168.1.1
/sbin/ip route del default
/sbin/ip route add default dev ppp0

~ sudo vi /etc/ppp/ip-down.d/disableroute

#!/bin/bash
/sbin/ip route add default via 192.168.1.1

重启VPN连接


~ sudo pon myvpn
#路由跟踪正确
~ traceroute www.163.com
traceroute to www.163.com (123.125.34.30), 30 hops max, 60 byte packets
 1  localhost (10.10.10.1)  293.397 ms  293.782 ms  293.668 ms
 2  router2-dal.linode.com (67.18.7.162)  293.530 ms  293.721 ms  294.223 ms
 3  xe-2-0-0.car04.dllstx2.networklayer.com (67.18.7.93)  293.454 ms  293.358 ms  293.239 ms
 4  po102.dsr02.dllstx2.networklayer.com (70.87.254.85)  293.749 ms  293.650 ms  293.544 ms
 5  po22.dsr02.dllstx3.networklayer.com (70.87.255.69)  293.444 ms  293.339 ms  293.242 ms
 6  ae17.bbr02.eq01.dal03.networklayer.com (173.192.18.230)  293.117 ms  293.525 ms  300.406 ms
 7  dls-bb1-link.telia.net (80.239.195.177)  300.850 ms  300.667 ms  300.320 ms

#正常退出
~ sudo poff myvpn
#测试网络连接正常
~ ping www.163.com
PING 163.xdwscache.glb0.lxdns.com (101.23.128.17) 56(84) bytes of data.
64 bytes from 101.23.128.17: icmp_req=1 ttl=54 time=28.2 ms
64 bytes from 101.23.128.17: icmp_req=2 ttl=54 time=28.1 ms

4. 看看外面的世界youtube

vpn-youtube

技术性文章,帮助大家更好的了解互联网。


转载请注明出处:
http://blog.fens.me/vpn-pptp-client-ubuntu/

打赏作者

win7通过PPTP协议使用VPN

ubuntu实用工具系列文章,将介绍基于Linux ubuntu的各种工具软件的配置和使用。有些工具大家早已耳熟能详,有些工具经常用到但确依然陌生。我将记录我在使用操作系统时,安装及配置工具上面的一些方法,把使用心得记录下来也便于自己的以后查找和回忆。

关于作者

  • 张丹(Conan), 程序员Java,R,PHP,Javascript
  • weibo:@Conan_Z
  • blog: http://blog.fens.me
  • email: bsspirit@gmail.com

转载请注明出处:
http://blog.fens.me/vpn-pptp-client-win7/

vpn-pptp-win7

前言

GFW给大家的生活事带来了各种不便,只有靠我们自己才能改变这种不便。像facebook, twitter, youtube, google+, bitbucket, slideside…. 这些世界知名的网站,我们都没有办法直接访问,有时候你很难联想到为什么要屏蔽这些网站。特别是纯技术社区!

不过我们也有很多的技术,可以穿越这条封锁线。今天我们聊一下,win7通过PPTP协议使用VPN(Virtual Private Network),如何看到外面的世界。

关于PPTP的服务器端配置:请参考 在Ubuntu上安装PPTP VPN服务 文章
Ubuntu通过PPTP协议使用VPN:请参考 Ubuntu通过PPTP协议使用VPN 文章

目录

  1. 获得VPN账号
  2. win7客户端连接操作步骤
  3. 看看外面的世界youtube

1. 获得VPN账号

当你有了基于PPTP协议的VPN账号后,怎么在win7中配置!

VPN账号包括3个部分:IP,用户名,密码

比如:(只为演示说明,此账号不可用)
ip: 123.123.123.123
用户名:xx1
密码: xx2

2. win7客户端连接操作步骤

通过win7自带的客户端软件进行连接。

流程图说明操作步骤:

vpn-pptp-process

每一步操作细节

vpn-p1

1. 开始–》控制面板–》网络和共享中心–》
2. 设置新的连接或者网络–》
3. 连接到工作区–》下一步–》
4. 创建新连接–》使用我的Internet连接(VPN)

win7-vpn-p2

5. 键入要连接的Internet地址–》下一步

输入内容:
输入Internet地址: 123.123.123.123
目录名称:VPN连接

6. 键入您的用户和密码–》创建

输入内容:
用户名: xx1
密码: xx2

7. 点击右下角的网络标志:选择刚才新建好的 “VPN连接” –》右键–》属性
8. 安全–》VPN类型–》点对点隧道协议(PPTP)–》确定

win7-vpn-p3

9. 点击右下角的网络标志:选择刚才新建好的 “VPN连接” –》连接
10. 选择刚才新建好的 “VPN连接” –》连接
11. 连接成功。


3. 看看外面的世界youtube

vpn10

技术性文章,帮助大家更好的了解互联网。

转载请注明出处:
http://blog.fens.me/vpn-pptp-client-win7/

打赏作者

在Ubuntu上安装PPTP VPN服务

1

关于作者

  • 张丹(Conan), 程序员Java,R,PHP,Javascript
  • weibo:@Conan_Z
  • blog: http://blog.fens.me
  • email: bsspirit@gmail.com

转载请注明出处:
http://blog.fens.me/ubuntu-vpn-pptp/

此图完整的阐述了身为帝国平民的必备技能之一,VPN服务则是此种技能的技术实现,虚拟专用网络(Virtual Private Network ,简称VPN)指的是在公用网络上建立专用网络的技术。它涵盖了跨共享网络或公共网络的封装、加密和身份验证链接的专用网络的扩展。VPN主要采用了彩隧道技术、加解密技术、密钥管理技术和使用者与设备身份认证技术。

点对点隧道协议(PPTP)是VPN服务的一种最简单的实现协议,其它常见的VPN类型还有:使用IPsec的第2层隧道协议(L2TP/IPsec)、安全套接字隧道协议(SSL VPN)。本文主要讨论PPTP VPN服务在Ubuntu上的安装和配置。

A.使用apt源服务来安装PPTPD服务


sudo apt-get update
sudo apt-get install pptpd

B.安装完成之后编辑pptpd.conf配置文件


sudo vi /etc/pptpd.conf

#确保如下选项的配置
option /etc/ppp/pptpd-option                    #指定PPP选项文件的位置
debug                                           #启用调试模式
localip 192.168.0.1                             #VPN服务器的虚拟ip
remoteip 192.168.0.200-238,192.168.0.245        #分配给VPN客户端的虚拟ip

C.编辑PPP选项配置文件

sudo vi /etc/ppp/pptpd-options

#确保如下选项的配置
name pptpd                      #pptpd服务的名称
refuse-pap                      #拒绝pap身份认证模式
refuse-chap                     #拒绝chap身份认证模式
refuse-mschap                   #拒绝mschap身份认证模式
require-mschap-v2               #允许mschap-v2身份认证模式
require-mppe-128                #允许mppe 128位加密身份认证模式
ms-dns 8.8.8.8                  #使用Google DNS
ms-dns 8.8.4.4                  #使用Google DNS
proxyarp                        #arp代理
debug                           #调试模式
dump                            #服务启动时打印出所有配置信息
lock                            #锁定TTY设备
nobsdcomp                       #禁用BSD压缩模式
logfile /var/log/pptpd.log      #输出日志文件位置

D.编辑用户配置文件来添加用户

sudo vi /etc/ppp/chap-secrets

#格式:用户名   服务类型   密码   分配的ip地址
test    *    1234    *
#第一个*代表服务可以是PPTPD也可以是L2TPD,第二个*代表随机分配ip

E.重启PPTPD服务


sudo service pptpd restart

F.配置网络和路由规则 设置ipv4转发


sudo sed -i 's/#net.ipv4.ip_forward=1/net.ipv4.ip_forward=1/g' /etc/sysctl.conf
sudo sysctl -p

设置iptables NAT转发

#注意这里eth0代表你的外网网卡,请用ifconfig查看或者咨询网络管理员
sudo iptables -t nat -A POSTROUTING -s 192.168.0.0/24 -o eth0 -j MASQUERADE
#如果上面的命令报错,那么可以尝试以下的命令,其中xxx.xxx.xxx.xxx代表你的VPS外网ip地址
sudo iptables -t nat -A POSTROUTING -s 192.168.0.0/24 -o eth0 -j SNAT --to-source xxx.xxx.xxx.xxx

设置MTU来确保过大的包不会被丢弃(这个可以不做)


sudo iptables -I FORWARD -s 192.168.0.0/24 -p tcp --syn -i ppp+ -j TCPMSS --set-mss 1300

iptables的设置重启之后会取消,所以可以将上面的命令加入到/etc/rc.local来确保每次重启都会执行设置。

G.至此设置全部完成,可以用任意一个客户端机器如MAC、PC或者手机来新建一个VPN连接使用用户test,密码1234进行测试。另外网上提供一种自动安装脚本,可以参见如下操作:


wget -c http://small-script.googlecode.com/files/debian-pptpd.tar.gz
tar -zxf debian-pptpd.tar.gz
sudo sh pptpd.sh

最后,如果想要实现更便利的用户管理,请参见在Ubuntu上安装FreeRADIUS服务

转载请注明出处:
http://blog.fens.me/ubuntu-vpn-pptp/

打赏作者