让Hadoop跑在云端系列文章,介绍了如何整合虚拟化和Hadoop,让Hadoop集群跑在VPS虚拟主机上,通过云向用户提供存储和计算的服务。
现在硬件越来越便宜,一台非品牌服务器,2颗24核CPU,配48G内存,2T的硬盘,已经降到2万块人民币以下了。这种配置如果简单地放几个web应用,显然是奢侈的浪费。就算是用来实现单节点的hadoop,对计算资源浪费也是非常高的。对于这么高性能的计算机,如何有效利用计算资源,就成为成本控制的一项重要议题了。
通过虚拟化技术,我们可以将一台服务器,拆分成12台VPS,每台2核CPU,4G内存,40G硬盘,并且支持资源重新分配。多么伟大的技术啊!现在我们有了12个节点的hadoop集群, 让Hadoop跑在云端,让世界加速。
关于作者:
- 张丹(Conan), 程序员Java,R,PHP,Javascript
- weibo:@Conan_Z
- blog: http://blog.fens.me
- email: bsspirit@gmail.com
转载请注明出处:
http://blog.fens.me/hadoop-clone-add-delete/

前言
让Hadoop跑在云端系列文章,经过前面几篇文章的介绍,我们已经可以创建并管理虚拟机,增加hadoop节点。本文只是把操作过程整理一下,做一个操作总结,让没有计算机背景的同学,也可以进行操作。
目录
- 增加克隆体hadoop节点c6
- 删除c6节点
- 实现脚本
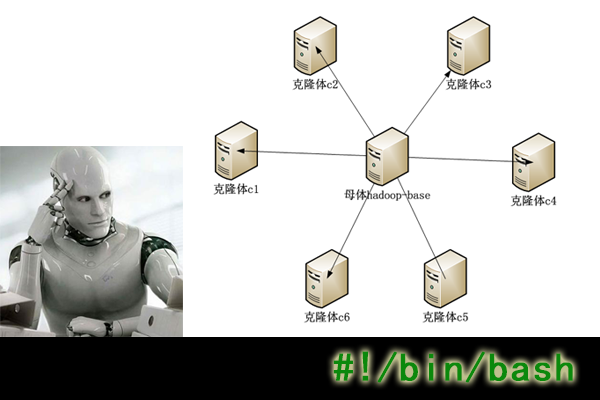
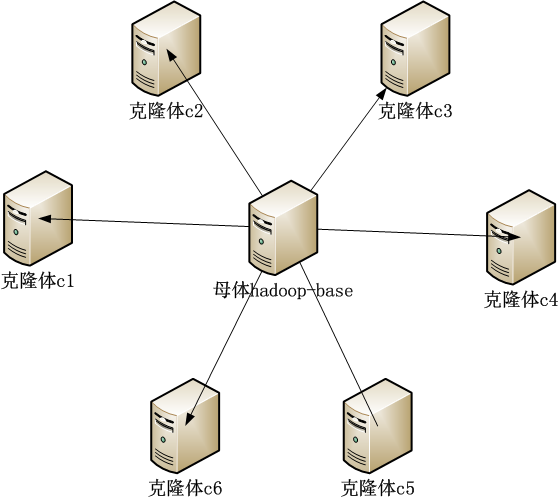
1. 增加克隆体hadoop节点c6
1. 登陆host主机,查检c6.wtmat.com域名是否已经被正确解析。
~ ssh cos@host.wtmart.com

~ ping c6.wtmart.com
ping: unknown host c6.wtmart.com
2. 登陆dns.wtmart.com服务器,做域名绑定。
~ ssh cos@dns.wtmart.com

~  sudo vi /etc/bind/db.wtmart.com
#增加
c6      IN      A       192.168.1.35

#重启dns服务器
~ sudo /etc/init.d/bind9 restart
 * Stopping domain name service... bind9                                                              waiting for pid 1418 to die                                                                                              [ OK ]
 * Starting domain name service... bind9

~ exit
3. 返回host, 查检c6.wtmat.com域名是否已经被正确解析。
~ ping c6.wtmart.com -n
PING c6.wtmart.com (192.168.1.35) 56(84) bytes of data.
From 192.168.1.79 icmp_seq=1 Destination Host Unreachable
From 192.168.1.79 icmp_seq=2 Destination Host Unreachable
From 192.168.1.79 icmp_seq=3 Destination Host Unreachable
c6.wtmart.com已被解析到192.168.1.35,只是还没有主机,下面我们就给c6增加一台虚拟机。
4. 在host,克隆虚拟机
~ sudo virt-clone --connect qemu:///system -o hadoop-base -n c6 -f /disk/sdb1/c6.img
Cloning hadoop-base.img               1% [                          ]  42 MB/s | 531 MB     15:53 ETA
Cloning hadoop-base.img                                                        |  40 GB     07:54
5. 打开虚拟机管理控制软件virsh
~ sudo virsh

#查看主机状态
virsh # list --all
 Id    Name                           State
----------------------------------------------------
 5     server3                        running
 6     server4                        running
 7     d2                             running
 8     r1                             running
 9     server2                        running
 18    server5                        running
 48    c3                             running
 50    c1                             running
 52    c4                             running
 53    c2                             running
 55    c5                             running
 -     c6                             shut off
 -     d1                             shut off
 -     hadoop-base                    shut off
 -     u1210-base                     shut off


#编辑c6虚拟机,给虚拟机挂载分区硬盘/dev/sdb10
~ edit c6
<disk type='block' device='disk'>
<driver name='qemu' type='raw' cache='none'/>
<source dev='/dev/sdb10'/>
<target dev='vdb' bus='virtio'/>
</disk>

#启动c6
~ start c6
Domain c6 started

#进入c6
~ console c6
6. 在c6中,执行快速配置脚本。
~ pwd
/home/cos

~ ls -l
drwxrwxr-x 2 cos cos 4096 Jul  9 23:50 hadoop
-rw-rw-r-- 1 cos cos 1404 Jul 11 16:50 quick.sh
drwxrwxr-x 7 cos cos 4096 Jul  9 23:31 toolkit

#修改虚拟机参数
~ vi quick.sh
export HOST=c6
export IP=192.168.1.35


#请用sudo身份执行脚本
~ sudo sh ./quick.sh

====================hostname host============================
====================ip address============================
Rather than invoking init scripts through /etc/init.d, use the service(8)
utility, e.g. service networking restart

Since the script you are attempting to invoke has been converted to an
Upstart job, you may also use the stop(8) and then start(8) utilities,
e.g. stop networking ; start networking. The restart(8) utility is also available.
networking stop/waiting
networking start/running
====================dns============================
====================fdisk mount============================
Device contains neither a valid DOS partition table, nor Sun, SGI or OSF disklabel
Building a new DOS disklabel with disk identifier 0x8f02312d.
Changes will remain in memory only, until you decide to write them.
After that, of course, the previous content won't be recoverable.

Warning: invalid flag 0x0000 of partition table 4 will be corrected by w(rite)

Command (m for help): Partition type:
   p   primary (0 primary, 0 extended, 4 free)
   e   extended
Select (default p): Partition number (1-4, default 1): Using default value 1
First sector (2048-379580414, default 2048): Using default value 2048
Last sector, +sectors or +size{K,M,G} (2048-379580414, default 379580414): Using default value 379580414

Command (m for help): The partition table has been altered!

Calling ioctl() to re-read partition table.
Syncing disks.
mke2fs 1.42.5 (29-Jul-2012)
Filesystem label=
OS type: Linux
Block size=4096 (log=2)
Fragment size=4096 (log=2)
Stride=0 blocks, Stripe width=0 blocks
11862016 inodes, 47447295 blocks
2372364 blocks (5.00%) reserved for the super user
First data block=0
Maximum filesystem blocks=4294967296
1448 block groups
32768 blocks per group, 32768 fragments per group
8192 inodes per group
Superblock backups stored on blocks:
        32768, 98304, 163840, 229376, 294912, 819200, 884736, 1605632, 2654208,
        4096000, 7962624, 11239424, 20480000, 23887872

Allocating group tables: done
Writing inode tables: done
Creating journal (32768 blocks): done
Writing superblocks and filesystem accounting information: done

==================== hadoop folder============================
====================ssh============================
Generating public/private rsa key pair.
Your identification has been saved in /home/cos/.ssh/id_rsa.
Your public key has been saved in /home/cos/.ssh/id_rsa.pub.
The key fingerprint is:
55:0d:3c:61:cc:53:e5:68:24:aa:33:18:3b:fc:08:75 cos@c6
The key's randomart image is:
+--[ RSA 2048]----+
|           +*=o..|
|           +*o.o |
|      o E o  oo .|
|     o = o   .   |
|    . = S        |
|     . + o       |
|      . .        |
|                 |
|                 |
+-----------------+


#退出虚拟机
~ exit
7. 登陆hadoop的主节点c1.wtmart.com
~ ssh cos@c1.wtmart.com

#查看当前hadoop集群状态, 5个hadoop节点正常运行
~ hadoop dfsadmin -report
Configured Capacity: 792662536192 (738.22 GB)
Present Capacity: 744482840576 (693.35 GB)
DFS Remaining: 744482676736 (693.35 GB)
DFS Used: 163840 (160 KB)
DFS Used%: 0%
Under replicated blocks: 0
Blocks with corrupt replicas: 0
Missing blocks: 0

-------------------------------------------------
Datanodes available: 5 (5 total, 0 dead)

Name: 192.168.1.30:50010
Decommission Status : Normal
Configured Capacity: 158533136384 (147.65 GB)
DFS Used: 49152 (48 KB)
Non DFS Used: 15181529088 (14.14 GB)
DFS Remaining: 143351558144(133.51 GB)
DFS Used%: 0%
DFS Remaining%: 90.42%
Last contact: Fri Jul 12 23:16:09 CST 2013


Name: 192.168.1.31:50010
Decommission Status : Normal
Configured Capacity: 158532087808 (147.64 GB)
DFS Used: 28672 (28 KB)
Non DFS Used: 8249528320 (7.68 GB)
DFS Remaining: 150282530816(139.96 GB)
DFS Used%: 0%
DFS Remaining%: 94.8%
Last contact: Fri Jul 12 23:16:08 CST 2013


Name: 192.168.1.32:50010
Decommission Status : Normal
Configured Capacity: 158533136384 (147.65 GB)
DFS Used: 28672 (28 KB)
Non DFS Used: 8249581568 (7.68 GB)
DFS Remaining: 150283526144(139.96 GB)
DFS Used%: 0%
DFS Remaining%: 94.8%
Last contact: Fri Jul 12 23:16:08 CST 2013


Name: 192.168.1.34:50010
Decommission Status : Normal
Configured Capacity: 158532087808 (147.64 GB)
DFS Used: 28672 (28 KB)
Non DFS Used: 8249528320 (7.68 GB)
DFS Remaining: 150282530816(139.96 GB)
DFS Used%: 0%
DFS Remaining%: 94.8%
Last contact: Fri Jul 12 23:16:09 CST 2013


Name: 192.168.1.33:50010
Decommission Status : Normal
Configured Capacity: 158532087808 (147.64 GB)
DFS Used: 28672 (28 KB)
Non DFS Used: 8249528320 (7.68 GB)
DFS Remaining: 150282530816(139.96 GB)
DFS Used%: 0%
DFS Remaining%: 94.8%
Last contact: Fri Jul 12 23:16:08 CST 2013
8. 增加c6到hadoop集群
~ pwd
/home/cos

~ ls
-rw-rw-r-- 1 cos cos 1078 Jul 12 23:30 clone-node-add.sh
-rw-rw-r-- 1 cos cos  918 Jul 12 23:44 clone-node-del.sh
drwxrwxr-x 2 cos cos 4096 Jul  9 21:42 download
drwxr-xr-x 6 cos cos 4096 Jul  9 23:31 hadoop
drwxrwxr-x 7 cos cos 4096 Jul  9 23:31 toolkit

#修改配置参数
~ vi clone-node-add.sh

#新增节点c6.wtmart.com
export NEW_NODE=c6.wtmart.com
#配置slaves节点
export SLAVES=c1.wtmart.com:c2.wtmart.com:c3.wtmart.com:c4.wtmart.com:c5.wtmart.com:c6.wtmart.com

#运行脚本,以当前用户运行
~ sh ./clone-node-add.sh
===============sync ssh=========================
Warning: Permanently added 'c6.wtmart.com,192.168.1.35' (ECDSA) to the list of known hosts.
scp c1.wtmart.com
scp c2.wtmart.com
scp c3.wtmart.com
scp c4.wtmart.com
scp c5.wtmart.com
scp c6.wtmart.com
===============sync hadoop slaves=========================
scp c1.wtmart.com
slaves                                                               100%   84     0.1KB/s   00:00
scp c2.wtmart.com
slaves                                                               100%   84     0.1KB/s   00:00
scp c3.wtmart.com
slaves                                                               100%   84     0.1KB/s   00:00
scp c4.wtmart.com
slaves                                                               100%   84     0.1KB/s   00:00
scp c5.wtmart.com
slaves                                                               100%   84     0.1KB/s   00:00
scp c6.wtmart.com
slaves                                                               100%   84     0.1KB/s   00:00
===============restart hadoop cluster=========================
Warning: $HADOOP_HOME is deprecated.

stopping jobtracker
c1.wtmart.com: Warning: $HADOOP_HOME is deprecated.
c1.wtmart.com:
c5.wtmart.com: Warning: $HADOOP_HOME is deprecated.
c5.wtmart.com:
c1.wtmart.com: stopping tasktracker
c5.wtmart.com: stopping tasktracker
c4.wtmart.com: Warning: $HADOOP_HOME is deprecated.
c4.wtmart.com:
c4.wtmart.com: stopping tasktracker
c3.wtmart.com: Warning: $HADOOP_HOME is deprecated.
c3.wtmart.com:
c2.wtmart.com: Warning: $HADOOP_HOME is deprecated.
c2.wtmart.com:
c3.wtmart.com: stopping tasktracker
c2.wtmart.com: stopping tasktracker
c6.wtmart.com: Warning: $HADOOP_HOME is deprecated.
c6.wtmart.com:
c6.wtmart.com: no tasktracker to stop
stopping namenode
c1.wtmart.com: Warning: $HADOOP_HOME is deprecated.
c1.wtmart.com:
c1.wtmart.com: stopping datanode
c5.wtmart.com: Warning: $HADOOP_HOME is deprecated.
c5.wtmart.com:
c6.wtmart.com: Warning: $HADOOP_HOME is deprecated.
c6.wtmart.com:
c2.wtmart.com: Warning: $HADOOP_HOME is deprecated.
c2.wtmart.com:
c6.wtmart.com: no datanode to stop
c5.wtmart.com: stopping datanode
c3.wtmart.com: Warning: $HADOOP_HOME is deprecated.
c3.wtmart.com:
c4.wtmart.com: Warning: $HADOOP_HOME is deprecated.
c4.wtmart.com:
c2.wtmart.com: stopping datanode
c3.wtmart.com: stopping datanode
c4.wtmart.com: stopping datanode
c1.wtmart.com: Warning: $HADOOP_HOME is deprecated.
c1.wtmart.com:
c1.wtmart.com: stopping secondarynamenode
Warning: $HADOOP_HOME is deprecated.

starting namenode, logging to /home/cos/toolkit/hadoop-1.0.3/libexec/../logs/hadoop-cos-namenode-c1.out
c1.wtmart.com: Warning: $HADOOP_HOME is deprecated.
c1.wtmart.com:
c3.wtmart.com: Warning: $HADOOP_HOME is deprecated.
c3.wtmart.com:
c2.wtmart.com: Warning: $HADOOP_HOME is deprecated.
c2.wtmart.com:
c5.wtmart.com: Warning: $HADOOP_HOME is deprecated.
c5.wtmart.com:
c4.wtmart.com: Warning: $HADOOP_HOME is deprecated.
c4.wtmart.com:
c1.wtmart.com: starting datanode, logging to /home/cos/toolkit/hadoop-1.0.3/libexec/../logs/hadoop-cos-datanode-c1.out
c6.wtmart.com: Warning: $HADOOP_HOME is deprecated.
c6.wtmart.com:
c5.wtmart.com: starting datanode, logging to /home/cos/toolkit/hadoop-1.0.3/libexec/../logs/hadoop-cos-datanode-c5.out
c2.wtmart.com: starting datanode, logging to /home/cos/toolkit/hadoop-1.0.3/libexec/../logs/hadoop-cos-datanode-c2.out
c6.wtmart.com: starting datanode, logging to /home/cos/toolkit/hadoop-1.0.3/libexec/../logs/hadoop-cos-datanode-c6.out
c3.wtmart.com: starting datanode, logging to /home/cos/toolkit/hadoop-1.0.3/libexec/../logs/hadoop-cos-datanode-c3.out
c4.wtmart.com: starting datanode, logging to /home/cos/toolkit/hadoop-1.0.3/libexec/../logs/hadoop-cos-datanode-c4.out
c1.wtmart.com: Warning: $HADOOP_HOME is deprecated.
c1.wtmart.com:
c1.wtmart.com: starting secondarynamenode, logging to /home/cos/toolkit/hadoop-1.0.3/libexec/../logs/hadoop-cos-secondarynamenode-c1.out
starting jobtracker, logging to /home/cos/toolkit/hadoop-1.0.3/libexec/../logs/hadoop-cos-jobtracker-c1.out
c1.wtmart.com: Warning: $HADOOP_HOME is deprecated.
c1.wtmart.com:
c1.wtmart.com: starting tasktracker, logging to /home/cos/toolkit/hadoop-1.0.3/libexec/../logs/hadoop-cos-tasktracker-c1.out
c4.wtmart.com: Warning: $HADOOP_HOME is deprecated.
c4.wtmart.com:
c5.wtmart.com: Warning: $HADOOP_HOME is deprecated.
c2.wtmart.com: Warning: $HADOOP_HOME is deprecated.
c2.wtmart.com:
c5.wtmart.com:
c3.wtmart.com: Warning: $HADOOP_HOME is deprecated.
c6.wtmart.com: Warning: $HADOOP_HOME is deprecated.
c6.wtmart.com:
c3.wtmart.com:
c5.wtmart.com: starting tasktracker, logging to /home/cos/toolkit/hadoop-1.0.3/libexec/../logs/hadoop-cos-tasktracker-c5.out
c2.wtmart.com: starting tasktracker, logging to /home/cos/toolkit/hadoop-1.0.3/libexec/../logs/hadoop-cos-tasktracker-c2.out
c6.wtmart.com: starting tasktracker, logging to /home/cos/toolkit/hadoop-1.0.3/libexec/../logs/hadoop-cos-tasktracker-c6.out
c4.wtmart.com: starting tasktracker, logging to /home/cos/toolkit/hadoop-1.0.3/libexec/../logs/hadoop-cos-tasktracker-c4.out
c3.wtmart.com: starting tasktracker, logging to /home/cos/toolkit/hadoop-1.0.3/libexec/../logs/hadoop-cos-tasktracker-c3.out
9. 查看hadoop节点已经增加,c6已经增加到hadoop集群中
#查看系统进程
~ jps
12019 TaskTracker
11763 SecondaryNameNode
12098 Jps
11878 JobTracker
11633 DataNode
11499 NameNode

#查看hadoop节点
~ hadoop dfsadmin -report
Configured Capacity: 983957319680 (916.38 GB)
Present Capacity: 925863960576 (862.28 GB)
DFS Remaining: 925863768064 (862.28 GB)
DFS Used: 192512 (188 KB)
DFS Used%: 0%
Under replicated blocks: 0
Blocks with corrupt replicas: 0
Missing blocks: 0

-------------------------------------------------
Datanodes available: 6 (6 total, 0 dead)

Name: 192.168.1.30:50010
Decommission Status : Normal
Configured Capacity: 158533136384 (147.65 GB)
DFS Used: 49152 (48 KB)
Non DFS Used: 15181541376 (14.14 GB)
DFS Remaining: 143351545856(133.51 GB)
DFS Used%: 0%
DFS Remaining%: 90.42%
Last contact: Fri Jul 12 23:27:01 CST 2013


Name: 192.168.1.31:50010
Decommission Status : Normal
Configured Capacity: 158532087808 (147.64 GB)
DFS Used: 28672 (28 KB)
Non DFS Used: 8249528320 (7.68 GB)
DFS Remaining: 150282530816(139.96 GB)
DFS Used%: 0%
DFS Remaining%: 94.8%
Last contact: Fri Jul 12 23:27:00 CST 2013


Name: 192.168.1.32:50010
Decommission Status : Normal
Configured Capacity: 158533136384 (147.65 GB)
DFS Used: 28672 (28 KB)
Non DFS Used: 8249581568 (7.68 GB)
DFS Remaining: 150283526144(139.96 GB)
DFS Used%: 0%
DFS Remaining%: 94.8%
Last contact: Fri Jul 12 23:27:00 CST 2013


Name: 192.168.1.34:50010
Decommission Status : Normal
Configured Capacity: 158532087808 (147.64 GB)
DFS Used: 28672 (28 KB)
Non DFS Used: 8249528320 (7.68 GB)
DFS Remaining: 150282530816(139.96 GB)
DFS Used%: 0%
DFS Remaining%: 94.8%
Last contact: Fri Jul 12 23:27:00 CST 2013


Name: 192.168.1.33:50010
Decommission Status : Normal
Configured Capacity: 158532087808 (147.64 GB)
DFS Used: 28672 (28 KB)
Non DFS Used: 8249528320 (7.68 GB)
DFS Remaining: 150282530816(139.96 GB)
DFS Used%: 0%
DFS Remaining%: 94.8%
Last contact: Fri Jul 12 23:27:00 CST 2013


Name: 192.168.1.35:50010
Decommission Status : Normal
Configured Capacity: 191294783488 (178.16 GB)
DFS Used: 28672 (28 KB)
Non DFS Used: 9913651200 (9.23 GB)
DFS Remaining: 181381103616(168.92 GB)
DFS Used%: 0%
DFS Remaining%: 94.82%
Last contact: Fri Jul 12 23:27:02 CST 2013
删除c6节点
1. 登陆hadoop主节点,c1.wtmart.com
~ ssh cos@c1.wtmart.com

~ pwd
/home/cos

~ ls -l
-rw-rw-r-- 1 cos cos 1078 Jul 12 23:30 clone-node-add.sh
-rw-rw-r-- 1 cos cos  918 Jul 12 23:44 clone-node-del.sh
drwxrwxr-x 2 cos cos 4096 Jul  9 21:42 download
drwxr-xr-x 6 cos cos 4096 Jul  9 23:31 hadoop
drwxrwxr-x 7 cos cos 4096 Jul  9 23:31 toolkit
2. 修改配置脚本
~ vi clone-node-del.sh
export DEL_NODE=c6
export SLAVES=c1.wtmart.com:c2.wtmart.com:c3.wtmart.com:c4.wtmart.com:c5.wtmart.com

#运行脚本,以当前用户运行
~  sh ./clone-node-del.sh
===============sync ssh=========================
scp c1.wtmart.com
scp c2.wtmart.com
scp c3.wtmart.com
scp c4.wtmart.com
scp c5.wtmart.com
===============sync hadoop slaves=========================
scp c1.wtmart.com
slaves                                                               100%   70     0.1KB/s   00:00
scp c2.wtmart.com
slaves                                                               100%   70     0.1KB/s   00:00
scp c3.wtmart.com
slaves                                                               100%   70     0.1KB/s   00:00
scp c4.wtmart.com
slaves                                                               100%   70     0.1KB/s   00:00
scp c5.wtmart.com
slaves                                                               100%   70     0.1KB/s   00:00
===============restart hadoop cluster=========================
Warning: $HADOOP_HOME is deprecated.

stopping jobtracker
c1.wtmart.com: Warning: $HADOOP_HOME is deprecated.
c1.wtmart.com:
c1.wtmart.com: stopping tasktracker
c2.wtmart.com: Warning: $HADOOP_HOME is deprecated.
c2.wtmart.com:
c2.wtmart.com: stopping tasktracker
c5.wtmart.com: Warning: $HADOOP_HOME is deprecated.
c5.wtmart.com:
c3.wtmart.com: Warning: $HADOOP_HOME is deprecated.
c3.wtmart.com:
c5.wtmart.com: stopping tasktracker
c4.wtmart.com: Warning: $HADOOP_HOME is deprecated.
c4.wtmart.com:
c3.wtmart.com: stopping tasktracker
c4.wtmart.com: stopping tasktracker
stopping namenode
c1.wtmart.com: Warning: $HADOOP_HOME is deprecated.
c1.wtmart.com:
c1.wtmart.com: stopping datanode
c4.wtmart.com: Warning: $HADOOP_HOME is deprecated.
c4.wtmart.com:
c5.wtmart.com: Warning: $HADOOP_HOME is deprecated.
c5.wtmart.com:
c4.wtmart.com: stopping datanode
c5.wtmart.com: stopping datanode
c3.wtmart.com: Warning: $HADOOP_HOME is deprecated.
c3.wtmart.com:
c2.wtmart.com: Warning: $HADOOP_HOME is deprecated.
c2.wtmart.com:
c3.wtmart.com: stopping datanode
c2.wtmart.com: stopping datanode
c1.wtmart.com: Warning: $HADOOP_HOME is deprecated.
c1.wtmart.com:
c1.wtmart.com: stopping secondarynamenode
Warning: $HADOOP_HOME is deprecated.

starting namenode, logging to /home/cos/toolkit/hadoop-1.0.3/libexec/../logs/hadoop-cos-namenode-c1.out
c1.wtmart.com: Warning: $HADOOP_HOME is deprecated.
c1.wtmart.com:
c3.wtmart.com: Warning: $HADOOP_HOME is deprecated.
c3.wtmart.com:
c4.wtmart.com: Warning: $HADOOP_HOME is deprecated.
c4.wtmart.com:
c5.wtmart.com: Warning: $HADOOP_HOME is deprecated.
c2.wtmart.com: Warning: $HADOOP_HOME is deprecated.
c2.wtmart.com:
c5.wtmart.com:
c3.wtmart.com: starting datanode, logging to /home/cos/toolkit/hadoop-1.0.3/libexec/../logs/hadoop-cos-datanode-c3.out
c1.wtmart.com: starting datanode, logging to /home/cos/toolkit/hadoop-1.0.3/libexec/../logs/hadoop-cos-datanode-c1.out
c5.wtmart.com: starting datanode, logging to /home/cos/toolkit/hadoop-1.0.3/libexec/../logs/hadoop-cos-datanode-c5.out
c2.wtmart.com: starting datanode, logging to /home/cos/toolkit/hadoop-1.0.3/libexec/../logs/hadoop-cos-datanode-c2.out
c4.wtmart.com: starting datanode, logging to /home/cos/toolkit/hadoop-1.0.3/libexec/../logs/hadoop-cos-datanode-c4.out
c1.wtmart.com: Warning: $HADOOP_HOME is deprecated.
c1.wtmart.com:
c1.wtmart.com: starting secondarynamenode, logging to /home/cos/toolkit/hadoop-1.0.3/libexec/../logs/hadoop-cos-secondarynamenode-c1.out
starting jobtracker, logging to /home/cos/toolkit/hadoop-1.0.3/libexec/../logs/hadoop-cos-jobtracker-c1.out
c4.wtmart.com: Warning: $HADOOP_HOME is deprecated.
c4.wtmart.com:
c5.wtmart.com: Warning: $HADOOP_HOME is deprecated.
c5.wtmart.com:
c3.wtmart.com: Warning: $HADOOP_HOME is deprecated.
c3.wtmart.com:
c5.wtmart.com: starting tasktracker, logging to /home/cos/toolkit/hadoop-1.0.3/libexec/../logs/hadoop-cos-tasktracker-c5.out
c2.wtmart.com: Warning: $HADOOP_HOME is deprecated.
c2.wtmart.com:
c4.wtmart.com: starting tasktracker, logging to /home/cos/toolkit/hadoop-1.0.3/libexec/../logs/hadoop-cos-tasktracker-c4.out
c3.wtmart.com: starting tasktracker, logging to /home/cos/toolkit/hadoop-1.0.3/libexec/../logs/hadoop-cos-tasktracker-c3.out
c2.wtmart.com: starting tasktracker, logging to /home/cos/toolkit/hadoop-1.0.3/libexec/../logs/hadoop-cos-tasktracker-c2.out
c1.wtmart.com: Warning: $HADOOP_HOME is deprecated.
c1.wtmart.com:
c1.wtmart.com: starting tasktracker, logging to /home/cos/toolkit/hadoop-1.0.3/libexec/../logs/hadoop-cos-tasktracker-c1.out
3. 查看hadoop节点,c6已经被删除
~ hadoop dfsadmin -report
Warning: $HADOOP_HOME is deprecated.

Safe mode is ON
Configured Capacity: 792662536192 (738.22 GB)
Present Capacity: 744482836480 (693.35 GB)
DFS Remaining: 744482672640 (693.35 GB)
DFS Used: 163840 (160 KB)
DFS Used%: 0%
Under replicated blocks: 0
Blocks with corrupt replicas: 0
Missing blocks: 0

-------------------------------------------------
Datanodes available: 5 (5 total, 0 dead)

Name: 192.168.1.30:50010
Decommission Status : Normal
Configured Capacity: 158533136384 (147.65 GB)
DFS Used: 49152 (48 KB)
Non DFS Used: 15181533184 (14.14 GB)
DFS Remaining: 143351554048(133.51 GB)
DFS Used%: 0%
DFS Remaining%: 90.42%
Last contact: Fri Jul 12 23:45:29 CST 2013


Name: 192.168.1.31:50010
Decommission Status : Normal
Configured Capacity: 158532087808 (147.64 GB)
DFS Used: 28672 (28 KB)
Non DFS Used: 8249528320 (7.68 GB)
DFS Remaining: 150282530816(139.96 GB)
DFS Used%: 0%
DFS Remaining%: 94.8%
Last contact: Fri Jul 12 23:45:29 CST 2013


Name: 192.168.1.32:50010
Decommission Status : Normal
Configured Capacity: 158533136384 (147.65 GB)
DFS Used: 28672 (28 KB)
Non DFS Used: 8249581568 (7.68 GB)
DFS Remaining: 150283526144(139.96 GB)
DFS Used%: 0%
DFS Remaining%: 94.8%
Last contact: Fri Jul 12 23:45:29 CST 2013


Name: 192.168.1.34:50010
Decommission Status : Normal
Configured Capacity: 158532087808 (147.64 GB)
DFS Used: 28672 (28 KB)
Non DFS Used: 8249528320 (7.68 GB)
DFS Remaining: 150282530816(139.96 GB)
DFS Used%: 0%
DFS Remaining%: 94.8%
Last contact: Fri Jul 12 23:45:32 CST 2013


Name: 192.168.1.33:50010
Decommission Status : Normal
Configured Capacity: 158532087808 (147.64 GB)
DFS Used: 28672 (28 KB)
Non DFS Used: 8249528320 (7.68 GB)
DFS Remaining: 150282530816(139.96 GB)
DFS Used%: 0%
DFS Remaining%: 94.8%
Last contact: Fri Jul 12 23:45:32 CST 2013
4. 登陆host,删除c6的虚拟机
~ ssh cos@host.wtmart.com
~ sudo virsh

#暂停c6的虚拟机
virsh # destroy c6
Domain c6 destroyed

#销毁c6的虚拟机实例
virsh # undefine c6
Domain c6 has been undefined

#查看虚拟机列表,c6已经不存在
virsh # list --all
 Id    Name                           State
----------------------------------------------------
 5     server3                        running
 6     server4                        running
 7     d2                             running
 8     r1                             running
 9     server2                        running
 18    server5                        running
 48    c3                             running
 50    c1                             running
 52    c4                             running
 53    c2                             running
 55    c5                             running
 -     d1                             shut off
 -     hadoop-base                    shut off
 -     u1210-base                     shut off
5. 物理硬盘删除c6的镜像文件
~ cd /disk/sdb1
~ sudo rm c6.img
完成删除虚拟c6节点的操作。
3. 实现脚本
quick.sh
~ vi quick.sh

#!/bin/bash
export HOST=c5
export DOMAIN=$HOST.wtmat.com
export IP=192.168.1.34
export DNS=192.168.1.7

#1. hostname host
echo "====================hostname host============================"
hostname $HOST
echo $HOST >  /etc/hostname
sed -i -e "/127.0.0.1/d" /etc/hosts
sed -i -e 1"i\127.0.0.1 localhost ${HOST}" /etc/hosts

#2. ip
echo "====================ip address============================"
sed -i -e "/address/d;/^iface eth0 inet static/a\address ${IP}" /etc/network/interfaces
/etc/init.d/networking restart

#3. dns
echo "====================dns============================"
echo "nameserver ${DNS}" > /etc/resolv.conf

#4. fdisk mount
echo "====================fdisk mount============================"
(echo n; echo p; echo ; echo ; echo ; echo w) | fdisk /dev/vdb
mkfs -t ext4 /dev/vdb1
mount /dev/vdb1 /home/cos/hadoop
echo "/dev/vdb1 /home/cos/hadoop ext4 defaults 0 0 " >> /etc/fstab

#5. hadoop folder
echo "==================== hadoop folder============================"
mkdir /home/cos/hadoop/data
mkdir /home/cos/hadoop/tmp
chown -R cos:cos /home/cos/hadoop/
chmod 755 /home/cos/hadoop/data
chmod 755 /home/cos/hadoop/tmp

#6. ssh
echo "====================ssh============================"
rm -rf /home/cos/.ssh/*
sudo -u cos ssh-keygen -t rsa -N "" -f /home/cos/.ssh/id_rsa
sudo cat /home/cos/.ssh/id_rsa.pub >> /home/cos/.ssh/authorized_keys
chown -R cos:cos /home/cos/.ssh/
exit
clone-node-add.sh
~ vi clone-node-add.sh

#!/bin/bash
export NEW_NODE=c6.wtmart.com
export PASS=cos
export SLAVES=c1.wtmart.com:c2.wtmart.com:c3.wtmart.com:c4.wtmart.com:c5.wtmart.com:c6.wtmart.com
IFS=:

#sudo apt-get install sshpass
#1. sync ssh
echo "===============sync ssh========================="
sshpass -p ${PASS} scp -o StrictHostKeyChecking=no cos@${NEW_NODE}:/home/cos/.ssh/authorized_keys .
cat authorized_keys >> /home/cos/.ssh/authorized_keys
rm authorized_keys

for SLAVE in $SLAVES
do
        echo scp $SLAVE
        sshpass -p ${PASS} scp /home/cos/.ssh/authorized_keys cos@$SLAVE:/home/cos/.ssh/authorized_keys
done

#2. sync hadoop slaves
echo "===============sync hadoop slaves========================="
rm /home/cos/toolkit/hadoop-1.0.3/conf/slaves
for SLAVE in $SLAVES
do
   echo $SLAVE >> /home/cos/toolkit/hadoop-1.0.3/conf/slaves
done

for SLAVE in $SLAVES
do
        echo scp $SLAVE
        scp /home/cos/toolkit/hadoop-1.0.3/conf/slaves cos@$SLAVE:/home/cos/toolkit/hadoop-1.0.3/conf/slaves
done

#3. restart hadoop cluster
echo "===============restart hadoop cluster========================="
stop-all.sh
start-all.sh
clone-node-del.sh
~ vi clone-node-del.sh

#!/bin/bash
export DEL_NODE=c6
export PASS=cos
export SLAVES=c1.wtmart.com:c2.wtmart.com:c3.wtmart.com:c4.wtmart.com:c5.wtmart.com
IFS=:

#0 stop
stop-all.sh

#1. sync ssh
echo "===============sync ssh========================="
sed -i "/cos@${DEL_NODE}/d" /home/cos/.ssh/authorized_keys

for SLAVE in $SLAVES
do
        echo scp $SLAVE
        sshpass -p ${PASS} scp /home/cos/.ssh/authorized_keys cos@$SLAVE:/home/cos/.ssh/authorized_keys
done

#2. sync hadoop slaves
echo "===============sync hadoop slaves========================="
rm /home/cos/toolkit/hadoop-1.0.3/conf/slaves
for SLAVE in $SLAVES
do
   echo $SLAVE >> /home/cos/toolkit/hadoop-1.0.3/conf/slaves
done

for SLAVE in $SLAVES
do
        echo scp $SLAVE
        scp /home/cos/toolkit/hadoop-1.0.3/conf/slaves cos@$SLAVE:/home/cos/toolkit/hadoop-1.0.3/conf/slaves
done

#3. restart hadoop cluster
echo "===============restart hadoop cluster========================="
start-all.sh
方便维护人员快速增加删除hadoop节点。
转载请注明出处:
http://blog.fens.me/hadoop-clone-add-delete/