• Archive by category "虚拟化实践"

Blog Archives

当R语言遇上Docker

R的极客理想系列文章,涵盖了R的思想,使用,工具,创新等的一系列要点,以我个人的学习和体验去诠释R的强大。

R语言作为统计学一门语言,一直在小众领域闪耀着光芒。直到大数据的爆发,R语言变成了一门炙手可热的数据分析的利器。随着越来越多的工程背景的人的加入,R语言的社区在迅速扩大成长。现在已不仅仅是统计领域,教育,银行,电商,互联网….都在使用R语言。

要成为有理想的极客,我们不能停留在语法上,要掌握牢固的数学,概率,统计知识,同时还要有创新精神,把R语言发挥到各个领域。让我们一起动起来吧,开始R的极客理想。

关于作者:

  • 张丹(Conan), 程序员R,Nodejs,Java
  • weibo:@Conan_Z
  • blog: http://blog.fens.me
  • email: bsspirit@gmail.com

转载请注明出处:
http://blog.fens.me/r-docker

r-docker

前言

R语言作为数据分析的工具,已经广泛被大家所接受并使用。但要把R语言项目工程化,部署到生产环境,提供在线用户使用却是难度很大的。主要原因就是R本身是单线程的,不支持并行处理。

当R遇到上了Docker会发生什么呢?本文将做详细的解释。

目录

  1. 当R遇到上了Docker
  2. 用Docker来管理R的程序

1. 当R遇到上了Docker

前言中提到,R运行时环境是单线程的,不支持并行处理,所以我们很难把R直接应用到生产环境中。当R遇到上了Docker,就出现了一个可以解决上面问题的方案。

通过Docker的容器化技术,把R的应用Docker化。每当用户发出请求,程序可以自动地在线启动一个Docker化的容器,来装载R的任务,部署,运行,计算,并返回结果。

r-docker2

从极端的情况考虑,如果要面对100万次并发的请求,我们需要启动100万个Docker的容器,每次容器单独执行自己的任务。但这种情况是要避免的,因为R本身来说,是做数据任务的,并不善于处理web是请求。如果可以把用户的大批量请求,转换成少量的数据计算的任务,那么这个设计就完美地解决了R由于并发而不能被工程化的问题。

r-docker3

比如,针对大量用户的重复性计算,把R的计算结果保存在缓存池中。

2. 用Docker来管理R的程序

设计方案定好,接下来就是就是动手实践了。

操作过程分成4步:

  • 1. 要有Docker的环境
  • 2. 找到第三方成熟的R语言的Docker镜像
  • 3. 把我们的R程序装进去
  • 4. 打包,运行,上传

1. Docker的环境。

安装Docker环境,就不在本文中介绍了,Docker环境的安装,请参考文章在Ubuntu中安装Docker

2. 找到第三方成熟的R语言的Docker镜像。

在docker hub中,搜索关键字 r, 共有535条结果。我们直接选用,排在第一位的r-base做为Docker容器的基础就行了。

docker-r

从仓库中,下载r-base镜像。


# 下载r-base镜像,大概300mb要下一会儿
~ sudo docker pull r-base
Using default tag: latest
latest: Pulling from library/r-base
9cd73496e13f: Pull complete 
f10af350cd29: Pull complete 
eea7b33eea97: Pull complete 
c91475e50472: Pull complete 
1e5e5f6785b4: Pull complete 
8c4091261ff6: Pull complete 
Digest: sha256:5f06e5a89cc64cbc513d02a8c650ea8bcbf0499795add57d18793069795c6f8d
Status: Downloaded newer image for r-base:latest

# 查看本地镜像列表
~ sudo docker images
REPOSITORY          TAG                 IMAGE ID            CREATED             SIZE
bsspirit/fensme     latest              8496b10e857a        2 hours ago         182.8 MB
ubuntu              latest              f8d79ba03c00        2 weeks ago         126.4 MB
r-base              latest              e2abe45e47d7        3 weeks ago         959.9 MB

3. 把我们的R程序装进去。

把R程序放进去之前,我们要先通过命令交互的方法,看看r-base容器中,是什么样子的。

运行r-base容器,会直接打开一个R的命令行窗口。


~ sudo docker run -ti --rm r-base

R version 3.3.1 (2016-06-21) -- "Bug in Your Hair"
Copyright (C) 2016 The R Foundation for Statistical Computing
Platform: x86_64-pc-linux-gnu (64-bit)

R is free software and comes with ABSOLUTELY NO WARRANTY.
You are welcome to redistribute it under certain conditions.
Type 'license()' or 'licence()' for distribution details.

  Natural language support but running in an English locale

R is a collaborative project with many contributors.
Type 'contributors()' for more information and
'citation()' on how to cite R or R packages in publications.

Type 'demo()' for some demos, 'help()' for on-line help, or
'help.start()' for an HTML browser interface to help.
Type 'q()' to quit R.

> 

我们通过执行R语言程序,了解一下Docker环境的信息。


# R程序启动路径
> getwd()
[1] "/"

# 当前路径中的目录
> dir()
 [1] "bin"   "boot"  "dev"   "etc"   "home"  "lib"   "lib64" "media" "mnt"  
[10] "opt"   "proc"  "root"  "run"   "sbin"  "srv"   "sys"   "tmp"   "usr"  
[19] "var"  

# 用户身份
> system('whoami')
root

# 系统信息
> sessionInfo()
R version 3.3.1 (2016-06-21)
Platform: x86_64-pc-linux-gnu (64-bit)
Running under: Debian GNU/Linux stretch/sid

locale:
 [1] LC_CTYPE=en_US.UTF-8       LC_NUMERIC=C              
 [3] LC_TIME=en_US.UTF-8        LC_COLLATE=en_US.UTF-8    
 [5] LC_MONETARY=en_US.UTF-8    LC_MESSAGES=en_US.UTF-8   
 [7] LC_PAPER=en_US.UTF-8       LC_NAME=C                 
 [9] LC_ADDRESS=C               LC_TELEPHONE=C            
[11] LC_MEASUREMENT=en_US.UTF-8 LC_IDENTIFICATION=C       

attached base packages:
[1] stats     graphics  grDevices utils     datasets  methods   base    

# R语言版本
> R.Version()
$platform
[1] "x86_64-pc-linux-gnu"

$arch
[1] "x86_64"

$os
[1] "linux-gnu"

$system
[1] "x86_64, linux-gnu"

$status
[1] ""

$major
[1] "3"

$minor
[1] "3.1"

$year
[1] "2016"

$month
[1] "06"

$day
[1] "21"

$`svn rev`
[1] "70800"

$language
[1] "R"

$version.string
[1] "R version 3.3.1 (2016-06-21)"

$nickname
[1] "Bug in Your Hair"

通过上面的几条命令,r-base容器的系统环境已经掌握。接下来,我们可以写一个R的算法,让这个程序在r-base的容器中运行。退出容器。

新建项目目录


~ mkdir ret && cd ret
~ pwd
/home/conan/ret

我们用a.r写一个计算万科(WANK)000002.SZ股票收益率的程序。数据从yahoo财经进行采集,R语言用于收益率计算,计算结果通过在控制台打印。

wanke

新建R语言算法文件,a.r。


~ vi a.r

install.packages(c('quantmod','PerformanceAnalytics'))
library(quantmod)
library(PerformanceAnalytics)
VANKE<-getSymbols("000002.SZ",auto.assign = FALSE, from = '2010-10-10')
close<-VANKE$'000002.SZ.Close'
ret<-CalculateReturns(close, method = "discrete")
cumret<-cumprod((ret+1)[-1])-1
VANKE_ret<-merge(close,ret,cumret)
names(VANKE_ret)<-c('close','ret','cumret')
print(tail(VANKE_ret))

我们先在本机中运行这段代码。


> 安装类库
> install.packages(c('quantmod','PerformanceAnalytics'))
> # 装载类库
> library(quantmod)
> library(PerformanceAnalytics)
> 
> # 获得VANKE每K线数据
> VANKE<-getSymbols("000002.SZ",auto.assign = FALSE, from = '2010-10-10')
>
> # 收盘价
> close<-VANKE$'000002.SZ.Close'
> 
> # 每日收益率 = (T日收盘价 - (T-1日收盘价))/T-1日收盘价
> ret<-CalculateReturns(close, method = "discrete")
> 
> # 每日累计收盘率 = (T日收益率+1)*(T+1日收益率+1)*...*(T+N日收益率+1)-1
> cumret<-cumprod((ret+1)[-1])-1
> 
> # 合并数据集
> VANKE_ret<-merge(close,ret,cumret)
> names(VANKE_ret)<-c('close','ret','cumret')
> 
> # 查看VANKE最近几日收益率
> print(tail(VANKE_ret))
           close          ret   cumret
2016-08-18 25.58 -0.010444874 1.893665
2016-08-19 24.59 -0.038702111 1.781674
2016-08-22 24.70  0.004473363 1.794118
2016-08-23 24.70  0.000000000 1.794118
2016-08-24 23.99 -0.028744939 1.713801
2016-08-25 23.54 -0.018757816 1.662896

接下来,编写Dockerfile通过加载外部文件的方法。


~ vi Dockerfile

FROM r-base
COPY . /usr/local/src/myscripts
WORKDIR /usr/local/src/myscripts
CMD ["Rscript", "a.r"]

4. 打包,运行,上传。

打包,生成Docker的镜像文件a.r。


~ sudo docker build -t a.r .
[sudo] password for conan: 
Sending build context to Docker daemon 3.072 kB
Step 1 : FROM r-base
 ---> e2abe45e47d7
Step 2 : COPY . /usr/local/src/myscripts
 ---> e6ef215d3683
Removing intermediate container aaabfdfe92ab
Step 3 : WORKDIR /usr/local/src/myscripts
 ---> Running in e3f2c65b947a
 ---> c667baee06bf
Removing intermediate container e3f2c65b947a
Step 4 : CMD Rscript a.r
 ---> Running in dc040bbdd3b9
 ---> 9a48d6dc02fe
Removing intermediate container dc040bbdd3b9
Successfully built 9a48d6dc02fe

启动r-base容器,运行a.r的脚本。


~  sudo docker run a.r

看着大段的日志从眼前飞过,计算出了万科的收益率的结果。

docker-r2

最后一步,不忘上传到docker hub,仓库地址为:https://hub.docker.com/r/bsspirit/ret/

上传镜像的操作命令:


~ sudo docker tag 9a48d6dc02fe bsspirit/ret
~ sudo docker push bsspirit/ret

如果你有Docker的环境,你可以直接用下面的命令,进行容器下载和运行。


~ sudo docker run bsspirit/ret

R和Docker的相遇,给R提供了并行计算施展的空间。Docker和R的相遇,也让Docker能够切入数据处理领域,有了更广阔的应用场景。感谢R和Docker给程序员的世界,带来了新的机会!!

转载请注明出处:
http://blog.fens.me/r-docker

打赏作者

在Ubuntu中安装Docker

Ubuntu实用工具系列文章,将介绍基于Linux ubuntu的各种工具软件的配置和使用。有些工具大家早已耳熟能详,有些工具经常用到但确依然陌生。我将记录我在使用操作系统时,安装及配置工具上面的一些方法,把使用心得记录下来也便于自己的以后查找和回忆。

关于作者:

  • 张丹, 程序员R,Nodejs,Java
  • weibo:@Conan_Z
  • blog: http://blog.fens.me
  • email: bsspirit@gmail.com

转载请注明出处:
http://blog.fens.me/linux-docker-install/

ubuntu-docker

前言

网上已经有很多介绍Docker安装的文章,自己的安装过程记录一下,为了博客文章结构的连贯性,为写下一篇R和Docker的相遇做为环境基础,同时也给自己一个备忘。

目录

  1. Docker是什么?
  2. 在Linux Ubuntu中安装Docker
  3. Docker镜像仓库
  4. 制作自己的Docker镜像
  5. 上传Docker镜像到公共仓库

1. Docker是什么?

在互联网圈混,如果还不知道Docker你就out了。从2014年开始,docker技术在互联网技术中异军突起,2015-2016年很多公司已经对Docker开始大量研究和应用。

Docker是什么?Docker是一个开源的应用容器引擎,系统级的轻量虚拟化技术,为应用程序的自动化部署提供解决方案。

你可以快速创建一个容器,并在容器上开发和运行你们的应用程序,通过配置文件可以轻松实现应用程序的自动化安装、部署和升级。

Docker的优势

Docker倍受业界追捧,必然有它非常明显的优势和特点。

  • 轻量级资源:容器是在进程级别隔离,并使用宿主机的内核,而不需要虚拟化整个操作系统。不需要虚拟化和系统调用复杂的操作。因此节省了很大的额外开销。不需要额外的hypervisor(虚拟化技术)支持,不需要虚拟硬件,不需要额外完整的系统。
  • 可移植性:所需要的应用都在容器中,可以在任意一台docker主机上运行
  • 可预测性:宿主机和容器相互不关心对方都运行什么。只考虑所需的接口标准化。

再不动手把Docker用上,你就真的out了。

2. 在Linux Ubuntu中安装Docker

安装Docker只需3步,下载Docker, 安装Docker,检查Docker是否成功。

Docker目前支持主流的3种操作系统的Linux, Mac, Windows的环境,本文使用的Linux系统环境为:Linux Ubuntu 14.04.4 LTS 64bit。在Ubuntu中下载和安装Docker可以直接用apt-get搞定。

由于Docker在1.7.1以后的版本指定了自己的源,所以我们需要先在APT中配置Docker的源。

更新APT的源,安装https和ca证书的库,默认这2个库都已经装了。


~ sudo apt-get update
~ sudo apt-get install apt-transport-https ca-certificates

添加秘钥GPG到APT配置中。


~ sudo apt-key adv --keyserver hkp://p80.pool.sks-keyservers.net:80 --recv-keys 58118E89F3A912897C070ADBF76221572C52609D

增加Docker的源到/etc/apt/souces.list文件中,我的版本是14.04对应ubuntu-trusty。


~ sudo vi /etc/apt/sources.list

# 增加到最后一行
deb https://apt.dockerproject.org/repo ubuntu-trusty main

接下来,就可以用可以用apt-get直接安装Docker了。


~ sudo apt-get update
~ sudo apt-get install docker-engine

安装完成,默认会启动Docker。


# 检查docker服务
~ service docker status
docker start/running, process 10013

# 检查docker进行
~ ps -aux|grep docker
root     10013  0.0  1.0 424948 40584 ?        Ssl  22:29   0:00 /usr/bin/dockerd --raw-logs
root     10022  0.0  0.2 199680 10280 ?        Ssl  22:29   0:00 docker-containerd -l unix:///var/run/docker/libcontainerd/docker-containerd.sock --shimdocker-containerd-shim --metrics-interval=0 --start-timeout 2m --state-dir /var/run/docker/libcontainerd/containerd --runtime docker-runc

# 检查docker版本
~ sudo docker version
Client:
 Version:      1.12.1
 API version:  1.24
 Go version:   go1.6.3
 Git commit:   23cf638
 Built:        Thu Aug 18 05:22:43 2016
 OS/Arch:      linux/amd64

Server:
 Version:      1.12.1
 API version:  1.24
 Go version:   go1.6.3
 Git commit:   23cf638
 Built:        Thu Aug 18 05:22:43 2016
 OS/Arch:      linux/amd64

检查Docker是否成功,运行hello-world。如果出现下面的信息,表示Docker引擎安装成功。


~ sudo docker run hello-world
Unable to find image 'hello-world:latest' locally
latest: Pulling from library/hello-world
c04b14da8d14: Pull complete 
Digest: sha256:0256e8a36e2070f7bf2d0b0763dbabdd67798512411de4cdcf9431a1feb60fd9
Status: Downloaded newer image for hello-world:latest

Hello from Docker!
This message shows that your installation appears to be working correctly.

To generate this message, Docker took the following steps:
 1. The Docker client contacted the Docker daemon.
 2. The Docker daemon pulled the "hello-world" image from the Docker Hub.
 3. The Docker daemon created a new container from that image which runs the
    executable that produces the output you are currently reading.
 4. The Docker daemon streamed that output to the Docker client, which sent it
    to your terminal.

To try something more ambitious, you can run an Ubuntu container with:
 $ docker run -it ubuntu bash

Share images, automate workflows, and more with a free Docker Hub account:
 https://hub.docker.com

For more examples and ideas, visit:
 https://docs.docker.com/engine/userguide/

注意:我们在执行上面的命令的时候,经常会遇到一个错误。Cannot connect to the Docker daemon. Is the docker daemon running on this host?

比如,直接输入 docker run hello-world 命令。


~ docker run hello-world
docker: Cannot connect to the Docker daemon. Is the docker daemon running on this host?.
See 'docker run --help'.

这是由于权限的问题,docker默认和root权限绑定,如果不加sudo时则没有权限。

3. Docker镜像仓库

对于上面我们执行的docker run hello-world命令,是什么意思呢?

把3个词分开来看,docker代表docker程序,run代表命令,hello-world代表镜像。就是用docker启动hello-world镜像。由于我们刚装好的docker,本地并没有镜像,那么run的命令会对docker远端的仓库中,找到名叫hello-world的镜像,然后下载到本地,再运行。

Docker官方的镜像仓库访问地址:https://hub.docker.com/

我们可以在Docker官方的仓库中,搜索你感兴趣的系统、语言、技术框架等,有很多的技术都已经被docker化了。我们就可以很方便地用别人已经做好的容器,站在前人的基础上继续工作。

docker-repo

从列表中点开一项后,会有对这个镜像的详细介绍。比如,Ubuntu的镜像。

docker-repo2

如果我们想要下载这个镜像,只需要按照他的提示,在命令行输入 docker pull ubuntu 这样就行了。


~ sudo docker pull ubuntu
Using default tag: latest
latest: Pulling from library/ubuntu
2f0243478e1f: Pull complete 
d8909ae88469: Pull complete 
820f09abed29: Pull complete 
01193a8f3d88: Pull complete 
Digest: sha256:8e2324f2288c26e1393b63e680ee7844202391414dbd48497e9a4fd997cd3cbf
Status: Downloaded newer image for ubuntu:latest

下载好后镜像,会保存在本地的仓库中。查看本地的镜像。


~ sudo docker images
REPOSITORY          TAG                 IMAGE ID            CREATED             SIZE
ubuntu              latest              f8d79ba03c00        2 weeks ago         126.4 MB
hello-world         latest              c54a2cc56cbb        7 weeks ago         1.848 kB

目前,有2个本地镜像,一个是hello-world,另一个是ubuntu。

4. 制作自己的Docker镜像

我们也可以制作自己的镜像,然后上传到官方的仓库中,让更多的人来使用。如果要制作自己的Docker镜像,你只需要写一个Dockerfile文件就行了。

下面我们创建一个能进行网络访问的Docker,从http://fens.me网站抓取最新8篇的文章列表,并打印到控制台。

docker-curl-fensme

创建项目目录


~ mkdir fensme && cd fensme

创建Dockerfile,依赖于上文中下载的ubuntu镜像,还要需要安装curl库用于网页抓取,同时用于jq库解析JSON数据。


~ vi Dockerfile

FROM ubuntu:latest
RUN apt-get update && apt-get install -y curl jq
CMD curl http://api.fens.me/blogs/ | jq .[]

打包,创建名为fensme的镜像。


# 打包
~ sudo docker build -t fensme .

# 查看镜像列表
~ sudo docker images
REPOSITORY          TAG                 IMAGE ID            CREATED             SIZE
fensme              latest              41b68972b35a        4 minutes ago       182.8 MB
ubuntu              latest              f8d79ba03c00        2 weeks ago         126.4 MB
hello-world         latest              c54a2cc56cbb        7 weeks ago         1.848 kB

运行fensme的镜像,这样就实现了网站数据的抓取。


~ sudo docker run fensme
  % Total    % Received % Xferd  Average Speed   Time    Time     Time  Current
                                 Dload  Upload   Total   Spent    Left  Speed
100  1421  100  1421    0     0    715      0  0:00:01  0:00:01 --:--:--   715
{
  "title": "R语言解读自回归模型",
  "date": 20160819,
  "link": "http://blog.fens.me/r-ar/",
  "img": "http://blog.fens.me/wp-content/uploads/2016/08/r-ar.png"
}
{
  "title": "R语言量化投资常用包总结",
  "date": 20160810,
  "link": "http://blog.fens.me/r-quant-packages/",
  "img": "http://blog.fens.me/wp-content/uploads/2016/08/quant-packages.png"
}
{
  "title": "R语言跨界调用C++",
  "date": 20160801,
  "link": "http://blog.fens.me/r-cpp-rcpp",
  "img": "http://blog.fens.me/wp-content/uploads/2016/08/rcpp.png"
}
{
  "title": "R语言解读多元线性回归模型",
  "date": 20160727,
  "link": "http://blog.fens.me/r-multi-linear-regression/",
  "img": "http://blog.fens.me/wp-content/uploads/2016/07/reg-multi-liner.png"
}
{
  "title": "R语言解读一元线性回归模型",
  "date": 20160725,
  "link": "http://blog.fens.me/r-linear-regression/",
  "img": "http://blog.fens.me/wp-content/uploads/2016/07/reg-liner.png"
}
{
  "title": "R语言中文分词包jiebaR",
  "date": 20160721,
  "link": "http://blog.fens.me/r-word-jiebar/",
  "img": "http://blog.fens.me/wp-content/uploads/2016/07/jiebaR.png"
}
{
  "title": "2016天善智能交流会第22场: R语言为量化而生",
  "date": 20160704,
  "link": "http://blog.fens.me/meeting-hellobi-20160701/",
  "img": "http://blog.fens.me/wp-content/uploads/2016/07/meeting-hellobi.png"
}
{
  "title": "R语言为量化而生",
  "date": 20160703,
  "link": "http://blog.fens.me/r-finance/",
  "img": "http://blog.fens.me/wp-content/uploads/2016/07/r-finance.png"
}

这个例子,我们通过Docker封装了一个非常简单的爬虫,当你需要的时候启动它,把结果写到数据库中。当执行完任务,系统资源就释放了,你需要再为它考虑。

比较简单地就可以把一个技术或一个功能Docker化,从而构建出个性化的Docker。

5. 上传Docker镜像到公共仓库

最后一步,其实就是把我们做好的Docker镜像上传到官方的仓库中,让其他的人也可以使用。

首先需要去docker hub上面注册一个账号,然后登录进去。

docker-hub-login

在docker hub上,创建一个自己的仓库。

docker-hub-create

在本地操作系统,绑定docker hub的账号


~ sudo docker login --username=bsspirit --email=bsspirit@163.com
Flag --email has been deprecated, will be removed in 1.13.
Password: 
Login Succeeded

接下来,要你刚才创建的fensme的镜像加上命名空间,对应该docker hub上面镜像名bsspirit/fensme。


# 给fensme增加命名空间
~ sudo docker tag 8496b10e857a bsspirit/fensme:latest

~ sudo docker images
REPOSITORY          TAG                 IMAGE ID            CREATED              SIZE
bsspirit/fensme     latest              8496b10e857a        About a minute ago   182.8 MB
fensme              latest              8496b10e857a        15 minutes ago       182.8 MB
ubuntu              latest              f8d79ba03c00        2 weeks ago          126.4 MB
hello-world         latest              c54a2cc56cbb        7 weeks ago          1.848 kB

上传bsspirit/fensme镜像,然后你就可以在docker hub的网站上看到你自己的镜像了。


~ sudo docker push bsspirit/fensme
The push refers to a repository [docker.io/bsspirit/fensme]
d9c50c22842b: Pushed 
4699cbd1a947: Pushed 
2bed5b3ec49f: Pushed 
3834bde7e567: Pushed 
d8d865b23727: Pushed 
latest: digest: sha256:bfea736a92b6e602d6bbca867715b0e985f2e9bc3ea4a75b545d7e009e22ac2b size: 1362

打开docker hub网站,刷新页面。

docker-repo3

最后,如果其他人需要使用这个docker镜像,像最开始介绍的,直接下载运行就可以了。


~ sudo docker run bsspirit/fensme

通过上面的操作,我们就把Docker在Linux Ubuntu中的系统安装完成。

转载请注明出处:
http://blog.fens.me/linux-docker-install/

打赏作者

Nova安装攻略

自己搭建VPS系列文章,介绍了如何利用自己的计算机资源,通过虚拟化技术搭建VPS。

在互联网2.0时代,每个人都有自己的博客,还有很多专属于自己的互联网应用。这些应用大部分都是互联网公司提供的。对于一些有能力的开发人员(geek)来说,他们希望做一些自己的应用,可以用到最新最炫的技术,并且有自己的域名,有自己的服务器。这时就要去租一些互联网上的VPS主机。VPS主机就相当于是一台远程的计算机,可以部署自己的应用程序,然后申请一个域名,就可以正式发布在互联网上了。本站“@晒粉丝” 就使用的Linode主机VPS在美国达拉斯机房。

其实,VPS还可以自己搭建的。只要我们有一台高性能的服务器,一个IP地址,一个路由。可以把一台高性能的服务器,很快的变成5台,10台,20台的虚拟VPS。我们就可以在自己的VPS上面的,发布各种的应用,还可以把剩余的服务器资源租给其他的互联网使用者。 本系列文章将分为以下几个部分介绍:“虚拟化技术选型”,“动态IP解析”,“在Ubuntu上安装KVM并搭建虚拟环境”,“给KVM虚拟机增加硬盘”,“Nova安装攻略”,“VPS内网的网络架构设计”,“VPS租用云服务”。

关于作者:

  • 张丹(Conan), 程序员Java,R,PHP,Javascript
  • weibo:@Conan_Z
  • blog: http://blog.fens.me
  • email: bsspirit@gmail.com

转载请注明出处:
http://blog.fens.me/vps-nova-setup/

openstack

前言

Nova是Openstack一个重要的组成部分,最核心的功能就是对虚拟机进行管理(kvm, qemu, xen, vmware, virtual box)。

本次安装实验对Linux Ubuntu系统版本有严格的要求,必须是12.04 LTS。其他版本模拟实验均不成功,请大家严格执行。

本次实验的参考图书:
OpenStack Cloud Computing Cookbook
Chapter 1: Starting OpenStack Compute

目录

  1. nova安装方案
  2. VirtrulBox虚拟机环境
  3. 操作系统环境
  4. 软件包依赖
  5. nova配置
  6. 创建nova实例
  7. 登陆云实例
  8. 错误总结

1. nova安装方案

使用VirtrulBox虚拟机,嵌套qemu虚拟机。nova安装在VirtrulBox环境中,云实例则安装qemu环境中。通过nova管理qemu云实例。

2. VirtrulBox虚拟机环境

VirtrulBox虚拟机: 6G内存,4核CPU, Linux Ubuntu 12.04 LTS
CPU支持VT-x/AMD-V,嵌套分页,PAE/NX
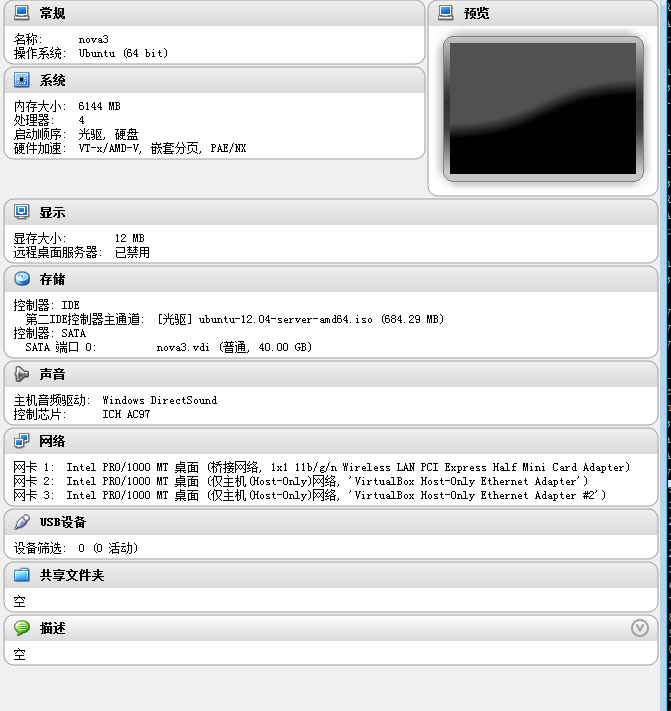
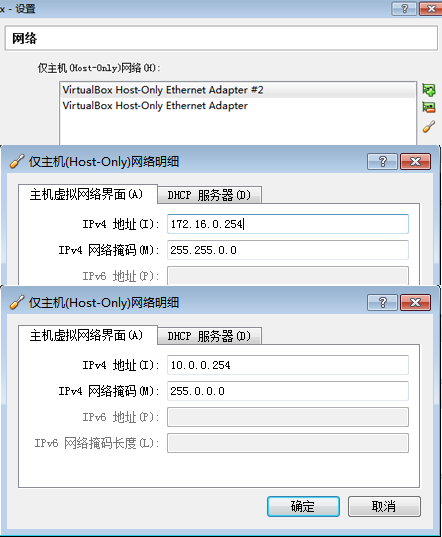
nova1

3张虚拟网卡:

  • 网卡1:桥接网卡
  • 网卡2:Host-Only
  • 网卡3:Host-Only

vbox2

Host-Only网卡在虚拟机中的全局设置:
vbox1

3. 操作系统环境

再次强调:本次实验的Ubuntu版本,必须12.04 LTS


~ uname -a
Linux nova 3.2.0-23-generic #36-Ubuntu SMP Tue Apr 10 20:39:51 UTC 2012 x86_64 x86_64 x86_64 GNU/Linux

~ cat /etc/issue
Ubuntu 12.04 LTS \n \l

~ ifconfig
eth0      Link encap:Ethernet  HWaddr 08:00:27:90:e8:19
          inet addr:192.168.1.200  Bcast:192.168.1.255  Mask:255.255.255.0
          inet6 addr: fe80::a00:27ff:fe90:e819/64 Scope:Link
          UP BROADCAST RUNNING MULTICAST  MTU:1500  Metric:1
          RX packets:162 errors:0 dropped:0 overruns:0 frame:0
          TX packets:132 errors:0 dropped:0 overruns:0 carrier:0
          collisions:0 txqueuelen:1000
          RX bytes:16399 (16.3 KB)  TX bytes:22792 (22.7 KB)

lo        Link encap:Local Loopback
          inet addr:127.0.0.1  Mask:255.0.0.0
          inet6 addr: ::1/128 Scope:Host
          UP LOOPBACK RUNNING  MTU:16436  Metric:1
          RX packets:0 errors:0 dropped:0 overruns:0 frame:0
          TX packets:0 errors:0 dropped:0 overruns:0 carrier:0
          collisions:0 txqueuelen:0
          RX bytes:0 (0.0 B)  TX bytes:0 (0.0 B)

创建openstack用户
创建新用户openstack,密码openstack,增加到sudo组


~ sudo useradd openstack
~ sudo passwd openstack  
~ sudo adduser openstack sudo

~ sudo mkdir -p /home/openstack
~ sudo chown openstack:openstack /home/openstack

~ ls -l /home
drwxr-xr-x 8 conan     conan     4096 Jul 13 17:07 conan
drwxr-xr-x 2 openstack openstack 4096 Jul 13 17:21 openstack

用openstack账号重新登陆,测试sudo命令
以下所有操作请使用openstack用户


ssh openstack@192.168.1.200

openstack@u1:~$ whoami
openstack

openstack@u1:~$ sudo -i  
[sudo] password for openstack:

root@u1:~# whoami
root

root@u1:~# exit
logout

虚拟机网卡配置


~ sudo vi /etc/network/interfaces

auto lo
iface lo inet loopback

auto eth0
iface eth0 inet static
address 192.168.1.200
netmask 255.255.255.0
network 192.168.1.0
broadcase 192.168.1.255
gateway 192.168.1.1

#public interface
auto eth1
iface eth1 inet static
address 172.16.0.1
netmask 255.255.0.0
network 172.16.0.0
broadcase 172.16.255.255

#private interface
auto eth2
iface eth2 inet manual
up ifconfig eth2 up

重新启动网卡


~ sudo /etc/init.d/networking restart

 * Running /etc/init.d/networking restart is deprecated because it may not enable again some interfaces
 * Reconfiguring network interfaces...                                                 ssh stop/waiting
ssh start/running, process 2040
ssh stop/waiting
ssh start/running, process 2082
ssh stop/waiting
ssh start/running, process 2121
                                                                            [ OK ]
~ ifconfig
eth0      Link encap:Ethernet  HWaddr 08:00:27:90:e8:19
          inet addr:192.168.1.200  Bcast:192.168.1.255  Mask:255.255.255.0
          inet6 addr: fe80::a00:27ff:fe90:e819/64 Scope:Link
          UP BROADCAST RUNNING MULTICAST  MTU:1500  Metric:1
          RX packets:3408 errors:0 dropped:0 overruns:0 frame:0
          TX packets:2244 errors:0 dropped:0 overruns:0 carrier:0
          collisions:0 txqueuelen:1000
          RX bytes:3321759 (3.3 MB)  TX bytes:250703 (250.7 KB)

eth1      Link encap:Ethernet  HWaddr 08:00:27:4e:06:74
          inet addr:172.16.0.1  Bcast:172.16.255.255  Mask:255.255.0.0
          inet6 addr: fe80::a00:27ff:fe4e:674/64 Scope:Link
          UP BROADCAST RUNNING MULTICAST  MTU:1500  Metric:1
          RX packets:18 errors:0 dropped:0 overruns:0 frame:0
          TX packets:6 errors:0 dropped:0 overruns:0 carrier:0
          collisions:0 txqueuelen:1000
          RX bytes:1656 (1.6 KB)  TX bytes:468 (468.0 B)

eth2      Link encap:Ethernet  HWaddr 08:00:27:5a:b1:1f
          inet6 addr: fe80::a00:27ff:fe5a:b11f/64 Scope:Link
          UP BROADCAST RUNNING MULTICAST  MTU:1500  Metric:1
          RX packets:33 errors:0 dropped:0 overruns:0 frame:0
          TX packets:5 errors:0 dropped:0 overruns:0 carrier:0
          collisions:0 txqueuelen:1000
          RX bytes:3156 (3.1 KB)  TX bytes:378 (378.0 B)

lo        Link encap:Local Loopback
          inet addr:127.0.0.1  Mask:255.0.0.0
          inet6 addr: ::1/128 Scope:Host
          UP LOOPBACK RUNNING  MTU:16436  Metric:1
          RX packets:0 errors:0 dropped:0 overruns:0 frame:0
          TX packets:0 errors:0 dropped:0 overruns:0 carrier:0
          collisions:0 txqueuelen:0
          RX bytes:0 (0.0 B)  TX bytes:0 (0.0 B)

DNS配置


~ vi /etc/resolv.conf 
nameserver 8.8.8.8

~ ping www.163.com
PING 163.xdwscache.glb0.lxdns.com (101.23.128.17) 56(84) bytes of data.
64 bytes from 101.23.128.17: icmp_req=1 ttl=53 time=20.3 ms
64 bytes from 101.23.128.17: icmp_req=2 ttl=53 time=18.5 ms

4. 软件包依赖

更新源


~ sudo vi /etc/apt/sources.list

deb http://mirrors.163.com/ubuntu/ precise main universe restricted multiverse 
deb-src http://mirrors.163.com/ubuntu/ precise main universe restricted multiverse 
deb http://mirrors.163.com/ubuntu/ precise-security universe main multiverse restricted 
deb-src http://mirrors.163.com/ubuntu/ precise-security universe main multiverse restricted 
deb http://mirrors.163.com/ubuntu/ precise-updates universe main multiverse restricted 
deb http://mirrors.163.com/ubuntu/ precise-proposed universe main multiverse restricted 
deb-src http://mirrors.163.com/ubuntu/ precise-proposed universe main multiverse restricted 
deb http://mirrors.163.com/ubuntu/ precise-backports universe main multiverse restricted 
deb-src http://mirrors.163.com/ubuntu/ precise-backports universe main multiverse restricted 
deb-src http://mirrors.163.com/ubuntu/ precise-updates universe main multiverse restricted

nova相关软件安装


~ sudo apt-get update
~ sudo apt-get -y install rabbitmq-server nova-api nova-objectstore nova-scheduler nova-network nova-compute nova-cert glance qemu unzip
~ sudo apt-get install pm-utils

注:如果没有安装pm-utils,libvirtd日志中会有错误


Cannot find 'pm-is-supported' in path: No such file or directory

查看系统进程


~ pstree
init─┬─acpid
     ├─atd
     ├─beam.smp─┬─cpu_sup
     │          ├─inet_gethost───inet_gethost
     │          └─38*[{beam.smp}]
     ├─cron
     ├─dbus-daemon
     ├─dhclient3
     ├─dnsmasq
     ├─epmd
     ├─5*[getty]
     ├─irqbalance
     ├─2*[iscsid]
     ├─libvirtd───10*[{libvirtd}]
     ├─login───bash
     ├─rsyslogd───3*[{rsyslogd}]
     ├─sshd───sshd───bash
     ├─sshd─┬─sshd───sshd───sh───bash───pstree
     │      └─sshd───sshd───sh───bash
     ├─su───glance-api
     ├─su───glance-registry
     ├─su───nova-api
     ├─su───nova-cert
     ├─su───nova-network
     ├─su───nova-objectstor
     ├─su───nova-scheduler
     ├─su───nova-compute
     ├─udevd───2*[udevd]
     ├─upstart-socket-
     ├─upstart-udev-br
     └─whoopsie───{whoopsie}

安装ntp时间同步服务


~ sudo apt-get -y install ntp

#修改配置文件
~ sudo vi /etc/ntp.conf

#Replace ntp.ubuntu.com with an NTP server on your network
server ntp.ubuntu.com
server 127.127.1.0
fudge 127.127.1.0 stratum 10

#重启ntp
~ sudo service ntp restart

~ ps -aux|grep ntp
ntp       6990  0.0  0.0  37696  2180 ?        Ss   19:50   0:00 /usr/sbin/ntpd -p /var/run/ntpd.pid -g -u 113:120

#查看系统当前时间
~ date
Sat Jul 13 19:50:12 CST 2013

安装MySQL


~ sudo apt-get install mysql-server

#配置允许其他计算访问
~ sudo sed -i 's/127.0.0.1/0.0.0.0/g' /etc/mysql/my.cnf
~ sudo service mysql restart

#创建nova数据库及配置nova用户
~ MYSQL_PASS=mysql
~ mysql -uroot -p$MYSQL_PASS -e 'CREATE DATABASE nova;'
~ mysql -uroot -p$MYSQL_PASS -e "GRANT ALL PRIVILEGES ON nova.* TO 'nova'@'%'"
~ mysql -uroot -p$MYSQL_PASS -e "SET PASSWORD FOR 'nova'@'%' = PASSWORD('openstack');"

5. nova配置

修改nova.conf配置文件
可以去掉–verbose,只是为了打印更多的日志信息。


~ sudo vi /etc/nova/nova.conf

--dhcpbridge_flagfile=/etc/nova/nova.conf
--dhcpbridge=/usr/bin/nova-dhcpbridge
--logdir=/var/log/nova
--state_path=/var/lib/nova
--lock_path=/var/lock/nova
--force_dhcp_release
--iscsi_helper=tgtadm
--libvirt_use_virtio_for_bridges
--connection_type=libvirt
--root_helper=sudo nova-rootwrap
--verbose
--ec2_private_dns_show_ip
--sql_connection=mysql://nova:openstack@172.16.0.1/nova
--use_deprecated_auth
--s3_host=172.16.0.1
--rabbit_host=172.16.0.1
--ec2_host=172.16.0.1
--ec2_dmz_host=172.16.0.1
--public_interface=eth1
--image_service=nova.image.glance.GlanceImageService
--glance_api_servers=172.16.0.1:9292
--auto_assign_floating_ip=true
--scheduler_default_filters=AllHostsFilter

修改VMM设置,nova-compute.conf
这里要使用qemu虚拟机,如果我们不是嵌套虚拟化的模式,建议使用kvm虚拟机。


~ sudo vi /etc/nova/nova-compute.conf

--libvirt_type=qemu

把nova源数据写入MySQL


~ sudo nova-manage db sync

2013-07-14 21:18:56 DEBUG nova.utils [-] backend  from (pid=8750) __get_backend /usr/lib/python2.7/dist-packages/nova/utils.py:663
2013-07-14 21:19:06 WARNING nova.utils [-] /usr/lib/python2.7/dist-packages/sqlalchemy/pool.py:639: SADeprecationWarning: The 'listeners' argument to Pool (and create_engine()) is deprecated.  Use event.listen().
  Pool.__init__(self, creator, **kw)

2013-07-14 21:19:06 WARNING nova.utils [-] /usr/lib/python2.7/dist-packages/sqlalchemy/pool.py:145: SADeprecationWarning: Pool.add_listener is deprecated.  Use event.listen()
  self.add_listener(l)

2013-07-14 21:19:06 AUDIT nova.db.sqlalchemy.fix_dns_domains [-] Applying database fix for Essex dns_domains table.

创建openstack私有网络


~ sudo nova-manage network create vmnet --fixed_range_v4=10.0.0.0/8 --network_size=64 --bridge_interface=eth2

2013-07-14 21:19:34 DEBUG nova.utils [req-152fee41-ddc9-4ac5-902d-fb93f7af67a8 None None] backend  from (pid=8807) __get_backend /usr/lib/python2.7/dist-packages/nova/utils.py:663

设置openstack浮动IP


~ sudo nova-manage floating create --ip_range=172.16.1.0/24

2013-07-14 21:19:48 DEBUG nova.utils [req-7171e8bc-6542-40d2-b24c-b4593505fd87 None None] backend  from (pid=8814) __get_backend /usr/lib/python2.7/dist-packages/nova/utils.py:663

查看mysql中nova数据库


~ mysql -uroot -p

mysql> show databases;
+--------------------+
| Database           |
+--------------------+
| information_schema |
| ape_biz            |
| mysql              |
| nova               |
| performance_schema |
| test               |
+--------------------+
6 rows in set (0.00 sec)

mysql> use nova

mysql> show tables;
+-------------------------------------+
| Tables_in_nova                      |
+-------------------------------------+
| agent_builds                        |
| aggregate_hosts                     |
| aggregate_metadata                  |
| aggregates                          |
| auth_tokens                         |
| block_device_mapping                |
| bw_usage_cache                      |
| cells                               |
| certificates                        |
| compute_nodes                       |
| console_pools                       |
| consoles                            |
| dns_domains                         |
| fixed_ips                           |
| floating_ips                        |
| instance_actions                    |
| instance_faults                     |
| instance_info_caches                |
| instance_metadata                   |
| instance_type_extra_specs           |
| instance_types                      |
| instances                           |
| iscsi_targets                       |
| key_pairs                           |
| migrate_version                     |
| migrations                          |
| networks                            |
| projects                            |
| provider_fw_rules                   |
| quotas                              |
| s3_images                           |
| security_group_instance_association |
| security_group_rules                |
| security_groups                     |
| services                            |
| sm_backend_config                   |
| sm_flavors                          |
| sm_volume                           |
| snapshots                           |
| user_project_association            |
| user_project_role_association       |
| user_role_association               |
| users                               |
| virtual_interfaces                  |
| virtual_storage_arrays              |
| volume_metadata                     |
| volume_type_extra_specs             |
| volume_types                        |
| volumes                             |
+-------------------------------------+
49 rows in set (0.00 sec)

重启服务nova,libvirt,glance


#停止
~ sudo stop nova-compute
~ sudo stop nova-network
~ sudo stop nova-api
~ sudo stop nova-scheduler
~ sudo stop nova-objectstore
~ sudo stop nova-cert

~ sudo stop libvirt-bin
~ sudo stop glance-registry
~ sudo stop glance-api

#启动
~ sudo start nova-compute
~ sudo start nova-network
~ sudo start nova-api
~ sudo start nova-scheduler
~ sudo start nova-objectstore
~ sudo start nova-cert

~ sudo start libvirt-bin
~ sudo start glance-registry
~ sudo start glance-api

#查看系统进程树
~ pstree
init─┬─acpid
     ├─atd
     ├─beam.smp─┬─cpu_sup
     │          ├─inet_gethost───inet_gethost
     │          └─38*[{beam.smp}]
     ├─cron
     ├─dbus-daemon
     ├─dhclient3
     ├─dnsmasq
     ├─epmd
     ├─5*[getty]
     ├─irqbalance
     ├─2*[iscsid]
     ├─libvirtd───10*[{libvirtd}]
     ├─login───bash
     ├─mysqld───19*[{mysqld}]
     ├─ntpd
     ├─rsyslogd───3*[{rsyslogd}]
     ├─sshd───sshd───bash
     ├─sshd─┬─sshd───sshd───sh───bash───pstree
     │      └─sshd───sshd───sh───bash
     ├─su───glance-registry
     ├─su───glance-api
     ├─su───nova-network
     ├─su───nova-api
     ├─su───nova-scheduler
     ├─su───nova-objectstor
     ├─su───nova-cert
     ├─su───nova-compute
     ├─udevd───2*[udevd]
     ├─upstart-socket-
     ├─upstart-udev-br
     └─whoopsie───{whoopsie}

创建nova用户,角色,项目


#创建用户
~ sudo nova-manage user admin openstack
2013-07-14 21:22:00 DEBUG nova.utils [req-6a95dd03-04db-4f60-9198-d77a4d4936e8 None None] backend  from (pid=9254) __get_backend /usr/lib/python2.7/dist-packages/nova/utils.py:663
2013-07-14 21:22:00 AUDIT nova.auth.manager [-] Created user openstack (admin: True)
export EC2_ACCESS_KEY=62ff82fa-74a9-4ffb-a420-ea190e893863
export EC2_SECRET_KEY=f1f32aed-85fe-406d-8f28-bbf02d7a7134

#创建角色
~ sudo nova-manage role add openstack cloudadmin
2013-07-14 21:22:15 AUDIT nova.auth.manager [-] Adding sitewide role cloudadmin to user openstack
2013-07-14 21:22:15 DEBUG nova.utils [req-a9d8cdfa-263c-4d6a-8c69-d6571aabee00 None None] backend  from (pid=9262) __get_backend /usr/lib/python2.7/dist-packages/nova/utils.py:663

#创建项目
~ sudo nova-manage project create cookbook openstack
2013-07-14 21:22:34 DEBUG nova.utils [req-3a340500-6674-439e-ac95-e28954637cf5 None None] backend  from (pid=9395) __get_backend /usr/lib/python2.7/dist-packages/nova/utils.py:663
2013-07-14 21:22:34 AUDIT nova.auth.manager [-] Created project cookbook with manager openstack

~ sudo nova-manage project zipfile cookbook openstack
2013-07-14 21:22:49 DEBUG nova.utils [req-429e7839-6009-4862-98c5-af01ceac9cee None None] backend  from (pid=9402) __get_backend /usr/lib/python2.7/dist-packages/nova/utils.py:663
2013-07-14 21:22:49 DEBUG nova.utils [-] Running cmd (subprocess): openssl genrsa -out /tmp/tmprZNpYT/temp.key 1024 from (pid=9402) execute /usr/lib/python2.7/dist-packages/nova/utils.py:224
2013-07-14 21:22:49 DEBUG nova.utils [-] Running cmd (subprocess): openssl req -new -key /tmp/tmprZNpYT/temp.key -out /tmp/tmprZNpYT/temp.csr -batch -subj /C=US/ST=California/O=OpenStack/OU=NovaDev/CN=cookbook-openstack-2013-07-14T13:22:49Z from (pid=9402) execute /usr/lib/python2.7/dist-packages/nova/utils.py:224
2013-07-14 21:22:49 DEBUG nova.crypto [-] Flags path: /var/lib/nova/CA from (pid=9402) _sign_csr /usr/lib/python2.7/dist-packages/nova/crypto.py:290
2013-07-14 21:22:49 DEBUG nova.utils [-] Running cmd (subprocess): openssl ca -batch -out /tmp/tmpJZvmrM/outbound.csr -config ./openssl.cnf -infiles /tmp/tmpJZvmrM/inbound.csr from (pid=9402) execute /usr/lib/python2.7/dist-packages/nova/utils.py:224
2013-07-14 21:22:49 DEBUG nova.utils [-] Running cmd (subprocess): openssl x509 -in /tmp/tmpJZvmrM/outbound.csr -serial -noout from (pid=9402) execute /usr/lib/python2.7/dist-packages/nova/utils.py:224
2013-07-14 21:22:49 WARNING nova.auth.manager [-] No vpn data for project cookbook

安装命令行工具及配置


~ sudo apt-get install euca2ools python-novaclient unzip

~ pwd
/home/openstack

~ ls -l
-rw-r--r-- 1 root root 5930 Jul 13 20:38 nova.zip

#解压工具包
~ unzip nova.zip
Archive:  nova.zip
extracting: novarc
extracting: pk.pem
extracting: cert.pem
extracting: cacert.pem

#增加环境变量
~ . novarc

#查看环境变量
~ env
LC_PAPER=en_US
LC_ADDRESS=en_US
LC_MONETARY=en_US
SHELL=/bin/sh
TERM=xterm
SSH_CLIENT=192.168.1.11 60377 22
LC_NUMERIC=en_US
EUCALYPTUS_CERT=/home/openstack/cacert.pem
OLDPWD=/var/log/libvirt
SSH_TTY=/dev/pts/0
LC_ALL=en_US.UTF-8
USER=openstack
LC_TELEPHONE=en_US
NOVA_CERT=/home/openstack/cacert.pem
EC2_SECRET_KEY=6f964a16-6036-44ef-bdf3-23dff94f5b94
NOVA_PROJECT_ID=cookbook
EC2_USER_ID=42
PATH=/usr/local/sbin:/usr/local/bin:/usr/sbin:/usr/bin:/sbin:/bin:/usr/games:/home/conan/toolkit/jdk16/bin:/home/conan/toolkit/cassandra/bin
MAIL=/var/mail/openstack
NOVA_VERSION=1.1
LC_IDENTIFICATION=en_US
NOVA_USERNAME=openstack
PWD=/home/openstack
JAVA_HOME=/home/conan/toolkit/jdk16
LANG=en_US.UTF-8
CASSANDRA_HOME=/home/conan/toolkit/cassandra125
LC_MEASUREMENT=en_US
NOVA_API_KEY=openstack
NOVA_URL=http://172.16.0.1:8774/v1.1/
SHLVL=1
HOME=/home/openstack
LANGUAGE=en_US:en
EC2_URL=http://172.16.0.1:8773/services/Cloud
LOGNAME=openstack
SSH_CONNECTION=192.168.1.11 60377 192.168.1.200 22
EC2_ACCESS_KEY=openstack:cookbook
EC2_PRIVATE_KEY=/home/openstack/pk.pem
DISPLAY=localhost:10.0
S3_URL=http://172.16.0.1:3333
LC_TIME=en_US
EC2_CERT=/home/openstack/cert.pem
LC_NAME=en_US
_=/usr/bin/env

#创建密钥
~ euca-add-keypair openstack > openstack.pem
~ chmod 0600 *.pem

~ ls -l
-rw------- 1 openstack openstack 1029 Jul 13 20:38 cacert.pem
-rw------- 1 openstack openstack 2515 Jul 13 20:38 cert.pem
-rw------- 1 openstack openstack 1113 Jul 13 20:38 novarc
-rw-r--r-- 1 root      root      5930 Jul 13 20:38 nova.zip
-rw------- 1 openstack openstack  954 Jul 13 20:50 openstack.pem
-rw------- 1 openstack openstack  887 Jul 13 20:38 pk.pem

查看nova服务


~ euca-describe-availability-zones verbose
AVAILABILITYZONE        nova    available
AVAILABILITYZONE        |- nova
AVAILABILITYZONE        | |- nova-scheduler     enabled :-) 2013-07-14 13:23:53
AVAILABILITYZONE        | |- nova-compute       enabled :-) 2013-07-14 13:23:53
AVAILABILITYZONE        | |- nova-cert  enabled :-) 2013-07-14 13:23:53
AVAILABILITYZONE        | |- nova-network       enabled :-) 2013-07-14 13:23:53

6. 创建nova实例

上传云实例到虚拟主机
ubuntu-12.04-server-cloudimg-i386.tar.gz文件,请自己下载:http://uec-images.ubuntu.com/releases/precise/release/ubuntu-12.04-server-cloudimg-i386.tar.gz


~ scp ubuntu-12.04-server-cloudimg-i386.tar.gz openstack@192.168.1.200:/home/openstack
ubuntu-12.04-server-cloudimg-i386.tar.gz                                              100%  206MB -11880.-5KB/s   00:07

~ ls -l
-rw------- 1 openstack openstack      1029 Jul 14 21:22 cacert.pem
-rw------- 1 openstack openstack      2515 Jul 14 21:22 cert.pem
-rw------- 1 openstack openstack      1113 Jul 14 21:22 novarc
-rw-r--r-- 1 root      root           5930 Jul 14 21:22 nova.zip
-rw------- 1 openstack openstack       954 Jul 14 21:23 openstack.pem
-rw------- 1 openstack openstack       887 Jul 14 21:22 pk.pem
-rw-r--r-- 1 openstack openstack 215487341 Jul 14 21:25 ubuntu-12.04-server-cloudimg-i386.tar.gz

安装云实例


~ cloud-publish-tarball ubuntu-12.04-server-cloudimg-i386.tar.gz images i386

Sun Jul 14 21:25:34 CST 2013: ====== extracting image ======
Warning: no ramdisk found, assuming '--ramdisk none'
kernel : precise-server-cloudimg-i386-vmlinuz-virtual
ramdisk: none
image  : precise-server-cloudimg-i386.img
Sun Jul 14 21:25:40 CST 2013: ====== bundle/upload kernel ======
Sun Jul 14 21:26:06 CST 2013: ====== bundle/upload image ======
Sun Jul 14 21:27:04 CST 2013: ====== done ======
emi="ami-00000002"; eri="none"; eki="aki-00000001";

查看云实例
两种查看方式:euca客户端和nova客户端

注:注册image的操作要经过:decrypting,untarring,uploading,available这几个状态,需要等待几分钟


~ euca-describe-images

IMAGE   aki-00000001    images/precise-server-cloudimg-i386-vmlinuz-virtual.manifest.xmlavailable        private         i386    kernel                          instance-store
IMAGE   ami-00000002    images/precise-server-cloudimg-i386.img.manifest.xml            available        private         i386    machine aki-00000001                    instance-store

~ nova image-list
+--------------------------------------+-----------------------------------------------------+--------+--------+
|                  ID                  |                         Name                        | Status | Server |
+--------------------------------------+-----------------------------------------------------+--------+--------+
| 306eb471-bbc5-495e-b7a1-484e11f71502 | images/precise-server-cloudimg-i386-vmlinuz-virtual | ACTIVE |        |
| 9dbf632e-b0d8-4230-a0e5-ee3836040492 | images/precise-server-cloudimg-i386.img             | ACTIVE |        |
+--------------------------------------+-----------------------------------------------------+--------+--------+

设置云实例网络


~ euca-authorize default -P tcp -p 22 -s 0.0.0.0/0
GROUP   default
PERMISSION      default ALLOWS  tcp     22      22      FROM    CIDR    0.0.0.0/0

~ euca-authorize default -P icmp -t -1:-1
GROUP   default
PERMISSION      default ALLOWS  icmp    -1      -1      FROM    CIDR    0.0.0.0/0

查看系统空间


~ df -h
Filesystem      Size  Used Avail Use% Mounted on
/dev/sda1        34G  3.7G   29G  12% /
udev            3.0G  4.0K  3.0G   1% /dev
tmpfs           1.2G  316K  1.2G   1% /run
none            5.0M     0  5.0M   0% /run/lock
none            3.0G     0  3.0G   0% /run/shm
cgroup          3.0G     0  3.0G   0% /sys/fs/cgroup

~ nova flavor-list
+----+-----------+-----------+------+-----------+------+-------+-------------+
| ID |    Name   | Memory_MB | Disk | Ephemeral | Swap | VCPUs | RXTX_Factor |
+----+-----------+-----------+------+-----------+------+-------+-------------+
| 1  | m1.tiny   | 512       | 0    | 0         |      | 1     | 1.0         |
| 2  | m1.small  | 2048      | 10   | 20        |      | 1     | 1.0         |
| 3  | m1.medium | 4096      | 10   | 40        |      | 2     | 1.0         |
| 4  | m1.large  | 8192      | 10   | 80        |      | 4     | 1.0         |
| 5  | m1.xlarge | 16384     | 10   | 160       |      | 8     | 1.0         |
+----+-----------+-----------+------+-----------+------+-------+-------------+

还有29G硬盘空间,根据云实例创建favor-list,我可以选择 tiny或者small。

这里我选择用tiny模式


~ euca-run-instances ami-00000002 -t m1.tiny -k openstack
RESERVATION     r-f6y5tydu      cookbook        default
INSTANCE        i-00000001      ami-00000002                    pending openstack (cookbook, None)       0               m1.tiny 2013-07-14T13:30:02.000Z        unknown zone    aki-00000001                     monitoring-disabled     

查看云实例列表
这个操作要等几分钟:


~ euca-describe-instances
RESERVATION     r-f6y5tydu      cookbook        default
INSTANCE        i-00000001      ami-00000002    172.16.1.1      10.0.0.3        running openstack (cookbook, nova)       0               m1.tiny 2013-07-14T13:30:02.000Z        nova     aki-00000001                    monitoring-disabled     172.16.1.1      10.0.0.3instance-store

~ nova list
+--------------------------------------+----------+--------+----------------------------+
|                  ID                  |   Name   | Status |          Networks          |
+--------------------------------------+----------+--------+----------------------------+
| d6e5fe88-1950-48f4-853a-2fd57e6c72f4 | Server 1 | ACTIVE | vmnet=10.0.0.3, 172.16.1.1 |
+--------------------------------------+----------+--------+----------------------------+

~ top
11424 libvirt-  20   0 1451m 322m 7284 S  105  5.4   1:20.58 qemu-system-x86
 8962 nova      20   0  265m 104m 5936 S    3  1.8   0:17.57 nova-api
   35 root      25   5     0    0    0 S    1  0.0   0:00.66 ksmd
 5933 rabbitmq  20   0 2086m  28m 2468 S    1  0.5   0:03.33 beam.smp
 8969 nova      20   0  195m  48m 4748 S    1  0.8   0:02.77 nova-scheduler
 9190 nova      20   0 1642m  63m 6660 S    1  1.1   0:08.14 nova-compute
 8522 mysql     20   0 1118m  54m 8276 S    1  0.9   0:04.45 mysqld
 8951 nova      20   0  197m  50m 4756 S    1  0.9   0:03.09 nova-network

7. 登陆云实例

ping通过云实例


~ ping 172.16.1.1
PING 172.16.1.1 (172.16.1.1) 56(84) bytes of data.
64 bytes from 172.16.1.1: icmp_req=1 ttl=64 time=5.98 ms
64 bytes from 172.16.1.1: icmp_req=2 ttl=64 time=2.00 ms
64 bytes from 172.16.1.1: icmp_req=3 ttl=64 time=3.27 ms

通过证书登陆云实例


~ ssh -i openstack.pem ubuntu@172.16.1.1
The authenticity of host '172.16.1.1 (172.16.1.1)' can't be established.
ECDSA key fingerprint is b8:0b:a6:18:0d:30:06:ea:79:c7:17:e5:29:34:55:39.
Are you sure you want to continue connecting (yes/no)? yes
Warning: Permanently added '172.16.1.1' (ECDSA) to the list of known hosts.

在云实例简单操作


~ ubuntu@server-1:~$ who
ubuntu   pts/0        2013-07-14 13:35 (172.16.1.1)

~ ubuntu@server-1:~$ ifconfig
eth0      Link encap:Ethernet  HWaddr fa:16:3e:22:75:8f
          inet addr:10.0.0.3  Bcast:10.0.0.63  Mask:255.255.255.192
          inet6 addr: fe80::f816:3eff:fe22:758f/64 Scope:Link
          UP BROADCAST RUNNING MULTICAST  MTU:1500  Metric:1
          RX packets:263 errors:0 dropped:0 overruns:0 frame:0
          TX packets:250 errors:0 dropped:0 overruns:0 carrier:0
          collisions:0 txqueuelen:1000
          RX bytes:29823 (29.8 KB)  TX bytes:28061 (28.0 KB)

lo        Link encap:Local Loopback
          inet addr:127.0.0.1  Mask:255.0.0.0
          inet6 addr: ::1/128 Scope:Host
          UP LOOPBACK RUNNING  MTU:16436  Metric:1
          RX packets:0 errors:0 dropped:0 overruns:0 frame:0
          TX packets:0 errors:0 dropped:0 overruns:0 carrier:0
          collisions:0 txqueuelen:0
          RX bytes:0 (0.0 B)  TX bytes:0 (0.0 B)

nova实验安装完成!!

8. 错误总结

看上去上面过程,就是命令操作,但其实会遇到很多的问题。

1. 版本问题:如果用Ubunut 12.04.2时,和上面完全一样的操作,在创建云实例的时候会失败。云实例起不来,从RUNNING状态直接进入SHUTDOWN状态。ping不通,ssh也连不上。

2. 版本问题:如果用Ubunut 13.03时,命令操作,Nova数据库,Nova配置文件, Nova服务都已经和书中实例不一样了。按照书的操作无法进行。

3. 依赖软件问题:pm-utils这个软件竟然没有做libvirtd的依赖,需要手动安装。
如果没有安装会出现下面的错误


~ sudo cat /var/log/libvirt/libvirtd.log

2013-07-13 12:20:25.511+0000: 9292: info : libvirt version: 0.9.8
2013-07-13 12:20:25.511+0000: 9292: error : virExecWithHook:327 : Cannot find 'pm-is-supported' in path: No such file or directory
2013-07-13 12:20:25.511+0000: 9292: warning : qemuCapsInit:856 : Failed to get host power management capabilities
2013-07-13 12:20:25.653+0000: 9292: error : virExecWithHook:327 : Cannot find 'pm-is-supported' in path: No such file or directory
2013-07-13 12:20:25.653+0000: 9292: warning : lxcCapsInit:77 : Failed to get host power management capabilities
2013-07-13 12:20:25.654+0000: 9292: error : virExecWithHook:327 : Cannot find 'pm-is-supported' in path: No such file or directory
2013-07-13 12:20:25.655+0000: 9292: warning : umlCapsInit:87 : Failed to get host power management capabilities

#解决pm-is-supported错误
~ sudo apt-get -y install pm-utils
~ sudo stop libvirt-bin
~ sudo start libvirt-bin

4. nova状态问题:注册image时间,会卡在untarring永久不动了。nova image-list状态是saving。
这是因为image由于各种原因没有注册成功,我第一次就由于硬盘满了,就一直卡在这个状态了,也看不到错误信息太郁闷了。

解决办法:删除原来卡住的 image,重新注册。


euca-deregister aki-00000001
euca-deregister ami-00000002

耐心很重要,坚持就是胜利。

转载请注明出处:
http://blog.fens.me/vps-nova-setup/

打赏作者

让Hadoop跑在云端系列文章 之 增加删除hadoop节点

让Hadoop跑在云端系列文章,介绍了如何整合虚拟化和Hadoop,让Hadoop集群跑在VPS虚拟主机上,通过云向用户提供存储和计算的服务。

现在硬件越来越便宜,一台非品牌服务器,2颗24核CPU,配48G内存,2T的硬盘,已经降到2万块人民币以下了。这种配置如果简单地放几个web应用,显然是奢侈的浪费。就算是用来实现单节点的hadoop,对计算资源浪费也是非常高的。对于这么高性能的计算机,如何有效利用计算资源,就成为成本控制的一项重要议题了。

通过虚拟化技术,我们可以将一台服务器,拆分成12台VPS,每台2核CPU,4G内存,40G硬盘,并且支持资源重新分配。多么伟大的技术啊!现在我们有了12个节点的hadoop集群, 让Hadoop跑在云端,让世界加速。

关于作者:

  • 张丹(Conan), 程序员Java,R,PHP,Javascript
  • weibo:@Conan_Z
  • blog: http://blog.fens.me
  • email: bsspirit@gmail.com

转载请注明出处:

http://blog.fens.me/hadoop-clone-add-delete/

clone-add-del

前言

让Hadoop跑在云端系列文章,经过前面几篇文章的介绍,我们已经可以创建并管理虚拟机,增加hadoop节点。本文只是把操作过程整理一下,做一个操作总结,让没有计算机背景的同学,也可以进行操作。

目录

  1. 增加克隆体hadoop节点c6
  2. 删除c6节点
  3. 实现脚本


1. 增加克隆体hadoop节点c6

1. 登陆host主机,查检c6.wtmat.com域名是否已经被正确解析。


~ ssh cos@host.wtmart.com

~ ping c6.wtmart.com
ping: unknown host c6.wtmart.com

2. 登陆dns.wtmart.com服务器,做域名绑定。


~ ssh cos@dns.wtmart.com

~  sudo vi /etc/bind/db.wtmart.com
#增加
c6      IN      A       192.168.1.35

#重启dns服务器
~ sudo /etc/init.d/bind9 restart
 * Stopping domain name service... bind9                                                              waiting for pid 1418 to die                                                                                              [ OK ]
 * Starting domain name service... bind9

~ exit

3. 返回host, 查检c6.wtmat.com域名是否已经被正确解析。


~ ping c6.wtmart.com -n
PING c6.wtmart.com (192.168.1.35) 56(84) bytes of data.
From 192.168.1.79 icmp_seq=1 Destination Host Unreachable
From 192.168.1.79 icmp_seq=2 Destination Host Unreachable
From 192.168.1.79 icmp_seq=3 Destination Host Unreachable

c6.wtmart.com已被解析到192.168.1.35,只是还没有主机,下面我们就给c6增加一台虚拟机。

4. 在host,克隆虚拟机


~ sudo virt-clone --connect qemu:///system -o hadoop-base -n c6 -f /disk/sdb1/c6.img
Cloning hadoop-base.img               1% [                          ]  42 MB/s | 531 MB     15:53 ETA
Cloning hadoop-base.img                                                        |  40 GB     07:54

5. 打开虚拟机管理控制软件virsh


~ sudo virsh

#查看主机状态
virsh # list --all
 Id    Name                           State
----------------------------------------------------
 5     server3                        running
 6     server4                        running
 7     d2                             running
 8     r1                             running
 9     server2                        running
 18    server5                        running
 48    c3                             running
 50    c1                             running
 52    c4                             running
 53    c2                             running
 55    c5                             running
 -     c6                             shut off
 -     d1                             shut off
 -     hadoop-base                    shut off
 -     u1210-base                     shut off


#编辑c6虚拟机,给虚拟机挂载分区硬盘/dev/sdb10
~ edit c6
<disk type='block' device='disk'>
<driver name='qemu' type='raw' cache='none'/>
<source dev='/dev/sdb10'/>
<target dev='vdb' bus='virtio'/>
</disk>

#启动c6
~ start c6
Domain c6 started

#进入c6
~ console c6

6. 在c6中,执行快速配置脚本。


~ pwd
/home/cos

~ ls -l
drwxrwxr-x 2 cos cos 4096 Jul  9 23:50 hadoop
-rw-rw-r-- 1 cos cos 1404 Jul 11 16:50 quick.sh
drwxrwxr-x 7 cos cos 4096 Jul  9 23:31 toolkit

#修改虚拟机参数
~ vi quick.sh
export HOST=c6
export IP=192.168.1.35


#请用sudo身份执行脚本
~ sudo sh ./quick.sh

====================hostname host============================
====================ip address============================
Rather than invoking init scripts through /etc/init.d, use the service(8)
utility, e.g. service networking restart

Since the script you are attempting to invoke has been converted to an
Upstart job, you may also use the stop(8) and then start(8) utilities,
e.g. stop networking ; start networking. The restart(8) utility is also available.
networking stop/waiting
networking start/running
====================dns============================
====================fdisk mount============================
Device contains neither a valid DOS partition table, nor Sun, SGI or OSF disklabel
Building a new DOS disklabel with disk identifier 0x8f02312d.
Changes will remain in memory only, until you decide to write them.
After that, of course, the previous content won't be recoverable.

Warning: invalid flag 0x0000 of partition table 4 will be corrected by w(rite)

Command (m for help): Partition type:
   p   primary (0 primary, 0 extended, 4 free)
   e   extended
Select (default p): Partition number (1-4, default 1): Using default value 1
First sector (2048-379580414, default 2048): Using default value 2048
Last sector, +sectors or +size{K,M,G} (2048-379580414, default 379580414): Using default value 379580414

Command (m for help): The partition table has been altered!

Calling ioctl() to re-read partition table.
Syncing disks.
mke2fs 1.42.5 (29-Jul-2012)
Filesystem label=
OS type: Linux
Block size=4096 (log=2)
Fragment size=4096 (log=2)
Stride=0 blocks, Stripe width=0 blocks
11862016 inodes, 47447295 blocks
2372364 blocks (5.00%) reserved for the super user
First data block=0
Maximum filesystem blocks=4294967296
1448 block groups
32768 blocks per group, 32768 fragments per group
8192 inodes per group
Superblock backups stored on blocks:
        32768, 98304, 163840, 229376, 294912, 819200, 884736, 1605632, 2654208,
        4096000, 7962624, 11239424, 20480000, 23887872

Allocating group tables: done
Writing inode tables: done
Creating journal (32768 blocks): done
Writing superblocks and filesystem accounting information: done

==================== hadoop folder============================
====================ssh============================
Generating public/private rsa key pair.
Your identification has been saved in /home/cos/.ssh/id_rsa.
Your public key has been saved in /home/cos/.ssh/id_rsa.pub.
The key fingerprint is:
55:0d:3c:61:cc:53:e5:68:24:aa:33:18:3b:fc:08:75 cos@c6
The key's randomart image is:
+--[ RSA 2048]----+
|           +*=o..|
|           +*o.o |
|      o E o  oo .|
|     o = o   .   |
|    . = S        |
|     . + o       |
|      . .        |
|                 |
|                 |
+-----------------+


#退出虚拟机
~ exit

7. 登陆hadoop的主节点c1.wtmart.com


~ ssh cos@c1.wtmart.com

#查看当前hadoop集群状态, 5个hadoop节点正常运行
~ hadoop dfsadmin -report
Configured Capacity: 792662536192 (738.22 GB)
Present Capacity: 744482840576 (693.35 GB)
DFS Remaining: 744482676736 (693.35 GB)
DFS Used: 163840 (160 KB)
DFS Used%: 0%
Under replicated blocks: 0
Blocks with corrupt replicas: 0
Missing blocks: 0

-------------------------------------------------
Datanodes available: 5 (5 total, 0 dead)

Name: 192.168.1.30:50010
Decommission Status : Normal
Configured Capacity: 158533136384 (147.65 GB)
DFS Used: 49152 (48 KB)
Non DFS Used: 15181529088 (14.14 GB)
DFS Remaining: 143351558144(133.51 GB)
DFS Used%: 0%
DFS Remaining%: 90.42%
Last contact: Fri Jul 12 23:16:09 CST 2013


Name: 192.168.1.31:50010
Decommission Status : Normal
Configured Capacity: 158532087808 (147.64 GB)
DFS Used: 28672 (28 KB)
Non DFS Used: 8249528320 (7.68 GB)
DFS Remaining: 150282530816(139.96 GB)
DFS Used%: 0%
DFS Remaining%: 94.8%
Last contact: Fri Jul 12 23:16:08 CST 2013


Name: 192.168.1.32:50010
Decommission Status : Normal
Configured Capacity: 158533136384 (147.65 GB)
DFS Used: 28672 (28 KB)
Non DFS Used: 8249581568 (7.68 GB)
DFS Remaining: 150283526144(139.96 GB)
DFS Used%: 0%
DFS Remaining%: 94.8%
Last contact: Fri Jul 12 23:16:08 CST 2013


Name: 192.168.1.34:50010
Decommission Status : Normal
Configured Capacity: 158532087808 (147.64 GB)
DFS Used: 28672 (28 KB)
Non DFS Used: 8249528320 (7.68 GB)
DFS Remaining: 150282530816(139.96 GB)
DFS Used%: 0%
DFS Remaining%: 94.8%
Last contact: Fri Jul 12 23:16:09 CST 2013


Name: 192.168.1.33:50010
Decommission Status : Normal
Configured Capacity: 158532087808 (147.64 GB)
DFS Used: 28672 (28 KB)
Non DFS Used: 8249528320 (7.68 GB)
DFS Remaining: 150282530816(139.96 GB)
DFS Used%: 0%
DFS Remaining%: 94.8%
Last contact: Fri Jul 12 23:16:08 CST 2013

8. 增加c6到hadoop集群


~ pwd
/home/cos

~ ls
-rw-rw-r-- 1 cos cos 1078 Jul 12 23:30 clone-node-add.sh
-rw-rw-r-- 1 cos cos  918 Jul 12 23:44 clone-node-del.sh
drwxrwxr-x 2 cos cos 4096 Jul  9 21:42 download
drwxr-xr-x 6 cos cos 4096 Jul  9 23:31 hadoop
drwxrwxr-x 7 cos cos 4096 Jul  9 23:31 toolkit

#修改配置参数
~ vi clone-node-add.sh

#新增节点c6.wtmart.com
export NEW_NODE=c6.wtmart.com
#配置slaves节点
export SLAVES=c1.wtmart.com:c2.wtmart.com:c3.wtmart.com:c4.wtmart.com:c5.wtmart.com:c6.wtmart.com

#运行脚本,以当前用户运行
~ sh ./clone-node-add.sh
===============sync ssh=========================
Warning: Permanently added 'c6.wtmart.com,192.168.1.35' (ECDSA) to the list of known hosts.
scp c1.wtmart.com
scp c2.wtmart.com
scp c3.wtmart.com
scp c4.wtmart.com
scp c5.wtmart.com
scp c6.wtmart.com
===============sync hadoop slaves=========================
scp c1.wtmart.com
slaves                                                               100%   84     0.1KB/s   00:00
scp c2.wtmart.com
slaves                                                               100%   84     0.1KB/s   00:00
scp c3.wtmart.com
slaves                                                               100%   84     0.1KB/s   00:00
scp c4.wtmart.com
slaves                                                               100%   84     0.1KB/s   00:00
scp c5.wtmart.com
slaves                                                               100%   84     0.1KB/s   00:00
scp c6.wtmart.com
slaves                                                               100%   84     0.1KB/s   00:00
===============restart hadoop cluster=========================
Warning: $HADOOP_HOME is deprecated.

stopping jobtracker
c1.wtmart.com: Warning: $HADOOP_HOME is deprecated.
c1.wtmart.com:
c5.wtmart.com: Warning: $HADOOP_HOME is deprecated.
c5.wtmart.com:
c1.wtmart.com: stopping tasktracker
c5.wtmart.com: stopping tasktracker
c4.wtmart.com: Warning: $HADOOP_HOME is deprecated.
c4.wtmart.com:
c4.wtmart.com: stopping tasktracker
c3.wtmart.com: Warning: $HADOOP_HOME is deprecated.
c3.wtmart.com:
c2.wtmart.com: Warning: $HADOOP_HOME is deprecated.
c2.wtmart.com:
c3.wtmart.com: stopping tasktracker
c2.wtmart.com: stopping tasktracker
c6.wtmart.com: Warning: $HADOOP_HOME is deprecated.
c6.wtmart.com:
c6.wtmart.com: no tasktracker to stop
stopping namenode
c1.wtmart.com: Warning: $HADOOP_HOME is deprecated.
c1.wtmart.com:
c1.wtmart.com: stopping datanode
c5.wtmart.com: Warning: $HADOOP_HOME is deprecated.
c5.wtmart.com:
c6.wtmart.com: Warning: $HADOOP_HOME is deprecated.
c6.wtmart.com:
c2.wtmart.com: Warning: $HADOOP_HOME is deprecated.
c2.wtmart.com:
c6.wtmart.com: no datanode to stop
c5.wtmart.com: stopping datanode
c3.wtmart.com: Warning: $HADOOP_HOME is deprecated.
c3.wtmart.com:
c4.wtmart.com: Warning: $HADOOP_HOME is deprecated.
c4.wtmart.com:
c2.wtmart.com: stopping datanode
c3.wtmart.com: stopping datanode
c4.wtmart.com: stopping datanode
c1.wtmart.com: Warning: $HADOOP_HOME is deprecated.
c1.wtmart.com:
c1.wtmart.com: stopping secondarynamenode
Warning: $HADOOP_HOME is deprecated.

starting namenode, logging to /home/cos/toolkit/hadoop-1.0.3/libexec/../logs/hadoop-cos-namenode-c1.out
c1.wtmart.com: Warning: $HADOOP_HOME is deprecated.
c1.wtmart.com:
c3.wtmart.com: Warning: $HADOOP_HOME is deprecated.
c3.wtmart.com:
c2.wtmart.com: Warning: $HADOOP_HOME is deprecated.
c2.wtmart.com:
c5.wtmart.com: Warning: $HADOOP_HOME is deprecated.
c5.wtmart.com:
c4.wtmart.com: Warning: $HADOOP_HOME is deprecated.
c4.wtmart.com:
c1.wtmart.com: starting datanode, logging to /home/cos/toolkit/hadoop-1.0.3/libexec/../logs/hadoop-cos-datanode-c1.out
c6.wtmart.com: Warning: $HADOOP_HOME is deprecated.
c6.wtmart.com:
c5.wtmart.com: starting datanode, logging to /home/cos/toolkit/hadoop-1.0.3/libexec/../logs/hadoop-cos-datanode-c5.out
c2.wtmart.com: starting datanode, logging to /home/cos/toolkit/hadoop-1.0.3/libexec/../logs/hadoop-cos-datanode-c2.out
c6.wtmart.com: starting datanode, logging to /home/cos/toolkit/hadoop-1.0.3/libexec/../logs/hadoop-cos-datanode-c6.out
c3.wtmart.com: starting datanode, logging to /home/cos/toolkit/hadoop-1.0.3/libexec/../logs/hadoop-cos-datanode-c3.out
c4.wtmart.com: starting datanode, logging to /home/cos/toolkit/hadoop-1.0.3/libexec/../logs/hadoop-cos-datanode-c4.out
c1.wtmart.com: Warning: $HADOOP_HOME is deprecated.
c1.wtmart.com:
c1.wtmart.com: starting secondarynamenode, logging to /home/cos/toolkit/hadoop-1.0.3/libexec/../logs/hadoop-cos-secondarynamenode-c1.out
starting jobtracker, logging to /home/cos/toolkit/hadoop-1.0.3/libexec/../logs/hadoop-cos-jobtracker-c1.out
c1.wtmart.com: Warning: $HADOOP_HOME is deprecated.
c1.wtmart.com:
c1.wtmart.com: starting tasktracker, logging to /home/cos/toolkit/hadoop-1.0.3/libexec/../logs/hadoop-cos-tasktracker-c1.out
c4.wtmart.com: Warning: $HADOOP_HOME is deprecated.
c4.wtmart.com:
c5.wtmart.com: Warning: $HADOOP_HOME is deprecated.
c2.wtmart.com: Warning: $HADOOP_HOME is deprecated.
c2.wtmart.com:
c5.wtmart.com:
c3.wtmart.com: Warning: $HADOOP_HOME is deprecated.
c6.wtmart.com: Warning: $HADOOP_HOME is deprecated.
c6.wtmart.com:
c3.wtmart.com:
c5.wtmart.com: starting tasktracker, logging to /home/cos/toolkit/hadoop-1.0.3/libexec/../logs/hadoop-cos-tasktracker-c5.out
c2.wtmart.com: starting tasktracker, logging to /home/cos/toolkit/hadoop-1.0.3/libexec/../logs/hadoop-cos-tasktracker-c2.out
c6.wtmart.com: starting tasktracker, logging to /home/cos/toolkit/hadoop-1.0.3/libexec/../logs/hadoop-cos-tasktracker-c6.out
c4.wtmart.com: starting tasktracker, logging to /home/cos/toolkit/hadoop-1.0.3/libexec/../logs/hadoop-cos-tasktracker-c4.out
c3.wtmart.com: starting tasktracker, logging to /home/cos/toolkit/hadoop-1.0.3/libexec/../logs/hadoop-cos-tasktracker-c3.out

9. 查看hadoop节点已经增加,c6已经增加到hadoop集群中


#查看系统进程
~ jps
12019 TaskTracker
11763 SecondaryNameNode
12098 Jps
11878 JobTracker
11633 DataNode
11499 NameNode

#查看hadoop节点
~ hadoop dfsadmin -report
Configured Capacity: 983957319680 (916.38 GB)
Present Capacity: 925863960576 (862.28 GB)
DFS Remaining: 925863768064 (862.28 GB)
DFS Used: 192512 (188 KB)
DFS Used%: 0%
Under replicated blocks: 0
Blocks with corrupt replicas: 0
Missing blocks: 0

-------------------------------------------------
Datanodes available: 6 (6 total, 0 dead)

Name: 192.168.1.30:50010
Decommission Status : Normal
Configured Capacity: 158533136384 (147.65 GB)
DFS Used: 49152 (48 KB)
Non DFS Used: 15181541376 (14.14 GB)
DFS Remaining: 143351545856(133.51 GB)
DFS Used%: 0%
DFS Remaining%: 90.42%
Last contact: Fri Jul 12 23:27:01 CST 2013


Name: 192.168.1.31:50010
Decommission Status : Normal
Configured Capacity: 158532087808 (147.64 GB)
DFS Used: 28672 (28 KB)
Non DFS Used: 8249528320 (7.68 GB)
DFS Remaining: 150282530816(139.96 GB)
DFS Used%: 0%
DFS Remaining%: 94.8%
Last contact: Fri Jul 12 23:27:00 CST 2013


Name: 192.168.1.32:50010
Decommission Status : Normal
Configured Capacity: 158533136384 (147.65 GB)
DFS Used: 28672 (28 KB)
Non DFS Used: 8249581568 (7.68 GB)
DFS Remaining: 150283526144(139.96 GB)
DFS Used%: 0%
DFS Remaining%: 94.8%
Last contact: Fri Jul 12 23:27:00 CST 2013


Name: 192.168.1.34:50010
Decommission Status : Normal
Configured Capacity: 158532087808 (147.64 GB)
DFS Used: 28672 (28 KB)
Non DFS Used: 8249528320 (7.68 GB)
DFS Remaining: 150282530816(139.96 GB)
DFS Used%: 0%
DFS Remaining%: 94.8%
Last contact: Fri Jul 12 23:27:00 CST 2013


Name: 192.168.1.33:50010
Decommission Status : Normal
Configured Capacity: 158532087808 (147.64 GB)
DFS Used: 28672 (28 KB)
Non DFS Used: 8249528320 (7.68 GB)
DFS Remaining: 150282530816(139.96 GB)
DFS Used%: 0%
DFS Remaining%: 94.8%
Last contact: Fri Jul 12 23:27:00 CST 2013


Name: 192.168.1.35:50010
Decommission Status : Normal
Configured Capacity: 191294783488 (178.16 GB)
DFS Used: 28672 (28 KB)
Non DFS Used: 9913651200 (9.23 GB)
DFS Remaining: 181381103616(168.92 GB)
DFS Used%: 0%
DFS Remaining%: 94.82%
Last contact: Fri Jul 12 23:27:02 CST 2013

删除c6节点

1. 登陆hadoop主节点,c1.wtmart.com


~ ssh cos@c1.wtmart.com

~ pwd
/home/cos

~ ls -l
-rw-rw-r-- 1 cos cos 1078 Jul 12 23:30 clone-node-add.sh
-rw-rw-r-- 1 cos cos  918 Jul 12 23:44 clone-node-del.sh
drwxrwxr-x 2 cos cos 4096 Jul  9 21:42 download
drwxr-xr-x 6 cos cos 4096 Jul  9 23:31 hadoop
drwxrwxr-x 7 cos cos 4096 Jul  9 23:31 toolkit

2. 修改配置脚本


~ vi clone-node-del.sh
export DEL_NODE=c6
export SLAVES=c1.wtmart.com:c2.wtmart.com:c3.wtmart.com:c4.wtmart.com:c5.wtmart.com

#运行脚本,以当前用户运行
~  sh ./clone-node-del.sh
===============sync ssh=========================
scp c1.wtmart.com
scp c2.wtmart.com
scp c3.wtmart.com
scp c4.wtmart.com
scp c5.wtmart.com
===============sync hadoop slaves=========================
scp c1.wtmart.com
slaves                                                               100%   70     0.1KB/s   00:00
scp c2.wtmart.com
slaves                                                               100%   70     0.1KB/s   00:00
scp c3.wtmart.com
slaves                                                               100%   70     0.1KB/s   00:00
scp c4.wtmart.com
slaves                                                               100%   70     0.1KB/s   00:00
scp c5.wtmart.com
slaves                                                               100%   70     0.1KB/s   00:00
===============restart hadoop cluster=========================
Warning: $HADOOP_HOME is deprecated.

stopping jobtracker
c1.wtmart.com: Warning: $HADOOP_HOME is deprecated.
c1.wtmart.com:
c1.wtmart.com: stopping tasktracker
c2.wtmart.com: Warning: $HADOOP_HOME is deprecated.
c2.wtmart.com:
c2.wtmart.com: stopping tasktracker
c5.wtmart.com: Warning: $HADOOP_HOME is deprecated.
c5.wtmart.com:
c3.wtmart.com: Warning: $HADOOP_HOME is deprecated.
c3.wtmart.com:
c5.wtmart.com: stopping tasktracker
c4.wtmart.com: Warning: $HADOOP_HOME is deprecated.
c4.wtmart.com:
c3.wtmart.com: stopping tasktracker
c4.wtmart.com: stopping tasktracker
stopping namenode
c1.wtmart.com: Warning: $HADOOP_HOME is deprecated.
c1.wtmart.com:
c1.wtmart.com: stopping datanode
c4.wtmart.com: Warning: $HADOOP_HOME is deprecated.
c4.wtmart.com:
c5.wtmart.com: Warning: $HADOOP_HOME is deprecated.
c5.wtmart.com:
c4.wtmart.com: stopping datanode
c5.wtmart.com: stopping datanode
c3.wtmart.com: Warning: $HADOOP_HOME is deprecated.
c3.wtmart.com:
c2.wtmart.com: Warning: $HADOOP_HOME is deprecated.
c2.wtmart.com:
c3.wtmart.com: stopping datanode
c2.wtmart.com: stopping datanode
c1.wtmart.com: Warning: $HADOOP_HOME is deprecated.
c1.wtmart.com:
c1.wtmart.com: stopping secondarynamenode
Warning: $HADOOP_HOME is deprecated.

starting namenode, logging to /home/cos/toolkit/hadoop-1.0.3/libexec/../logs/hadoop-cos-namenode-c1.out
c1.wtmart.com: Warning: $HADOOP_HOME is deprecated.
c1.wtmart.com:
c3.wtmart.com: Warning: $HADOOP_HOME is deprecated.
c3.wtmart.com:
c4.wtmart.com: Warning: $HADOOP_HOME is deprecated.
c4.wtmart.com:
c5.wtmart.com: Warning: $HADOOP_HOME is deprecated.
c2.wtmart.com: Warning: $HADOOP_HOME is deprecated.
c2.wtmart.com:
c5.wtmart.com:
c3.wtmart.com: starting datanode, logging to /home/cos/toolkit/hadoop-1.0.3/libexec/../logs/hadoop-cos-datanode-c3.out
c1.wtmart.com: starting datanode, logging to /home/cos/toolkit/hadoop-1.0.3/libexec/../logs/hadoop-cos-datanode-c1.out
c5.wtmart.com: starting datanode, logging to /home/cos/toolkit/hadoop-1.0.3/libexec/../logs/hadoop-cos-datanode-c5.out
c2.wtmart.com: starting datanode, logging to /home/cos/toolkit/hadoop-1.0.3/libexec/../logs/hadoop-cos-datanode-c2.out
c4.wtmart.com: starting datanode, logging to /home/cos/toolkit/hadoop-1.0.3/libexec/../logs/hadoop-cos-datanode-c4.out
c1.wtmart.com: Warning: $HADOOP_HOME is deprecated.
c1.wtmart.com:
c1.wtmart.com: starting secondarynamenode, logging to /home/cos/toolkit/hadoop-1.0.3/libexec/../logs/hadoop-cos-secondarynamenode-c1.out
starting jobtracker, logging to /home/cos/toolkit/hadoop-1.0.3/libexec/../logs/hadoop-cos-jobtracker-c1.out
c4.wtmart.com: Warning: $HADOOP_HOME is deprecated.
c4.wtmart.com:
c5.wtmart.com: Warning: $HADOOP_HOME is deprecated.
c5.wtmart.com:
c3.wtmart.com: Warning: $HADOOP_HOME is deprecated.
c3.wtmart.com:
c5.wtmart.com: starting tasktracker, logging to /home/cos/toolkit/hadoop-1.0.3/libexec/../logs/hadoop-cos-tasktracker-c5.out
c2.wtmart.com: Warning: $HADOOP_HOME is deprecated.
c2.wtmart.com:
c4.wtmart.com: starting tasktracker, logging to /home/cos/toolkit/hadoop-1.0.3/libexec/../logs/hadoop-cos-tasktracker-c4.out
c3.wtmart.com: starting tasktracker, logging to /home/cos/toolkit/hadoop-1.0.3/libexec/../logs/hadoop-cos-tasktracker-c3.out
c2.wtmart.com: starting tasktracker, logging to /home/cos/toolkit/hadoop-1.0.3/libexec/../logs/hadoop-cos-tasktracker-c2.out
c1.wtmart.com: Warning: $HADOOP_HOME is deprecated.
c1.wtmart.com:
c1.wtmart.com: starting tasktracker, logging to /home/cos/toolkit/hadoop-1.0.3/libexec/../logs/hadoop-cos-tasktracker-c1.out

3. 查看hadoop节点,c6已经被删除


~ hadoop dfsadmin -report
Warning: $HADOOP_HOME is deprecated.

Safe mode is ON
Configured Capacity: 792662536192 (738.22 GB)
Present Capacity: 744482836480 (693.35 GB)
DFS Remaining: 744482672640 (693.35 GB)
DFS Used: 163840 (160 KB)
DFS Used%: 0%
Under replicated blocks: 0
Blocks with corrupt replicas: 0
Missing blocks: 0

-------------------------------------------------
Datanodes available: 5 (5 total, 0 dead)

Name: 192.168.1.30:50010
Decommission Status : Normal
Configured Capacity: 158533136384 (147.65 GB)
DFS Used: 49152 (48 KB)
Non DFS Used: 15181533184 (14.14 GB)
DFS Remaining: 143351554048(133.51 GB)
DFS Used%: 0%
DFS Remaining%: 90.42%
Last contact: Fri Jul 12 23:45:29 CST 2013


Name: 192.168.1.31:50010
Decommission Status : Normal
Configured Capacity: 158532087808 (147.64 GB)
DFS Used: 28672 (28 KB)
Non DFS Used: 8249528320 (7.68 GB)
DFS Remaining: 150282530816(139.96 GB)
DFS Used%: 0%
DFS Remaining%: 94.8%
Last contact: Fri Jul 12 23:45:29 CST 2013


Name: 192.168.1.32:50010
Decommission Status : Normal
Configured Capacity: 158533136384 (147.65 GB)
DFS Used: 28672 (28 KB)
Non DFS Used: 8249581568 (7.68 GB)
DFS Remaining: 150283526144(139.96 GB)
DFS Used%: 0%
DFS Remaining%: 94.8%
Last contact: Fri Jul 12 23:45:29 CST 2013


Name: 192.168.1.34:50010
Decommission Status : Normal
Configured Capacity: 158532087808 (147.64 GB)
DFS Used: 28672 (28 KB)
Non DFS Used: 8249528320 (7.68 GB)
DFS Remaining: 150282530816(139.96 GB)
DFS Used%: 0%
DFS Remaining%: 94.8%
Last contact: Fri Jul 12 23:45:32 CST 2013


Name: 192.168.1.33:50010
Decommission Status : Normal
Configured Capacity: 158532087808 (147.64 GB)
DFS Used: 28672 (28 KB)
Non DFS Used: 8249528320 (7.68 GB)
DFS Remaining: 150282530816(139.96 GB)
DFS Used%: 0%
DFS Remaining%: 94.8%
Last contact: Fri Jul 12 23:45:32 CST 2013

4. 登陆host,删除c6的虚拟机


~ ssh cos@host.wtmart.com
~ sudo virsh

#暂停c6的虚拟机
virsh # destroy c6
Domain c6 destroyed

#销毁c6的虚拟机实例
virsh # undefine c6
Domain c6 has been undefined

#查看虚拟机列表,c6已经不存在
virsh # list --all
 Id    Name                           State
----------------------------------------------------
 5     server3                        running
 6     server4                        running
 7     d2                             running
 8     r1                             running
 9     server2                        running
 18    server5                        running
 48    c3                             running
 50    c1                             running
 52    c4                             running
 53    c2                             running
 55    c5                             running
 -     d1                             shut off
 -     hadoop-base                    shut off
 -     u1210-base                     shut off

5. 物理硬盘删除c6的镜像文件


~ cd /disk/sdb1
~ sudo rm c6.img

完成删除虚拟c6节点的操作。

3. 实现脚本

quick.sh


~ vi quick.sh

#!/bin/bash
export HOST=c5
export DOMAIN=$HOST.wtmat.com
export IP=192.168.1.34
export DNS=192.168.1.7

#1. hostname host
echo "====================hostname host============================"
hostname $HOST
echo $HOST >  /etc/hostname
sed -i -e "/127.0.0.1/d" /etc/hosts
sed -i -e 1"i\127.0.0.1 localhost ${HOST}" /etc/hosts

#2. ip
echo "====================ip address============================"
sed -i -e "/address/d;/^iface eth0 inet static/a\address ${IP}" /etc/network/interfaces
/etc/init.d/networking restart

#3. dns
echo "====================dns============================"
echo "nameserver ${DNS}" > /etc/resolv.conf

#4. fdisk mount
echo "====================fdisk mount============================"
(echo n; echo p; echo ; echo ; echo ; echo w) | fdisk /dev/vdb
mkfs -t ext4 /dev/vdb1
mount /dev/vdb1 /home/cos/hadoop
echo "/dev/vdb1 /home/cos/hadoop ext4 defaults 0 0 " >> /etc/fstab

#5. hadoop folder
echo "==================== hadoop folder============================"
mkdir /home/cos/hadoop/data
mkdir /home/cos/hadoop/tmp
chown -R cos:cos /home/cos/hadoop/
chmod 755 /home/cos/hadoop/data
chmod 755 /home/cos/hadoop/tmp

#6. ssh
echo "====================ssh============================"
rm -rf /home/cos/.ssh/*
sudo -u cos ssh-keygen -t rsa -N "" -f /home/cos/.ssh/id_rsa
sudo cat /home/cos/.ssh/id_rsa.pub >> /home/cos/.ssh/authorized_keys
chown -R cos:cos /home/cos/.ssh/
exit

clone-node-add.sh


~ vi clone-node-add.sh

#!/bin/bash
export NEW_NODE=c6.wtmart.com
export PASS=cos
export SLAVES=c1.wtmart.com:c2.wtmart.com:c3.wtmart.com:c4.wtmart.com:c5.wtmart.com:c6.wtmart.com
IFS=:

#sudo apt-get install sshpass
#1. sync ssh
echo "===============sync ssh========================="
sshpass -p ${PASS} scp -o StrictHostKeyChecking=no cos@${NEW_NODE}:/home/cos/.ssh/authorized_keys .
cat authorized_keys >> /home/cos/.ssh/authorized_keys
rm authorized_keys

for SLAVE in $SLAVES
do
        echo scp $SLAVE
        sshpass -p ${PASS} scp /home/cos/.ssh/authorized_keys cos@$SLAVE:/home/cos/.ssh/authorized_keys
done

#2. sync hadoop slaves
echo "===============sync hadoop slaves========================="
rm /home/cos/toolkit/hadoop-1.0.3/conf/slaves
for SLAVE in $SLAVES
do
   echo $SLAVE >> /home/cos/toolkit/hadoop-1.0.3/conf/slaves
done

for SLAVE in $SLAVES
do
        echo scp $SLAVE
        scp /home/cos/toolkit/hadoop-1.0.3/conf/slaves cos@$SLAVE:/home/cos/toolkit/hadoop-1.0.3/conf/slaves
done

#3. restart hadoop cluster
echo "===============restart hadoop cluster========================="
stop-all.sh
start-all.sh

clone-node-del.sh


~ vi clone-node-del.sh

#!/bin/bash
export DEL_NODE=c6
export PASS=cos
export SLAVES=c1.wtmart.com:c2.wtmart.com:c3.wtmart.com:c4.wtmart.com:c5.wtmart.com
IFS=:

#0 stop
stop-all.sh

#1. sync ssh
echo "===============sync ssh========================="
sed -i "/cos@${DEL_NODE}/d" /home/cos/.ssh/authorized_keys

for SLAVE in $SLAVES
do
        echo scp $SLAVE
        sshpass -p ${PASS} scp /home/cos/.ssh/authorized_keys cos@$SLAVE:/home/cos/.ssh/authorized_keys
done

#2. sync hadoop slaves
echo "===============sync hadoop slaves========================="
rm /home/cos/toolkit/hadoop-1.0.3/conf/slaves
for SLAVE in $SLAVES
do
   echo $SLAVE >> /home/cos/toolkit/hadoop-1.0.3/conf/slaves
done

for SLAVE in $SLAVES
do
        echo scp $SLAVE
        scp /home/cos/toolkit/hadoop-1.0.3/conf/slaves cos@$SLAVE:/home/cos/toolkit/hadoop-1.0.3/conf/slaves
done

#3. restart hadoop cluster
echo "===============restart hadoop cluster========================="
start-all.sh

方便维护人员快速增加删除hadoop节点。

转载请注明出处:

http://blog.fens.me/hadoop-clone-add-delete/

打赏作者

让Hadoop跑在云端系列文章 之 克隆虚拟机优化方案1-安装和配置

让Hadoop跑在云端系列文章,介绍了如何整合虚拟化和Hadoop,让Hadoop集群跑在VPS虚拟主机上,通过云向用户提供存储和计算的服务。

现在硬件越来越便宜,一台非品牌服务器,2颗24核CPU,配48G内存,2T的硬盘,已经降到2万块人民币以下了。这种配置如果简单地放几个web应用,显然是奢侈的浪费。就算是用来实现单节点的hadoop,对计算资源浪费也是非常高的。对于这么高性能的计算机,如何有效利用计算资源,就成为成本控制的一项重要议题了。

通过虚拟化技术,我们可以将一台服务器,拆分成12台VPS,每台2核CPU,4G内存,40G硬盘,并且支持资源重新分配。多么伟大的技术啊!现在我们有了12个节点的hadoop集群, 让Hadoop跑在云端,让世界加速。

关于作者:

  • 张丹(Conan), 程序员Java,R,PHP,Javascript
  • weibo:@Conan_Z
  • blog: http://blog.fens.me
  • email: bsspirit@gmail.com

转载请注明出处:

http://blog.fens.me/hadoop-clone-improve

clone-improve

前言

把虚拟化的hadoop环境创建好之后,我们就要考虑如何对系统进行优化了。从运维的角度,我找到了4个优化的出发点,安装,配置,监控,管理。
为了完成1个人管理1000节点的目标,点滴的优化,都是未来成功的基石。

我在努力着。。。


目录

  1. 对系统优化简单分析
  2. 优化问题1:c1作为母体每次克隆时要停机。
  3. 优化问题2:手动操作步骤太多。


1. 对系统优化简单分析(10个节点)

刚才我们从运维的角度,提出了4点优化的出发点:安装,配置,监控,管理。

现在系统成功运行了2个节点,一步一步地,如何能方便的做出10个节点呢?
注:如果上来就想着1000个节点,我们失去方向。请已经熟悉1000个节点方案的朋友忽略这篇文章!

安装
简单概括就是安装要简单,最好是一条命令或者一个脚本就可以完成!在我们的虚拟环境中,安装一个hadoop节点,其实就创建一台新的虚拟机,就一条命令!

可是现在的结构,c1作为母体每次克隆时要停机,就意味着hadoop环境要停机,这不是我们希望的。我们将讨论如何进行改进!

配置
克隆体的hadoop节点创建成功后,由于hostname, ip, dns, 挂载磁盘等,都从母体复制过来的。但这几项配置要求每个节点是不一样的,需要手动修改。

所以,我们应该做一个脚本,每次自动去修改这些配置项,减少手动的修改,减少复杂性。保证新增加的节点能顺利的加入原有的hadoop集群。

监控
我们现在用KVM虚拟机,可以直接通过host虚拟机管理控制台查看每个节点的情况,当然这些信息是不够。我们还需要安装其他的系统监控工具,及各种的hadoop监控工具。

关于监控,我们将在后继续介绍。

管理
如果我们想整套的hadoop环境更易用,可以通过openstack做管理,这会是一种更理想的方案。

当然,这篇文章不会涉及到这个问题,我们将在后继续介绍。

2. 优化问题1:c1作为母体每次克隆时要停机。

up1

c1作为hadoop集群的,namenode节点不应该停止,因些我们重新制作一个名为hadoop-base的母体。通过新母体制造克隆体。

先停止hadoop,通过 让Hadoop跑在云端系列文章 之 克隆虚拟机增加Hadoop节点 文章的方法,克隆一个新的母体hadoop-base。


~ sudo virt-clone --connect qemu:///system -o c1 -n hadoop-base -f /disk/sdb1/hadoop-base.img

查看虚拟机列表


virsh # list --all
 Id    Name                           State
----------------------------------------------------
 5     server3                        running
 6     server4                        running
 7     d2                             running
 8     r1                             running
 9     server2                        running
 18    server5                        running
 48    c3                             running
 50    c1                             running
 -     c2                             shut off
 -     d1                             shut off
 -     hadoop-base                    shut off
 -     u1210-base                     shut off

重新启动hadoop集群c1,c3两个节点。

在c1中查看hadoop节点


~ hadoop dfsadmin -report
Warning: $HADOOP_HOME is deprecated.

Safe mode is ON
Configured Capacity: 317066272768 (295.29 GB)
Present Capacity: 293635162112 (273.47 GB)
DFS Remaining: 293635084288 (273.47 GB)
DFS Used: 77824 (76 KB)
DFS Used%: 0%
Under replicated blocks: 0
Blocks with corrupt replicas: 0
Missing blocks: 0

-------------------------------------------------
Datanodes available: 2 (2 total, 0 dead)

Name: 192.168.1.30:50010
Decommission Status : Normal
Configured Capacity: 158533136384 (147.65 GB)
DFS Used: 49152 (48 KB)
Non DFS Used: 15181529088 (14.14 GB)
DFS Remaining: 143351558144(133.51 GB)
DFS Used%: 0%
DFS Remaining%: 90.42%
Last contact: Thu Jul 11 13:00:50 CST 2013

Name: 192.168.1.32:50010
Decommission Status : Normal
Configured Capacity: 158533136384 (147.65 GB)
DFS Used: 28672 (28 KB)
Non DFS Used: 8249581568 (7.68 GB)
DFS Remaining: 150283526144(139.96 GB)
DFS Used%: 0%
DFS Remaining%: 94.8%
Last contact: Thu Jul 11 13:00:52 CST 2013

通过新的母体hadoop-base制造克隆体c4


~ sudo virt-clone --connect qemu:///system -o hadoop-base -n c4 -f /disk/sdb1/c4.img

#增加分区硬盘/dev/sdb7
~ sudo virsh
virsh # edit c4
<disk type='block' device='disk'>
<driver name='qemu' type='raw' cache='none'/>
<source dev='/dev/sdb8'/>
<target dev='vdb' bus='virtio'/>
<address type='pci' domain='0x0000' bus='0x00' slot='0x06' function='0x0'/>
</disk>

#启动c4
virsh # start c4

#进入c4
virsh # console c4

现在,母体已经从c1变成的hadoop-base。c1已经不需要再关机了。

3. 优化问题2:手动操作步骤太多。

我们手动操作分成2个脚本来处理

  • 新克隆体虚拟机的配置
  • 向集群增加克隆体配置

新克隆体虚拟机的配置
登陆c4后,通过脚本来代替手动的配置。
脚本对下面6个步骤进行配置修改操作:

  1. hostname host
  2. ip
  3. dns
  4. fdisk mount
  5. hadoop folder
  6. ssh

对以上6个步骤的解释,请参考:Hadoop跑在云端系列文章 之 克隆虚拟机增加Hadoop节点


#!/bin/bash
export HOST=c4
export DOMAIN=$HOST.wtmat.com
export IP=192.168.1.33
export DNS=192.168.1.7

#1. hostname host
echo "====================hostname host============================"
hostname $HOST
echo $HOST >  /etc/hostname
sed -i -e "/127.0.0.1/d" /etc/hosts
sed -i -e 1"i\127.0.0.1 localhost ${HOST}" /etc/hosts

#2. ip
echo "====================ip address============================"
sed -i -e "/address/d;/^iface eth0 inet static/a\address ${IP}" /etc/network/interfaces
/etc/init.d/networking restart

#3. dns
echo "====================dns============================"
echo "nameserver ${DNS}" > /etc/resolv.conf

#4. fdisk mount
echo "====================fdisk mount============================"
(echo n; echo p; echo ; echo ; echo ; echo w) | fdisk /dev/vdb
mkfs -t ext4 /dev/vdb1
mount /dev/vdb1 /home/cos/hadoop
echo "/dev/vdb1 /home/cos/hadoop ext4 defaults 0 0 " >> /etc/fstab

#5. hadoop folder
echo "==================== hadoop folder============================"
mkdir /home/cos/hadoop/data
mkdir /home/cos/hadoop/tmp
chown -R cos:cos /home/cos/hadoop/
chmod 755 /home/cos/hadoop/data
chmod 755 /home/cos/hadoop/tmp

#6. ssh
echo "====================ssh============================"
rm -rf /home/cos/.ssh/*
sudo -u cos ssh-keygen -t rsa -N "" -f /home/cos/.ssh/id_rsa 
sudo -u cos cat /home/cos/.ssh/id_rsa.pub >> /home/cos/.ssh/authorized_keys

exit

向集群增加克隆体配置
返回c1节点,用脚本完成加载c4的操作。

脚本对下面3步骤进行操作:

  1. 同步ssh公钥
  2. 同步hadoop的slaves文件
  3. 把c4加入到集群环境

下面脚本使用sshpaas软件,请提前安装


sudo apt-get install sshpass

脚本代码


#!/bin/bash
export NEW_NODE=c4.wtmart.com
export PASS=cos
export SLAVES=c1.wtmart.com:c3.wtmart.com:c4.wtmart.com
IFS=:

#1. sync ssh
sshpass -p ${PASS} scp -o StrictHostKeyChecking=no cos@${NEW_NODE}:/home/cos/.ssh/authorized_keys .
cat authorized_keys >> /home/cos/.ssh/authorized_keys

for SLAVE in $SLAVES
do
	echo scp $SLAVE
	sshpass -p ${PASS} scp /home/cos/.ssh/authorized_keys cos@$SLAVE:/home/cos/.ssh/authorized_keys
done

#2. sync hadoop slaves

rm /home/cos/toolkit/hadoop-1.0.3/conf/slaves
for SLAVE in $SLAVES
do
   echo $SLAVE >> /home/cos/toolkit/hadoop-1.0.3/conf/slaves
done

for SLAVE in $SLAVES
do
	echo scp $SLAVE
	scp /home/cos/toolkit/hadoop-1.0.3/conf/slaves cos@$SLAVE:/home/cos/toolkit/hadoop-1.0.3/conf/slaves
done

#3. restart hadoop cluster
stop-all.sh
start-all.sh

重启hadoop集群,看到新的节点c4,已经加入到集群


~ hadoop dfsadmin -report

Safe mode is ON
Configured Capacity: 475598360576 (442.94 GB)
Present Capacity: 443917721600 (413.43 GB)
DFS Remaining: 443917615104 (413.43 GB)
DFS Used: 106496 (104 KB)
DFS Used%: 0%
Under replicated blocks: 0
Blocks with corrupt replicas: 0
Missing blocks: 0

-------------------------------------------------
Datanodes available: 3 (3 total, 0 dead)

Name: 192.168.1.30:50010
Decommission Status : Normal
Configured Capacity: 158533136384 (147.65 GB)
DFS Used: 49152 (48 KB)
Non DFS Used: 15181529088 (14.14 GB)
DFS Remaining: 143351558144(133.51 GB)
DFS Used%: 0%
DFS Remaining%: 90.42%
Last contact: Thu Jul 11 15:55:57 CST 2013

Name: 192.168.1.32:50010
Decommission Status : Normal
Configured Capacity: 158533136384 (147.65 GB)
DFS Used: 28672 (28 KB)
Non DFS Used: 8249581568 (7.68 GB)
DFS Remaining: 150283526144(139.96 GB)
DFS Used%: 0%
DFS Remaining%: 94.8%
Last contact: Thu Jul 11 15:55:56 CST 2013

Name: 192.168.1.33:50010
Decommission Status : Normal
Configured Capacity: 158532087808 (147.64 GB)
DFS Used: 28672 (28 KB)
Non DFS Used: 8249528320 (7.68 GB)
DFS Remaining: 150282530816(139.96 GB)
DFS Used%: 0%
DFS Remaining%: 94.8%
Last contact: Thu Jul 11 15:55:58 CST 2013

有了这2个脚本,我们生成10个-20个节点,基本就是文件复制的时间了。

优化问题我们将继续深入进行。。。

转载请注明出处:

http://blog.fens.me/hadoop-clone-improve

打赏作者