• Archive by category "网络技术"

Blog Archives

在Ubuntu上安装IPSEC VPN服务

操作系统实用工具系列文章,将介绍基于Linux ubuntu的各种工具软件的配置和使用。有些工具大家早已耳熟能详,有些工具经常用到但确依然陌生。我将记录我在使用操作系统时,安装及配置工具上面的一些方法,把使用心得记录下来也便于自己的以后查找和回忆。

关于作者:

  • 张丹(Conan), 程序员R,Nodejs,Java
  • weibo:@Conan_Z
  • blog: http://blog.fens.me
  • email: bsspirit@gmail.com

转载请注明出处:
http://blog.fens.me/ubuntu-vpn-ipsec

前言

随着iphone的IOS版本升级到了10以后,PPTP协议的VPN不再支持了。为了能够继续使用Google的服务,提升对信息的准确查询,那么只能基于新的标准,再重新搭建一套的环境。用PPTP搭建VPN请参考文章:在Ubuntu上安装PPTP VPN服务

本文只是在纯技术层面进行介绍,如何使用IPSEC协议来搭建VPN服务。

目录

  1. IPSEC协议
  2. 服务器端程序搭建
  3. 客户端测试
  4. 剖析脚本

1. IPSEC协议

IPSec(Internet Protocol Security)是一种开放标准的框架结构,通过使用加密的安全服务以确保在 Internet 协议 (IP) 网络上进行保密而安全的通讯。它通过端对端的安全性来提供主动的保护以防止专用网络与 Internet 的攻击。在通信中,只有发送方和接收方才是唯一必须了解 IPSec 保护的计算机。

IPSEC包封装过程

我们有一个生活中简单的例子,来说明一下IPSEC包封装过程。

假设2个小朋友A和B要邮寄包裹,A要寄东西给B,A的爸爸和B的爸爸正巧在一家公司工作,所以A就把给B的包裹,交给了A的爸爸,再由A的爸爸转交给B的爸爸,B的爸爸最后把包裹给B的手中。回寄也一样,通过B的父亲发回给A的父亲再回给A。

这种通讯实现方式要依赖以下几个因素:

  • A的爸爸和B的爸爸可以见到。
  • A发包裹,把包裹交给A的爸爸。
  • A的爸爸收到儿子的包裹后,能够正确的处理,并且重新包装过的包裹能够正确送出去。
  • 另外一端,B的爸爸收到包裹开以后,能够正确地交给B。
  • 反过来的流程一样。

2. 服务器端程序搭建

本来安装和配置IPSEC服务,不是一件容易,但无意中发现了 IPsec VPN 服务器一键安装脚本 项目,让这一切都变得非常简单。感谢项目作者 Lin Song

我的服务器环境是Ubuntu 16.04 LTS,主机在香港。

一键安装,只需要3个步骤。

  1. 从网上下载一个shell脚步。
  2. 修改登录的用户名、密码、秘钥。
  3. 运行脚本

1. 从网上下载一个shell脚步。


~ wget https://git.io/vpnsetup -O vpnsetup.sh

2. 修改登录的用户名、密码、秘钥。


~ vi vpnsetup.sh

# Define your own values for these variables
# - IPsec pre-shared key, VPN username and password
# - All values MUST be placed inside 'single quotes'
# - DO NOT use these characters within values:  \ " '
    
YOUR_IPSEC_PSK='abc'       # 设置密钥
YOUR_USERNAME='conan'      # 设置用户名
YOUR_PASSWORD='12345678'   # 设置密码

# 省略...

3. 运行脚本


~ sudo sh vpnsetup.sh

3. 客户端测试

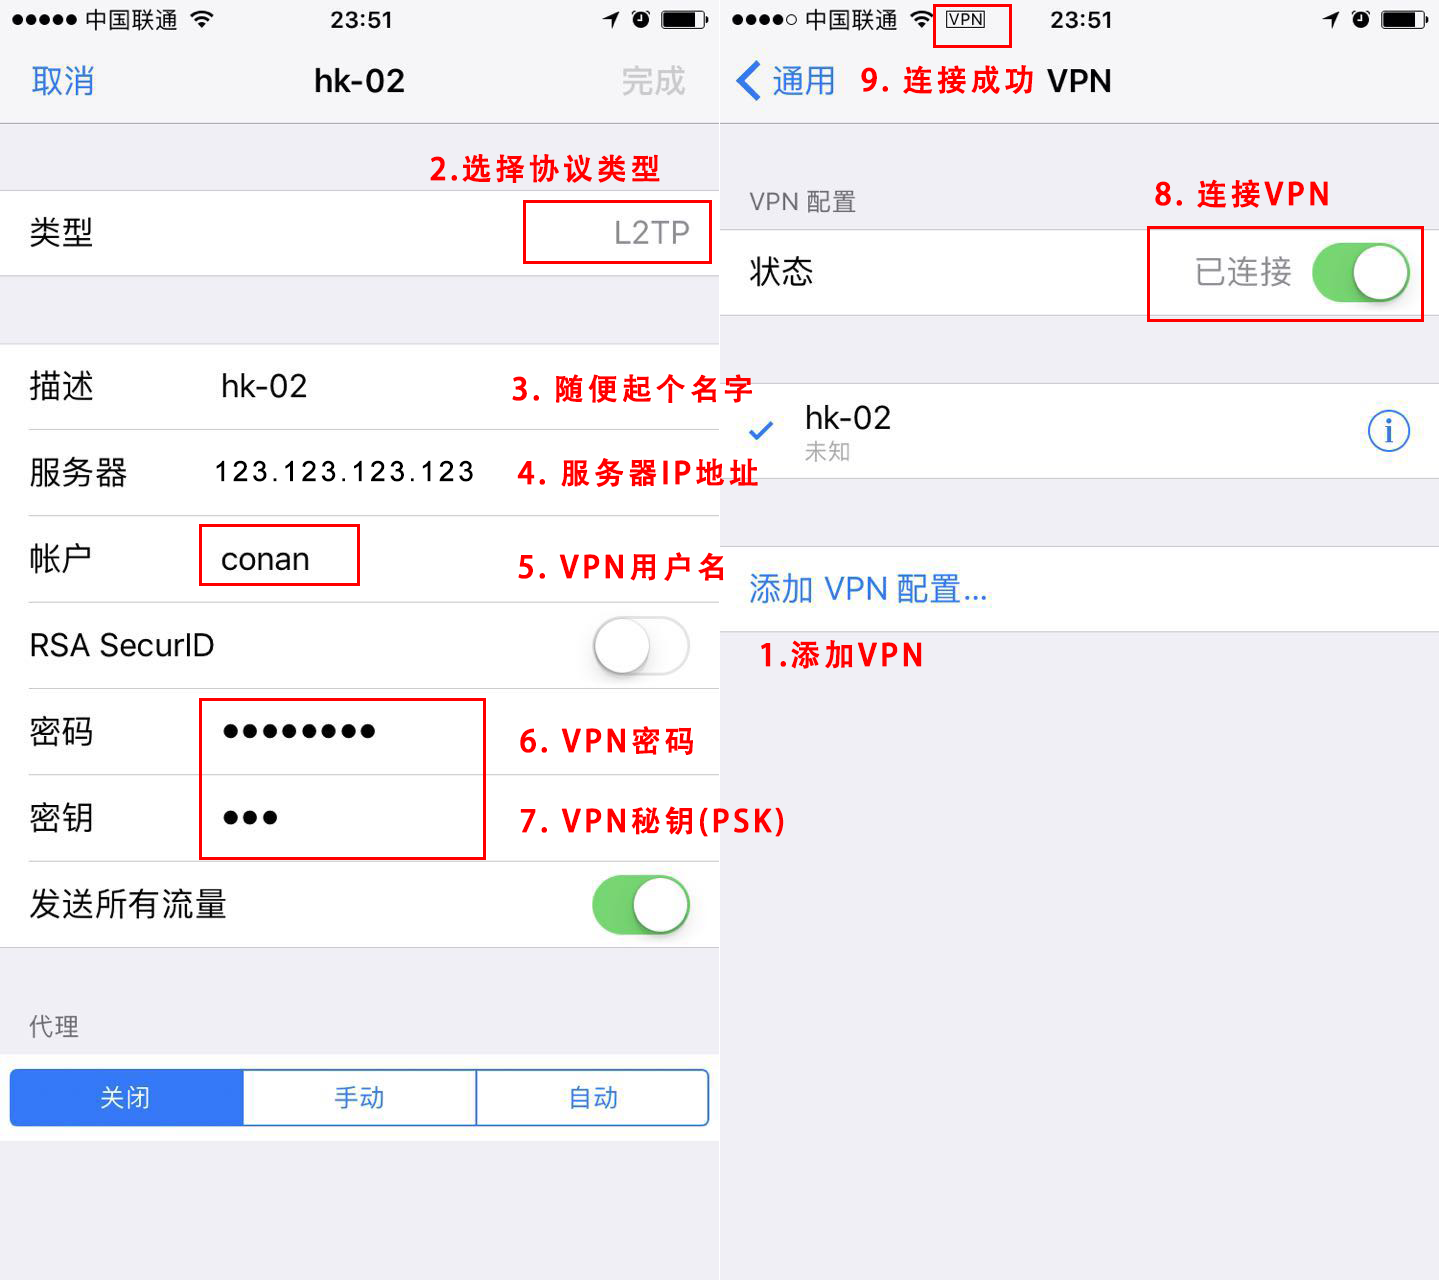
我的iphone-7手机,OS的版本为10.3.3,打开VPN的设置界面。设置–>通用–>VPN–>添加VPN配置。

具体配置

测试VPN是否正常工作,打开浏览器,访问www.google.com网页。

如果你也看到google,那么恭喜你就配置成功了!!

4. 剖析脚本

通过上面的操作,我们已经完成了VPN服务器的搭建,那么为什么还要有剖析脚本这个部分呢。我本来也自己尝试着参考网上的一些文章,以及一些开源VPN服务器的说明去配置,但花了几天的时间,一直都没有完全调通。这里其实有不少的网络知识点,是需要我们理解和掌握的。

正好可以查看 vpnsetup.sh 文件,一步一步的分析。

4.1 安装依赖包。


// 更新源
~ apt-get update

// 基础工具包
~ apt-get -yq install wget dnsutils openssl 
~ apt-get -yq install iproute gawk grep sed net-tools

// VPN相关的包
~ apt-get -yq install libnss3-dev libnspr4-dev pkg-config libpam0g-dev \
  libcap-ng-dev libcap-ng-utils libselinux1-dev \
  libcurl4-nss-dev flex bison gcc make \
  libunbound-dev libnss3-tools libevent-dev 
~ apt-get -yq --no-install-recommends install xmlto 
~ apt-get -yq install ppp xl2tpd 

// SSH相关的包
~ apt-get -yq install fail2ban
~ apt-get -yq install libsystemd-dev 

4.2 下载及安装libreswan包


~ wget https://download.libreswan.org/libreswan-3.21.tar.gz
~ tar xzf libreswan-3.21.tar.gz && cd libreswan-3.21
~ make -s programs && make -s install

4.3 修改配置文件

  • /etc/ipsec.conf
  • /etc/ipsec.secrets
  • /etc/xl2tpd/xl2tpd.conf
  • /etc/ppp/options.xl2tpd
  • /etc/ppp/chap-secrets
  • /etc/ipsec.d/passwd
  • /etc/sysctl.conf
  • /etc/iptables.rules

4.3.1 查看/etc/ipsec.conf


~ vi /etc/ipsec.conf

version 2.0

config setup
  virtual_private=%v4:10.0.0.0/8,%v4:192.168.0.0/16,%v4:172.16.0.0/12,%v4:!192.168.42.0/24,%v4:!192.168.43.0/24
  protostack=netkey
  nhelpers=0
  interfaces=%defaultroute
  uniqueids=no

conn shared
  left=%defaultroute
  leftid=123.123.123.123   # 当前服务器的IP
  right=%any
  encapsulation=yes
  authby=secret
  pfs=no
  rekey=no
  keyingtries=5
  dpddelay=30
  dpdtimeout=120
  dpdaction=clear
  ike=3des-sha1,3des-sha2,aes-sha1,aes-sha1;modp1024,aes-sha2,aes-sha2;modp1024,aes256-sha2_512
  phase2alg=3des-sha1,3des-sha2,aes-sha1,aes-sha2,aes256-sha2_512
  sha2-truncbug=yes

conn l2tp-psk
  auto=add
  leftprotoport=17/1701
  rightprotoport=17/%any
  type=transport
  phase2=esp
  also=shared

conn xauth-psk
  auto=add
  leftsubnet=0.0.0.0/0
  rightaddresspool=192.168.43.10-192.168.43.250
  modecfgdns1=8.8.8.8               # DNS 解析1
  modecfgdns2=8.8.4.4               # DNS 解析2
  leftxauthserver=yes
  rightxauthclient=yes
  leftmodecfgserver=yes
  rightmodecfgclient=yes
  modecfgpull=yes
  xauthby=file
  ike-frag=yes
  ikev2=never
  cisco-unity=yes
  also=shared
                   

4.3.2 查看/etc/ipsec.secrets


~ vi /etc/ipsec.secrets

%any  %any  : PSK "abc"                    # 设置ipsec的登录权限,秘钥为abc

4.3.3 查看/etc/xl2tpd/xl2tpd.conf


~ vi /etc/xl2tpd/xl2tpd.conf

[global]
port = 1701                                 # 连接端口

[lns default]
ip range = 192.168.42.10-192.168.42.250     # VPN内网IP段
local ip = 192.168.42.1                     # 主机的内网IP
require chap = yes                          # 要求chap身份认证模式
refuse pap = yes                            # 拒绝pap身份认证模式
require authentication = yes                # 要求认证登录
name = l2tpd                                # 服务名称为l2tpd
pppoptfile = /etc/ppp/options.xl2tpd        # ppp的配置文件
length bit = yes

4.3.4 查看/etc/ppp/options.xl2tpd


~ vi /etc/ppp/options.xl2tpd

ipcp-accept-local
ipcp-accept-remote
ms-dns 8.8.8.8                  # DNS 解析1
ms-dns 8.8.4.4                  # DNS 解析2
noccp
auth
mtu 1280
mru 1280
proxyarp                        # arp代理
lcp-echo-failure 4
lcp-echo-interval 30
connect-delay 5000

4.3.5 查看 /etc/ppp/chap-secrets


~ vi /etc/ppp/chap-secrets

# Secrets for authentication using CHAP
# client  server  secret  IP addresses
# 用户名  服务类型   密码   分配的ip地址
"conan" l2tpd "12345678" *                          # 设置客户端登录账户和密码,4个字段用空格分隔, *表示任意类型

4.3.6 查看 /etc/ipsec.d/passwd


~ vi  /etc/ipsec.d/passwd

conan:$1$rkrg5ssz$3lTGfeeazreqrR79pAoggh1:xauth-psk    # 使用秘钥加密后的密码

4.3.7 查看 /etc/sysctl.conf


~ vi /etc/sysctl.conf

kernel.msgmnb = 65536
kernel.msgmax = 65536
kernel.shmmax = 68719476736
kernel.shmall = 4294967296

net.ipv4.ip_forward = 1
net.ipv4.tcp_syncookies = 1
net.ipv4.conf.all.accept_source_route = 0
net.ipv4.conf.default.accept_source_route = 0
net.ipv4.conf.all.accept_redirects = 0
net.ipv4.conf.default.accept_redirects = 0
net.ipv4.conf.all.send_redirects = 0
net.ipv4.conf.default.send_redirects = 0
net.ipv4.conf.lo.send_redirects = 0
net.ipv4.conf.eth0.send_redirects = 0
net.ipv4.conf.all.rp_filter = 0
net.ipv4.conf.default.rp_filter = 0
net.ipv4.conf.lo.rp_filter = 0
net.ipv4.conf.eth0.rp_filter = 0
net.ipv4.icmp_echo_ignore_broadcasts = 1
net.ipv4.icmp_ignore_bogus_error_responses = 1

net.core.wmem_max = 12582912
net.core.rmem_max = 12582912
net.ipv4.tcp_rmem = 10240 87380 12582912
net.ipv4.tcp_wmem = 10240 87380 12582912

4.3.8 查看/etc/iptables.rules


~ vi /etc/iptables.rules

# Modified by hwdsl2 VPN script
# Generated by iptables-save v1.6.0 on Mon Sep 18 22:36:46 2017
*nat
:PREROUTING ACCEPT [0:0]
:INPUT ACCEPT [0:0]
:OUTPUT ACCEPT [0:0]
:POSTROUTING ACCEPT [0:0]
-A POSTROUTING -s 192.168.42.0/24 -o eth0 -j MASQUERADE
-A POSTROUTING -s 192.168.43.0/24 -o eth0 -m policy --dir out --pol none -j MASQUERADE
COMMIT
# Completed on Mon Sep 18 22:36:46 2017
# Generated by iptables-save v1.6.0 on Mon Sep 18 22:36:46 2017
*filter
:INPUT ACCEPT [0:0]
:FORWARD ACCEPT [0:0]
:OUTPUT ACCEPT [0:0]
-A INPUT -p udp -m udp --dport 1701 -m policy --dir in --pol none -j DROP
-A INPUT -m conntrack --ctstate INVALID -j DROP
-A INPUT -m conntrack --ctstate RELATED,ESTABLISHED -j ACCEPT
-A INPUT -p udp -m multiport --dports 500,4500 -j ACCEPT
-A INPUT -p udp -m udp --dport 1701 -m policy --dir in --pol ipsec -j ACCEPT
-A INPUT -p udp -m udp --dport 1701 -j DROP
-A FORWARD -m conntrack --ctstate INVALID -j DROP
-A FORWARD -i eth0 -o ppp+ -m conntrack --ctstate RELATED,ESTABLISHED -j ACCEPT
-A FORWARD -i ppp+ -o eth0 -j ACCEPT
-A FORWARD -s 192.168.42.0/24 -d 192.168.42.0/24 -i ppp+ -o ppp+ -j ACCEPT
-A FORWARD -d 192.168.43.0/24 -i eth0 -m conntrack --ctstate RELATED,ESTABLISHED -j ACCEPT
-A FORWARD -s 192.168.43.0/24 -o eth0 -j ACCEPT
-A FORWARD -s 10.1.20.0/24 -j ACCEPT
-A FORWARD -j DROP
COMMIT
# Completed on Mon Sep 18 22:36:46 2017

4.4 查看连接日志

接下来,我们用手机连接VPN,然后查看日志输出 。

连接日志


~ tail -f /var/log/syslog

Sep 19 13:54:28 i-vtnhoxsp xl2tpd[20115]: Connection established to 36.102.226.172, 65287.  Local: 21666, Remote: 20 (ref=0/0).  LNS session is 'default'
Sep 19 13:54:28 i-vtnhoxsp xl2tpd[20115]: start_pppd: I'm running:
Sep 19 13:54:28 i-vtnhoxsp xl2tpd[20115]: "/usr/sbin/pppd"
Sep 19 13:54:28 i-vtnhoxsp xl2tpd[20115]: "passive"
Sep 19 13:54:28 i-vtnhoxsp xl2tpd[20115]: "nodetach"
Sep 19 13:54:28 i-vtnhoxsp xl2tpd[20115]: "192.168.42.1:192.168.42.10"
Sep 19 13:54:28 i-vtnhoxsp xl2tpd[20115]: "refuse-pap"
Sep 19 13:54:28 i-vtnhoxsp xl2tpd[20115]: "auth"
Sep 19 13:54:28 i-vtnhoxsp xl2tpd[20115]: "require-chap"
Sep 19 13:54:28 i-vtnhoxsp xl2tpd[20115]: "name"
Sep 19 13:54:28 i-vtnhoxsp xl2tpd[20115]: "l2tpd"
Sep 19 13:54:28 i-vtnhoxsp xl2tpd[20115]: "file"
Sep 19 13:54:28 i-vtnhoxsp xl2tpd[20115]: "/etc/ppp/options.xl2tpd"
Sep 19 13:54:28 i-vtnhoxsp xl2tpd[20115]: "plugin"
Sep 19 13:54:28 i-vtnhoxsp xl2tpd[20115]: "pppol2tp.so"
Sep 19 13:54:28 i-vtnhoxsp xl2tpd[20115]: "pppol2tp"
Sep 19 13:54:28 i-vtnhoxsp xl2tpd[20115]: "8"
Sep 19 13:54:28 i-vtnhoxsp xl2tpd[20115]: "pppol2tp_lns_mode"
Sep 19 13:54:28 i-vtnhoxsp xl2tpd[20115]: "pppol2tp_tunnel_id"
Sep 19 13:54:28 i-vtnhoxsp xl2tpd[20115]: "21666"
Sep 19 13:54:28 i-vtnhoxsp xl2tpd[20115]: "pppol2tp_session_id"
Sep 19 13:54:28 i-vtnhoxsp xl2tpd[20115]: "21136"
Sep 19 13:54:28 i-vtnhoxsp xl2tpd[20115]: Call established with 36.102.226.172, Local: 21136, Remote: 10537, Serial: 1
Sep 19 13:54:28 i-vtnhoxsp pppd[23553]: Plugin pppol2tp.so loaded.
Sep 19 13:54:28 i-vtnhoxsp pppd[23553]: pppd 2.4.7 started by root, uid 0
Sep 19 13:54:28 i-vtnhoxsp pppd[23553]: Using interface ppp0
Sep 19 13:54:28 i-vtnhoxsp pppd[23553]: Connect: ppp0 <-->
Sep 19 13:54:28 i-vtnhoxsp pppd[23553]: Overriding mtu 1500 to 1280
Sep 19 13:54:28 i-vtnhoxsp pppd[23553]: Overriding mru 1500 to mtu value 1280
Sep 19 13:54:28 i-vtnhoxsp pppd[23553]: Overriding mtu 1500 to 1280
Sep 19 13:54:32 i-vtnhoxsp charon: 05[KNL] 192.168.42.1 appeared on ppp0
Sep 19 13:54:32 i-vtnhoxsp charon: 03[KNL] 192.168.42.1 disappeared from ppp0
Sep 19 13:54:32 i-vtnhoxsp charon: 07[KNL] 192.168.42.1 appeared on ppp0
Sep 19 13:54:32 i-vtnhoxsp pppd[23553]: Cannot determine ethernet address for proxy ARP
Sep 19 13:54:32 i-vtnhoxsp pppd[23553]: local  IP address 192.168.42.1
Sep 19 13:54:32 i-vtnhoxsp pppd[23553]: remote IP address 192.168.42.10
Sep 19 13:54:32 i-vtnhoxsp charon: 10[KNL] interface ppp0 activated

断开手机的VPN连接,查看日志。


~ tail -f /var/log/syslog

Sep 19 13:55:53 i-vtnhoxsp xl2tpd[20115]: result_code_avp: result code endianness fix for buggy Apple client. network=768, le=3
Sep 19 13:55:53 i-vtnhoxsp xl2tpd[20115]: control_finish: Connection closed to 36.102.226.172, serial 1 ()
Sep 19 13:55:53 i-vtnhoxsp pppd[23553]: LCP terminated by peer (User request)
Sep 19 13:55:53 i-vtnhoxsp xl2tpd[20115]: Terminating pppd: sending TERM signal to pid 23553
Sep 19 13:55:53 i-vtnhoxsp pppd[23553]: Connect time 1.4 minutes.
Sep 19 13:55:53 i-vtnhoxsp pppd[23553]: Sent 93199 bytes, received 34500 bytes.
Sep 19 13:55:53 i-vtnhoxsp charon: 06[KNL] interface ppp0 deactivated
Sep 19 13:55:53 i-vtnhoxsp xl2tpd[20115]: result_code_avp: result code endianness fix for buggy Apple client. network=256, le=1
Sep 19 13:55:53 i-vtnhoxsp xl2tpd[20115]: control_finish: Connection closed to 36.102.226.172, port 65287 (), Local: 21666, Remote: 20
Sep 19 13:55:53 i-vtnhoxsp charon: 03[KNL] 192.168.42.1 disappeared from ppp0
Sep 19 13:55:53 i-vtnhoxsp pppd[23553]: Overriding mtu 1500 to 1280
Sep 19 13:55:53 i-vtnhoxsp pppd[23553]: Overriding mru 1500 to mtu value 1280
Sep 19 13:55:53 i-vtnhoxsp pppd[23553]: Terminating on signal 15
Sep 19 13:55:56 i-vtnhoxsp pppd[23553]: Connection terminated.
Sep 19 13:55:56 i-vtnhoxsp charon: 11[KNL] interface ppp0 deleted
Sep 19 13:55:56 i-vtnhoxsp pppd[23553]: Modem hangup
Sep 19 13:55:56 i-vtnhoxsp pppd[23553]: Exit.

对于脚本的分析,虽然没有给出结论,而且很多配置我还是不太理解。不过要坚持学习,不断的提升自己的能力,不然永远都要等着大牛们提供一键安装的脚本。

转载请注明出处:
http://blog.fens.me/ubuntu-vpn-ipsec

打赏作者

GoAgent代理配置

操作系统实用工具系列文章,将介绍基于Linux ubuntu的各种工具软件的配置和使用。有些工具大家早已耳熟能详,有些工具经常用到但确依然陌生。我将记录我在使用操作系统时,安装及配置工具上面的一些方法,把使用心得记录下来也便于自己的以后查找和回忆。

关于作者

  • 张丹(Conan), 程序员Java,R,PHP,Javascript
  • weibo:@Conan_Z
  • blog: http://blog.fens.me
  • email: bsspirit@gmail.com

转载请注明出处:
http://blog.fens.me/proxy-goagent

goagent

前言

国内上网总是受限于各种监管,Facebook上不了,Google上不了,Twitter上不了,Youtube上不了,连Github都险些被封,在国外最广泛普及的网站,国内基本都给封了。咨询类网站就算上不了,通过国内其他网站的转发,也能看到很多消息;但工具类的网站就麻烦了,特别是像Gmail,1天上不了就会直接影响工作,而且绑定好的邮件地址也不是1-2天就能换的,那么我们就要想办法翻墙过去。

自己动手架个梯子,有条件的可以搭建一个私有PPTP服务器,没条件的直接使用GoAgent,也是不错的选择。

目录

  1. GoAgent介绍
  2. 创建GAE应用
  3. GoAgent配置
  4. Chrome浏览器插件设置
  5. IE浏览器代理设置

1. GoAgent介绍

GoAgent是什么呢?

GoAgent是Python语言开发的一款代理软件,利用Google App Engine(GAE)的服务器充当代理服务器,帮助用户浏览被封锁的内容。该软件在中国大陆被广泛用于突破大陆官方建立的防火墙(GFW)。

GoAgent支持的操作系統包括Windows、OS X、iOS、Linux、Android等。由于GoAgent所使用的Google App Engine被认为可以作为开放式代理,使用的是美国加利福尼亚州山景城Google数据中心IP段。

GoAgent项目的Github主页:
https://github.com/goagent/goagent

运行原理

GoAgent的运行原理与其他的代理工具基本查同,使用特定的中转服务器完成数据传输。它使用GAE的服务器作为中传,把数据封包后传送至Google服务器,再由Google服务器传送到目标服务器,接收数据时方法也类似。

中国大陆的防火墙GFW,虽然已尝试在封锁GoAgent的服务,到目前为止GoAgent仍可以正常使用。关键点在于,GAE服务器由数百万台计算机和IP地址构成,精确地完成对所有部署GoAgnet的封锁是不太可能的,而且每次针对GFW的封锁,GoAgent都会由民间发起升级更新,长期保持GoAgent的可用。

下图为简单的运行原理。

gfw

  • 1. 用户直接访问Facebook时,在中国核心网关出口时,被GFW拦截,访问中断。
  • 2. 用户通过GoAgent访问,用户请求经过GoAgent客户端,发送到美国的GoAgent服务器上,GoAgent服务器代理访问Facebook获得数据包,再沿同样路径回到用户界面,就能实现对GFW的突破。

2. 创建GAE应用

GoAgent是程序员的常用软件,网上已经很多的教程, 参考文章:https://github.com/goagent/goagent/blob/wiki/InstallGuide.md

1. 申请注册一个 Google App Engine 账号,用 Gmail 账号登录。

登陆网址: http://appengine.google.com

gfw01

2. 登录之后,自动转向 Application 注册页面。

gfw02

3. 接下来的页面,输入你的手机号码,需要注意的是,手机号码前面要+86(中国区号) 格式如:+86 13888888888。

gfw03

然后等待收取手机短信,收到短信后(一串数字号码)填入下图表单,点 send 提交.(有的手机收不到信息,到https://appengine.google.com/waitlist/sms_issues 提交该情况,一个工作日就能收到谷歌提示Google App Engine成功开通)。

gfw04

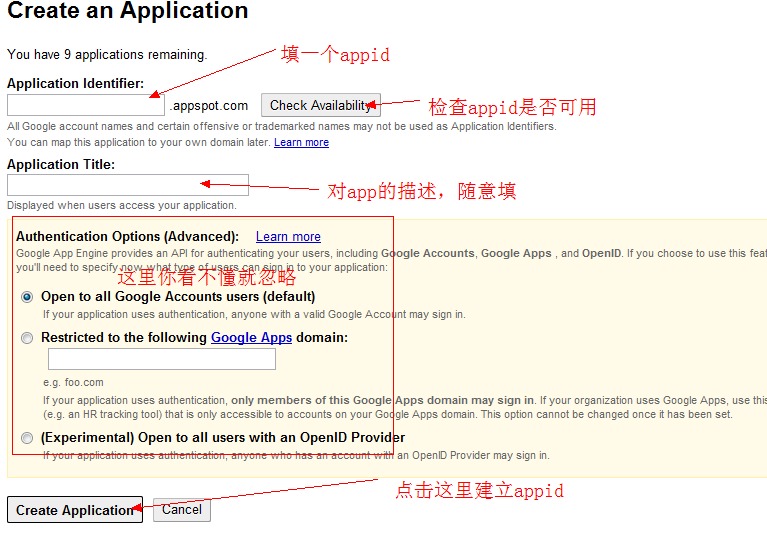
4. 提交完成之后,GAE 账号即被激活,然后就可以创建新的应用程序了。转入 “My Applications” 页面,点击 “Create an Application” 新建应用。

gfw05

一个Gmail账户最多可以创建十个GAE应用,每个应用每天 1G 免费流量。这里我们只创建一个应用就可以了。进入下一步,填写新应用的必要信息。在图中第一处添加一个应用名称,如 abc555 ,验证一下是否可用,如果显示 “Yes” 那么 abc555 就是你的 Appid(记住这个id),而 abc555.appspot.com 就是你的应用服务器地址了。第二个空可随便填,点击 Create Application 按钮提交。

gfw06

提交之后,就能看到下图这个页面,就说明你已经成功创建了一个新的应用,你也可以点击应用名称,进入控制面板进行管理。

gfw07

如果你要建立多个 appid,只需要从步骤 4 开始再重复操作多次就行了。

3. GoAgent配置

接下来,就让我们开始配置GoAgent吧。首先要下载GoAgent软件,可以直接去Github下载最新的源代码,https://github.com/goagent/goagent,也可以下载已经打包的发布包,最新版本Goagent 3.2.3下载 https://nodeload.github.com/goagent/goagent/legacy.zip/3.0

下载后,目录结构如图所示。

goagent00

  • server目录,用于上传到GAE的服务器端程序。
  • local目录,用于客户端代码的程序。

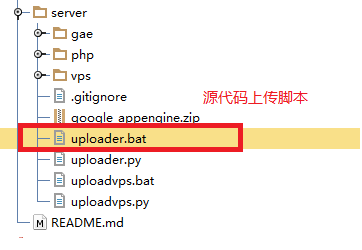
3.1 对于server目录,我们只需要关心1个文件就行了。

goagent02

  • uploader.bat,用于上传应用到GAE,实现GoAgent服务器端的部署。

goagent04

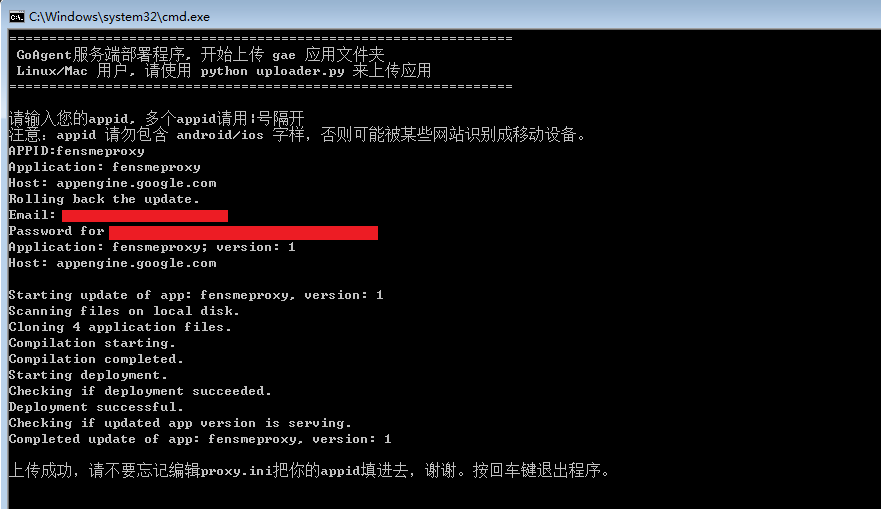
Windows用户双击server文件夹下的 uploader.bat,输入你上步创建的appid填完按回车。根据提示填你的谷歌帐户邮箱地址,填完按回车。根据提示填你的谷歌帐户密码,填完按回车,就完成了程序的上传。

3.2 对于local目录,我们需要关心3个文件就行了。

goagent01

  • CA.crt,证书文件,用于安全认证。
  • goagent.exe,本地客户端程序启动程序。
  • proxy.ini,GoAgent配置文件。

Windows用户双击CA.crt证书文件,安装既可。

goagent05

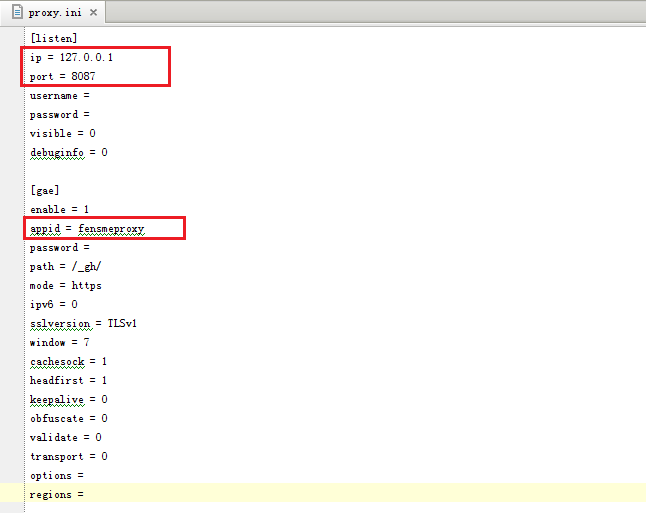
proxy.ini配置文件,编辑配置。

  • ip,为本机内网地址。
  • port,应用访问端口。
  • appid,对应GAE的appid。

goagent06

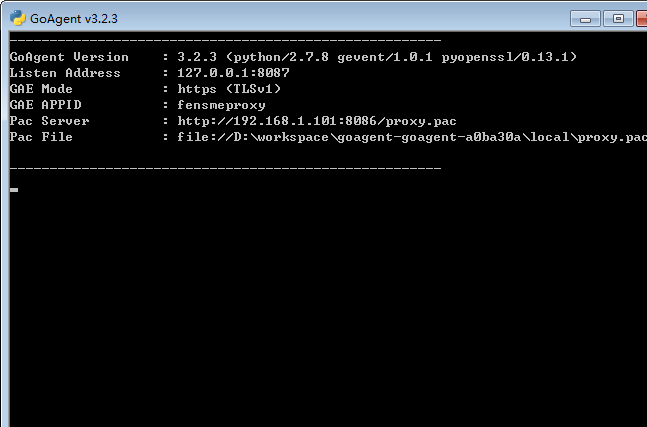
goagent.exe,启动本地代理程序。

goagent07

这样,GoAgent的服务器端和客户端配置都完成了,而且代理程序也已经启动了。

4. Chrome浏览器插件设置

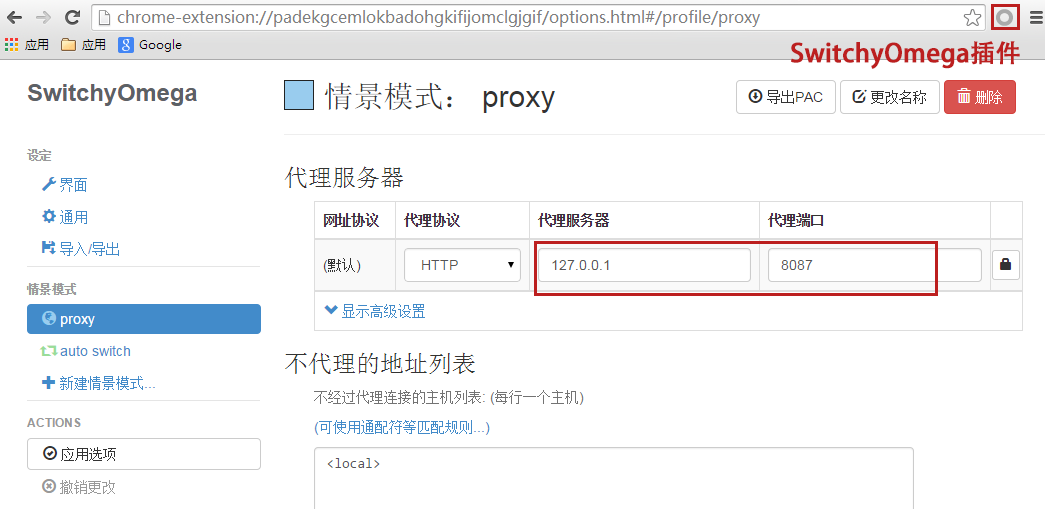
接下来,我们让浏览器去绑定GoAgent的代理。如果使用Chrome浏览器,那么需要装一个插件 SwitchyOmega。可以Chrome应用商品中直接安装,也可以手动安装,下载地址为 https://github.com/FelisCatus/SwitchyOmega/releases/download/v2.2.12/SwitchyOmega.crx

安装好后,在浏览器右上角就会出现插件的图标,然后配置好,代理服务器和代理端口就行了,对应上文中proxy.ini配置文件的ip和port选项。

goagent08

设置好代理,访问一下Google+的个人主页。

goagent09

5. IE浏览器代理设置

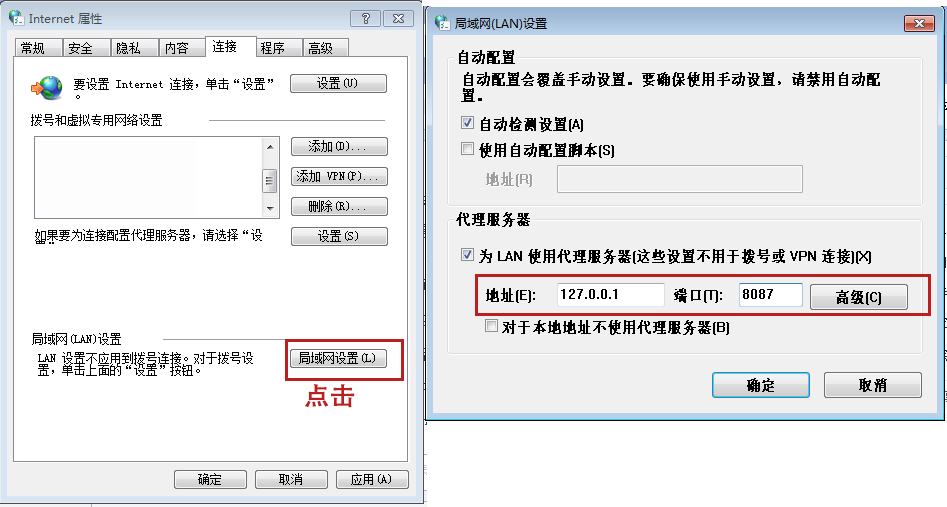
对于IE为内核的浏览器,配置GoAgent代理服务是更容易地。找到设置–>Internet选项–>连接–>局域网设置–>代理服务器。

goagent10

设置好代理,打开我的Facebook主页。

goagent11

GoAgent一款具有极客理想的软件,不仅GoAgent是完全开源,服务托管是GitHub和Google免费的提供的,流量是Google GAE免费的提供的,我们要感谢软件的作者和免费提供服务的运营商。

转载请注明出处:
http://blog.fens.me/proxy-goagent

打赏作者

用阿里云配置VPN

操作系统实用工具系列文章,将介绍基于Linux ubuntu的各种工具软件的配置和使用。有些工具大家早已耳熟能详,有些工具经常用到但确依然陌生。我将记录我在使用操作系统时,安装及配置工具上面的一些方法,把使用心得记录下来也便于自己的以后查找和回忆。

关于作者

  • 张丹(Conan), 程序员Java,R,PHP,Javascript
  • weibo:@Conan_Z
  • blog: http://blog.fens.me
  • email: bsspirit@gmail.com

转载请注明出处:
http://blog.fens.me/vpn-aliyun/

aliyun-vpn

前言

每次配置虚拟机的网络环境,都要花不少的时间,这次在阿里云上捣鼓VPN又出了岔子,VPN映射的网段和阿里云的虚拟机内网网段重叠了,而且阿里云自动做了路由,导致VPN路由失效。

本文将总结一下阿里云配置VPN的问题,估计自己以后也会经常回来翻看的。

目录

  1. 网络架构
  2. 遇到的问题
  3. 如何解决问题

1. 网络架构

要开发一个互联网应用,通常我们都需要购买服务器,部署自己应用然后托管到机房。对于刚起步的小公司来说,买服务器到托管到机房成本有点高,而且可能资源用不完,这时我们就有了一个更便宜的选择就是先租虚拟主机,阿里云就提供了这种服务。当然,和国外的主机服务商比阿里云还是很贵的,而且服务还有一些差距,但和国外的其他服务商比,也只能选阿里云了。

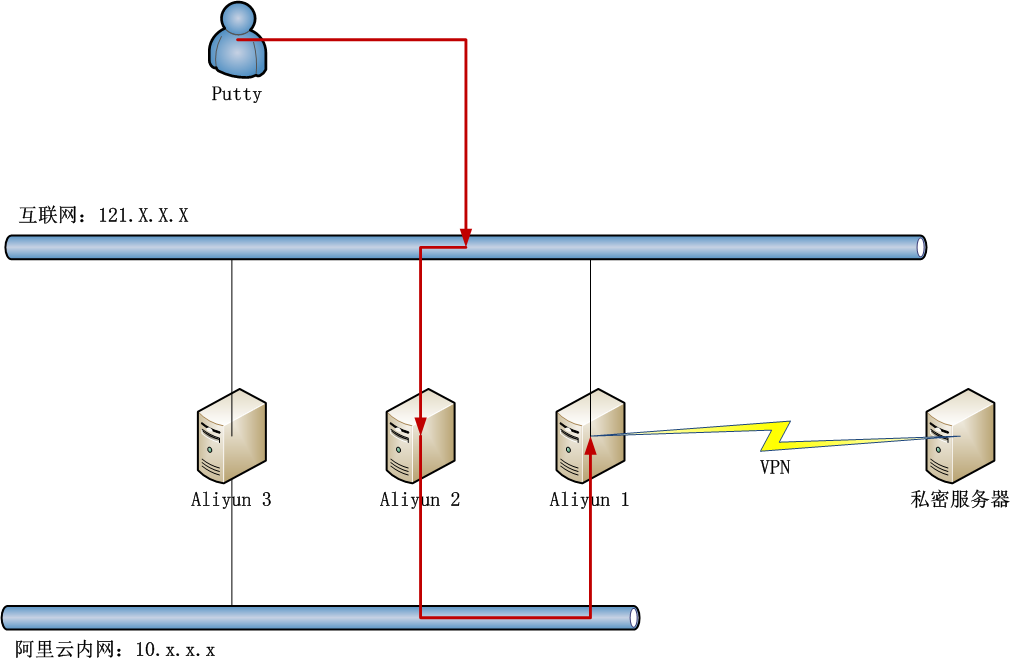
通常在阿里云租的虚拟主机,都会包括一个外网IP(121.x.x.x)和一个内网IP(10.x.x.x),外网IP主要面向互联网的访问,内网IP可以让内网的多台计算机通过内网进行通信。

接下来,我们会对应用进行分层,有用于数据存储的服务器(大硬盘),有用于计算的服务器(CPU密集型),有用于用户访问服务器(IO密集型)。另外,对于私密性比较高的数据或应用,我们通常用到VPN进行加密访问,从而保证传输过程的安全。

aliyun

我们一旦建立VPN连接,所有外网网络访问都将走VPN的加密通道,VPN通常只是小型私密网络,所以互联网的访问连接将会被切断。那么当互联网的访问被切掉到了,我们用Putty远程连接VPN的主机,也会访问不到了,这时就需要通过内网其他主机进行代理连接。比如,当Aliyun1打开VPN后,我们就不能直接通过Putty连接了,需要先用Putty登陆Aliyun2,再通过Aliyun2走内网登陆到Aliyun1。

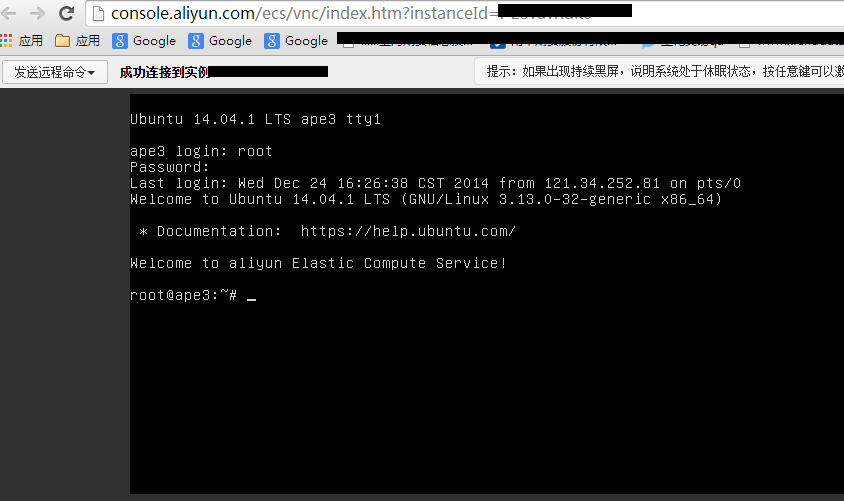
对于虚拟主机来说,即使只租用一台服务器也可以实现VPN的连接。当服务器进行了VPN连接,你可以从宿主机管理控制台,对连接VPN的计算机进行操作。阿里云也提供了这个功能,可以通过网页直接登陆。

aliyun-2

2. 遇到的问题

上面我们介绍的,都是标准的VPN访问流程。那么,我其实遇到了一个问题,就是阿里云的内网IP网段是10.x.x.x,连接VPN生成的私密网络的网段也是10.x.x.x,这时就造成了IP网段冲突。每个网卡都需要配置IP地址,网关,子网掩码,DNS服务器等,如果内网和外网的网段或IP发生冲突,而且两边的网络服务都不能进行修改,那么就直接无解了。幸运的是,只是A类的地址冲突了,而且B类,C类,D类的地址没有冲突。那么,可以通过把网断进行不同的映射,配置网关和路由。

其实,发现上面的问题,也是花了一些时间的。

我们先看阿里云主机的默认网络配置。


~ ifconfig
eth0      Link encap:Ethernet  HWaddr 00:16:3e:00:36:37
          inet addr:10.169.0.162  Bcast:10.169.7.255  Mask:255.255.248.0
          UP BROADCAST RUNNING MULTICAST  MTU:1500  Metric:1
          RX packets:109 errors:0 dropped:0 overruns:0 frame:0
          TX packets:43 errors:0 dropped:0 overruns:0 carrier:0
          collisions:0 txqueuelen:1000
          RX bytes:9597 (9.5 KB)  TX bytes:6767 (6.7 KB)

eth1      Link encap:Ethernet  HWaddr 00:16:3e:00:3d:3b
          inet addr:121.41.77.206  Bcast:121.41.79.255  Mask:255.255.252.0
          UP BROADCAST RUNNING MULTICAST  MTU:1500  Metric:1
          RX packets:2294 errors:0 dropped:0 overruns:0 frame:0
          TX packets:151 errors:0 dropped:0 overruns:0 carrier:0
          collisions:0 txqueuelen:1000
          RX bytes:108919 (108.9 KB)  TX bytes:12624 (12.6 KB)

lo        Link encap:Local Loopback
          inet addr:127.0.0.1  Mask:255.0.0.0
          UP LOOPBACK RUNNING  MTU:65536  Metric:1
          RX packets:0 errors:0 dropped:0 overruns:0 frame:0
          TX packets:0 errors:0 dropped:0 overruns:0 carrier:0
          collisions:0 txqueuelen:0
          RX bytes:0 (0.0 B)  TX bytes:0 (0.0 B)

~ cat /etc/resolv.conf
options timeout:1 attempts:1 rotate
nameserver 10.202.72.118
nameserver 10.202.72.116

~ route
Kernel IP routing table
Destination     Gateway         Genmask         Flags Metric Ref    Use Iface
default         121.41.79.247   0.0.0.0         UG    0      0        0 eth1
10.0.0.0        10.169.7.247    255.0.0.0       UG    0      0        0 eth0
10.169.0.0      *               255.255.248.0   U     0      0        0 eth0
100.64.0.0      10.169.7.247    255.192.0.0     UG    0      0        0 eth0
121.41.76.0     *               255.255.252.0   U     0      0        0 eth1
172.16.0.0      10.169.7.247    255.240.0.0     UG    0      0        0 eth0

安装及配置VPNC


# 安装VPNC
~ apt-get install vpnc

# 配置文件
~ vi /etc/vpnc/default.conf

IPSec gateway xxx.com
IPSec ID xxx
IPSec obfuscated secret xxxxxxxxx
Xauth username xxx
Xauth password xxxxxx

启动VPN连接。


~ vpnc
Stopped Name Service Cache Daemon: nscd.
 * Starting Name Service Cache Daemon nscd                                             [ OK ]
VPNC started in background (pid: 1543)...

查看网站连接,会多出tun0的网卡,分配的IP地址为10.1.15.228。


~ ifconfig
eth0      Link encap:Ethernet  HWaddr 00:16:3e:00:36:37
          inet addr:10.169.0.162  Bcast:10.169.7.255  Mask:255.255.248.0
          UP BROADCAST RUNNING MULTICAST  MTU:1500  Metric:1
          RX packets:1727 errors:0 dropped:0 overruns:0 frame:0
          TX packets:551 errors:0 dropped:0 overruns:0 carrier:0
          collisions:0 txqueuelen:1000
          RX bytes:103050 (103.0 KB)  TX bytes:70120 (70.1 KB)

eth1      Link encap:Ethernet  HWaddr 00:16:3e:00:3d:3b
          inet addr:121.41.77.206  Bcast:121.41.79.255  Mask:255.255.252.0
          UP BROADCAST RUNNING MULTICAST  MTU:1500  Metric:1
          RX packets:128289 errors:0 dropped:0 overruns:0 frame:0
          TX packets:649 errors:0 dropped:0 overruns:0 carrier:0
          collisions:0 txqueuelen:1000
          RX bytes:5435081 (5.4 MB)  TX bytes:82302 (82.3 KB)

lo        Link encap:Local Loopback
          inet addr:127.0.0.1  Mask:255.0.0.0
          UP LOOPBACK RUNNING  MTU:65536  Metric:1
          RX packets:0 errors:0 dropped:0 overruns:0 frame:0
          TX packets:0 errors:0 dropped:0 overruns:0 carrier:0
          collisions:0 txqueuelen:0
          RX bytes:0 (0.0 B)  TX bytes:0 (0.0 B)

tun0      Link encap:UNSPEC  HWaddr 00-00-00-00-00-00-00-00-00-00-00-00-00-00-00-00
          inet addr:10.1.15.228  P-t-P:10.1.15.228  Mask:255.255.255.255
          UP POINTOPOINT RUNNING NOARP MULTICAST  MTU:1412  Metric:1
          RX packets:40 errors:0 dropped:0 overruns:0 frame:0
          TX packets:82 errors:0 dropped:0 overruns:0 carrier:0
          collisions:0 txqueuelen:500
          RX bytes:3328 (3.3 KB)  TX bytes:11016 (11.0 KB)

通过情况下,这样的配置已经生效了,VPN也连接正常,但VPN网络确无法访问。


~ ping testvpn
ping: unknown host testvpn

第一感觉是DNS出问题了,查看DNS还是原来的内容,没有发生变化。


~ cat /etc/resolv.conf
options timeout:1 attempts:1 rotate
nameserver 10.202.72.118
nameserver 10.202.72.116

通常VPN连接的时候,都会配置一个新的DNS,那么我们把这个DNS设置成自动更新的。


~ dpkg-reconfigure resolvconf

同时,修改tail文件,设置一个更快速的阿里云DNS服务器。


vi /etc/resolvconf/resolv.conf.d/tail

nameserver 223.5.5.5
nameserver 223.6.6.6

断开VPN再重连接VPN


~ vpnc-disconnect
Terminating vpnc daemon (pid: 1543)

~ vpnc
Stopped Name Service Cache Daemon: nscd.
 * Starting Name Service Cache Daemon nscd                                             [ OK ]
VPNC started in background (pid: 2111)...

再次查看DNS的配置,我们看到/etc/resolv.conf已经会自动更新了。


cat /etc/resolv.conf
# Dynamic resolv.conf(5) file for glibc resolver(3) generated by resolvconf(8)
#     DO NOT EDIT THIS FILE BY HAND -- YOUR CHANGES WILL BE OVERWRITTEN
nameserver 10.1.1.1
nameserver 10.1.1.2
search xxx.test.cn
nameserver 223.5.5.5
nameserver 223.6.6.6

但通过VPN网络还是无法访问。


~ ping testvpn
ping: unknown host testvpn

检查路由表


 route
Kernel IP routing table
Destination     Gateway         Genmask         Flags Metric Ref    Use Iface
default         *               0.0.0.0         U     0      0        0 tun0
10.0.0.0        10.169.7.247    255.0.0.0       UG    0      0        0 eth0
10.1.15.0       *               255.255.255.0   U     0      0        0 tun0
10.169.0.0      *               255.255.248.0   U     0      0        0 eth0
100.64.0.0      10.169.7.247    255.192.0.0     UG    0      0        0 eth0
121.41.76.0     *               255.255.252.0   U     0      0        0 eth1
172.16.0.0      10.169.7.247    255.240.0.0     UG    0      0        0 eth0
vpn.test.com    121.41.79.247     255.255.255.255 UGH   0      0        0 eth1

这个时候就发现了,由VPN生成的10.1.15.0被强制使用了阿里云的10.0.0.0 的路由10.169.7.247,检查网卡配置文件/etc/network/interfaces。


~  cat /etc/network/interfaces
auto lo
iface lo inet loopback

auto eth1
iface eth1 inet static
address 121.41.77.206
netmask 255.255.252.0
up route add -net 0.0.0.0 netmask 0.0.0.0 gw 121.41.79.247 dev eth1

auto eth0
iface eth0 inet static
address 10.169.0.162
netmask 255.255.248.0

up route add -net 172.16.0.0 netmask 255.240.0.0 gw 10.169.7.247 dev eth0
up route add -net 100.64.0.0 netmask 255.192.0.0 gw 10.169.7.247 dev eth0
up route add -net 10.0.0.0 netmask 255.0.0.0 gw 10.169.7.247 dev eth0

最后一行发现了问题。

up route add -net 10.0.0.0 netmask 255.0.0.0 gw 10.169.7.247 dev eth0

这个网段的10.0.0.0所有IP统一会使用10.169.7.247的网关,怪不得VPN始终不通,原来是阿里云服务器默认的配置造成的问题。

3. 如何解决问题

只要定位到了问题,解决就不难。

我们看到由于阿里云的内网是10.x.x.x的,我们的几台服务器也分别是10.168.x.x, 10.169.x.x, 10.200.x.x, 10.251.x.x,我估计它是从10.1.x.x到10.255.x.x都配置了网络,所以直接对A类网段进行了配置。通过VPN生成的IP为10.1.15.228,从B类网段开始刚好与阿里云租的机器不重合,那么我们重新定义阿里云的网段配置就行了,对B类网段做映射。

修改文件 /etc/network/interfaces。


~ vi /etc/network/interfaces
auto lo
iface lo inet loopback

auto eth1
iface eth1 inet static
address 121.41.77.206
netmask 255.255.252.0
up route add -net 0.0.0.0 netmask 0.0.0.0 gw 121.41.79.247 dev eth1

auto eth0
iface eth0 inet static
address 10.169.0.162
netmask 255.255.248.0

up route add -net 172.16.0.0 netmask 255.240.0.0 gw 10.169.7.247 dev eth0
up route add -net 100.64.0.0 netmask 255.192.0.0 gw 10.169.7.247 dev eth0
#up route add -net 10.0.0.0 netmask 255.0.0.0 gw 10.169.7.247 dev eth0

up route add -net 10.200.0.0 netmask 255.255.0.0 gw 10.169.7.247 dev eth0
up route add -net 10.168.0.0 netmask 255.255.0.0 gw 10.169.7.247 dev eth0
up route add -net 10.169.0.0 netmask 255.255.0.0 gw 10.169.7.247 dev eth0
up route add -net 10.251.0.0 netmask 255.255.0.0 gw 10.169.7.247 dev eth0

重启网卡


~ /etc/init.d/networking restart

竟然是无效的命令,只能重启计算机了。


~ reboot

重启后,查看路由表。


~ route
Kernel IP routing table
Destination     Gateway         Genmask         Flags Metric Ref    Use Iface
default         121.41.79.247   0.0.0.0         UG    0      0        0 eth1
10.168.0.0      10.169.7.247    255.255.0.0     UG    0      0        0 eth0
10.169.0.0      *               255.255.248.0   U     0      0        0 eth0
10.169.0.0      10.169.7.247    255.255.0.0     UG    0      0        0 eth0
10.200.0.0      10.169.7.247    255.255.0.0     UG    0      0        0 eth0
10.251.0.0      10.169.7.247    255.255.0.0     UG    0      0        0 eth0
100.64.0.0      10.169.7.247    255.192.0.0     UG    0      0        0 eth0
121.41.76.0     *               255.255.252.0   U     0      0        0 eth1
172.16.0.0      10.169.7.247    255.240.0.0     UG    0      0        0 eth0

对B类网段的配置已经生效,已经去除了对A类10网段的配置。

连接VPN。


~ vpnc
Stopped Name Service Cache Daemon: nscd.
 * Starting Name Service Cache Daemon nscd                                             [ OK ]
VPNC started in background (pid: 1368)...

查看路由表


~ route
Kernel IP routing table
Destination     Gateway         Genmask         Flags Metric Ref    Use Iface
default         *               0.0.0.0         U     0      0        0 tun0
10.1.15.0       *               255.255.255.0   U     0      0        0 tun0
10.168.0.0      10.169.7.247    255.255.0.0     UG    0      0        0 eth0
10.169.0.0      *               255.255.248.0   U     0      0        0 eth0
10.169.0.0      10.169.7.247    255.255.0.0     UG    0      0        0 eth0
10.200.0.0      10.169.7.247    255.255.0.0     UG    0      0        0 eth0
10.251.0.0      10.169.7.247    255.255.0.0     UG    0      0        0 eth0
100.64.0.0      10.169.7.247    255.192.0.0     UG    0      0        0 eth0
121.41.76.0     *               255.255.252.0   U     0      0        0 eth1
172.16.0.0      10.169.7.247    255.240.0.0     UG    0      0        0 eth0
vpn.test.com    121.41.79.247   255.255.255.255 UGH   0      0        0 eth1

10.1.15.0由VPN生成的IP,没有被强制路由。

连接VPN内网计算机


~ ping testvpn
PING testvpn.xxx.com.cn (10.1.1.13) 56(84) bytes of data.
64 bytes from testvpn.xxx.com.cn (10.1.1.13): icmp_seq=1 ttl=127 time=39.5 ms
64 bytes from testvpn.xxx.com.cn (10.1.1.13): icmp_seq=2 ttl=127 time=40.4 ms

终于访问正常了,这样就完成了,通过阿里云连接VPN服务的网络配置。

本文主要记录了网络调试的一系列操作,阿里云在方便易用的同时,也会有一些额外的问题,需要大家有更多的Linux使用经验,从而有能力解决各种的VM技术问题。

转载请注明出处:
http://blog.fens.me/vpn-aliyun/

打赏作者

Nginx反向代理Websocket

从零开始nodejs系列文章,将介绍如何利Javascript做为服务端脚本,通过Nodejs框架web开发。Nodejs框架是基于V8的引擎,是目前速度最快的Javascript引擎。chrome浏览器就基于V8,同时打开20-30个网页都很流畅。Nodejs标准的web开发框架Express,可以帮助我们迅速建立web站点,比起PHP的开发效率更高,而且学习曲线更低。非常适合小型网站,个性化网站,我们自己的Geek网站!!

关于作者

  • 张丹(Conan), 程序员Java,R,PHP,Javascript
  • weibo:@Conan_Z
  • blog: http://blog.fens.me
  • email: bsspirit@gmail.com

转载请注明出处:
http://blog.fens.me/nodejs-websocket-nginx/

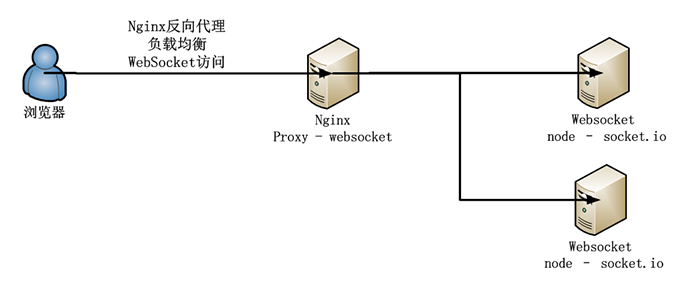
nodejs-nginx-ws

前言

用Nginx给网站做反向代理和负载均衡,是广泛使用的一种Web技术,不仅能够保证后端服务器的隐蔽性,还可以提高网站情况,部署灵活,而且以来源软件实现负载均衡性价比非常高。

不过今天要讲一下,如何用Nginx给Websocket服务器实现反向代理和负载均衡。我也是第一次做这样的尝试,所以仅把功能实现,优化以后再说。

目录

  1. 反向代理和负载均衡
  2. 创建基于Node的websocket服务器端
  3. 创建websocket客户端
  4. 用Nginx实现反向代理
  5. 用Nginx实现多websocket服务器的负载均衡

1. 反向代理和负载均衡

反向代理(Reverse Proxy)方式是指以代理服务器来接受internet上的连接请求,然后将请求转发给内部网络上的服务器,并将从服务器上得到的结果返回给internet上请求连接的客户端,此时代理服务器对外就表现为一个服务器。

负载均衡 (Load Balancing) 负载均衡建立在现有网络结构之上,它提供了一种廉价有效透明的方法扩展网络设备和服务器的带宽、增加吞吐量、加强网络数据处理能力、提高网络的灵活性和可用性。

2. 创建基于Node的websocket服务器端

系统环境:

  • win7 64bit
  • npm 1.2.19
  • node v0.10.5
  • bower 1.1.2
  • nginx 1.5.11
  • redis 2.4.6

创建基于Node的websocket服务器端

ws1

新建工程


D:\workspace\javascript>mkdir nginx-websocket && cd nginx-websocket
D:\workspace\javascript\nginx-websocket>npm install socket.io
socket.io@0.9.16 node_modules\socket.io
├── base64id@0.1.0
├── policyfile@0.0.4
├── redis@0.7.3
└── socket.io-client@0.9.16 (xmlhttprequest@1.4.2, uglify-js@1.2.5, active-x-obfuscator@0.0.1, ws@0.4.31)

服务器端启动文件app1.js


~ vi app1.js

var port = 3100;
var io = require('socket.io').listen(port);

io.sockets.on('connection', function (socket) {
    socket.emit('server', {
        server: 'Server1',
        port: port
    });
});

启动程序

node app1.js

3. 创建websocket客户端

通过bower安装socket.io-client库和jquery库


#下载socket.io-client
D:\workspace\javascript\nginx-websocket>bower install socket.io-client
bower socket.io-client#*        cached git://github.com/LearnBoost/socket.io-client.git#0.9.16
bower socket.io-client#*      validate 0.9.16 against git://github.com/LearnBoost/socket.io-client.git#*
bower socket.io-client#~0.9.16 install socket.io-client#0.9.16

socket.io-client#0.9.16 bower_components\socket.io-client

#下载jquery
D:\workspace\javascript\nginx-websocket>bower install jquery
bower jquery#*                  cached git://github.com/jquery/jquery.git#2.1.0
bower jquery#*                validate 2.1.0 against git://github.com/jquery/jquery.git#*
bower jquery#*                     new version for git://github.com/jquery/jquery.git#*
bower jquery#*                 resolve git://github.com/jquery/jquery.git#*
bower jquery#*                download https://github.com/jquery/jquery/archive/2.1.0.tar.gz
bower jquery#*                progress received 0.3MB of 0.7MB downloaded, 46%
bower jquery#*                progress received 0.3MB of 0.7MB downloaded, 50%
bower jquery#*                progress received 0.4MB of 0.7MB downloaded, 56%
bower jquery#*                progress received 0.4MB of 0.7MB downloaded, 61%
bower jquery#*                progress received 0.5MB of 0.7MB downloaded, 67%
bower jquery#*                progress received 0.5MB of 0.7MB downloaded, 72%
bower jquery#*                progress received 0.5MB of 0.7MB downloaded, 77%
bower jquery#*                progress received 0.6MB of 0.7MB downloaded, 81%
bower jquery#*                progress received 0.6MB of 0.7MB downloaded, 86%
bower jquery#*                progress received 0.6MB of 0.7MB downloaded, 91%
bower jquery#*                progress received 0.6MB of 0.7MB downloaded, 94%
bower jquery#*                progress received 0.7MB of 0.7MB downloaded, 99%
bower jquery#*                 extract archive.tar.gz
bower jquery#*                resolved git://github.com/jquery/jquery.git#2.1.0
bower jquery#~2.1.0            install jquery#2.1.0
jquery#2.1.0 bower_components\jquery

创建静态的html文件,作为websocket客户端:client.html


~ vi client.html

<!DOCTYPE html>
<html>
<head>
<title>Websocket Client</title>
<script src="bower_components/socket.io-client/dist/socket.io.min.js"></script>
<script src="bower_components/jquery/dist/jquery.min.js"></script>
</head>
<body>
<h1>Socket.IO Client</h1>
<div id="content">connecting....</div>

<script>
var socket = io.connect('http://localhost:3100');
socket.on('server', function (data) {
console.log(data);
$('#content').html(JSON.stringify(data));
});
</script>

</body>
</html>

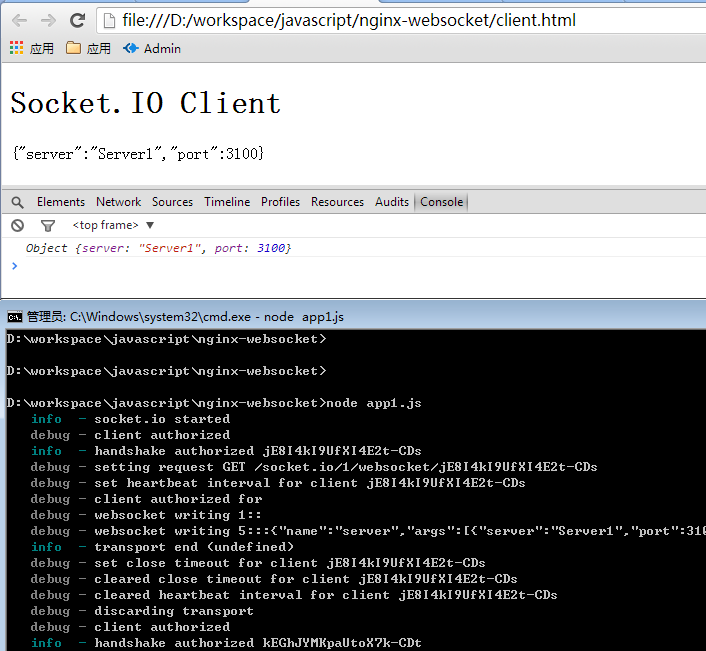
用浏览器打开client.html,查看websocket通讯情况。

websocket1

服务器端和客户端通讯成功。

接下来,我们用Nginx实现Websocket服务器的反向代理。

4. 用Nginx实现反向代理

看文官说明Nginx在1.3以后的版本支持websocket反向代理,但我在Nginx1.4版本测试时失败,nginx1.5.11版本测试成功。

ws2

操作步骤:

  • 1). 下载安装Nginx
  • 2). 修改Nginx配置文件,配置反向代理
  • 3). 启动Nginx服务器
  • 4). 修改app1.js,增加超时的设置
  • 5). 修改client.html,修改nginx访问端口
  • 6). 启动Node的Websocket服务器
  • 7). 浏览器访问测试

1). 下载安装Nginx

下载地址:http://nginx.org/en/download.html

2). 修改Nginx配置文件,配置反向代理

修改nginx配置文件:nginx.conf


http {

    // ...省略

    map $http_upgrade $connection_upgrade {
        default upgrade;
        ''      close;
    }

    server {

	    listen       3102;  #监听3102 
	    server_name localhost;

        location / {
            proxy_pass http://localhost:3100; #代理3100 

            proxy_set_header X-Real-IP $remote_addr;
	    proxy_set_header Host $host;
	    proxy_set_header X-Forwarded-For $proxy_add_x_forwarded_for;

	    proxy_http_version 1.1;
	    proxy_set_header Upgrade $http_upgrade;
	    proxy_set_header Connection "upgrade";
        }
    }

    // ...省略
}
  • 设置nginx的访问端口:3102
  • 设置nginx的代理端口:3100

3). 启动Nginx服务器


D:\toolkit\nginx-1.5.11>nginx.exe

4). 修改app1.js,增加超时的设置

修改启动文件:app1.js


var port = 3100;
var io = require('socket.io').listen(port);

io.enable('browser client minification');  // send minified client
io.enable('browser client etag');          // apply etag caching logic based on version number
io.enable('browser client gzip');          // gzip the file
//io.set('log level', 1);                    // reduce logging

io.set('transports', [ 'websocket','flashsocket','htmlfile','xhr-polling','jsonp-polling']);

io.sockets.on('connection', function (socket) {

    socket.emit('server', {
        server: 'Server1',
        port: port
    });
});

5). 修改client.html,修改nginx访问端口


<!DOCTYPE html>
<html>
<head>
<title>Websocket Client</title>
<script src="bower_components/socket.io-client/dist/socket.io.min.js"></script>
<script src="bower_components/jquery/dist/jquery.min.js"></script>
</head>
<body>
<h1>Socket.IO Client</h1>
<div id="content">connecting....</div>

<script>
    var socket = io.connect('http://localhost:3102',{ // 访问3102端口
        'connect timeout': 500,
        'reconnect': true,
        'reconnection delay': 500,
        'reopen delay': 500,
        'max reconnection attempts': 10
    });//设置连接超时

    socket.on('server', function (data) {
        console.log(data);
        $('#content').html(JSON.stringify(data));
    });
</script>

</body>
</html>

6). 启动Node的Websocket服务器


D:\workspace\javascript\nginx-websocket>node app1.js

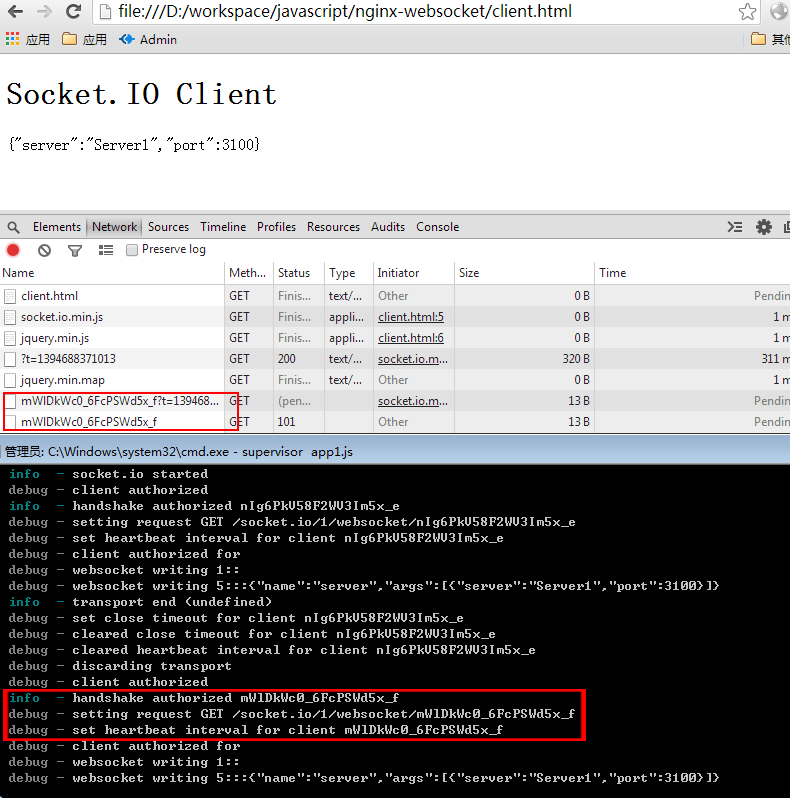
7). 浏览器访问测试

打开网页:

websocket2

这样就打通了nginx反向代理Websocket。不过遇到一个问题,就是tcp建立连接时特别慢,目前还没有好的解决办法。

5. 用Nginx实现多websocket服务器的负载均衡

接下来,我们在Nginx配置负载均衡。

ws3

由于基于Socket.io实现的Websocket服务器是单线程的,而访问实例被保存在MemoryStore中。如果我们想实现多个Websocket服务器或多进程调用,那么我们需要把访问实例单独存储,Socket.io集成了通过Redis的NoSQL数据库存储。

socket.io配置说明,可以参考:Configuring Socket.IO

操作步骤:

  • 1). 下载安装Redis服务器并启动
  • 2). 修改app1.js,增加Redis配置
  • 3). 新建app2.js,增加Redis配置
  • 4). 修改Nginx配置文件,配置app1,app2的负载均衡
  • 5). 启动Nginx服务器,启动app1.js, app2.js
  • 6). 浏览器访问测试

1). 下载安装Redis服务器并启动

Redis的window版本的下载地址:https://github.com/rgl/redis/downloads

启动redis


D:\toolkit\Redis>redis-server.exe

2). 修改app1.js,增加Redis配置

修改一个app1.js,绑定Redis存储实例


var port = 3100;
var io = require('socket.io').listen(port);

var RedisStore = require('socket.io/lib/stores/redis')
    , redis  = require('socket.io/node_modules/redis')
    , pub    = redis.createClient()
    , sub    = redis.createClient()
    , client = redis.createClient();

io.set('store', new RedisStore({
    redisPub : pub
    , redisSub : sub
    , redisClient : client
}));

io.enable('browser client minification');  // send minified client
io.enable('browser client etag');          // apply etag caching logic based on version number
io.enable('browser client gzip');          // gzip the file
//io.set('log level', 1);                    // reduce logging

io.set('transports', [ 'websocket','flashsocket','htmlfile','xhr-polling','jsonp-polling']);

io.sockets.on('connection', function (socket) {

    socket.emit('server', {
        server: 'Server1',
        port: port
    });
});

3). 新建app2.js,增加Redis配置

增加一个app2.js,做为第二个websocket服务器


var port = 3101;
var io = require('socket.io').listen(port);

var RedisStore = require('socket.io/lib/stores/redis')
    , redis  = require('socket.io/node_modules/redis')
    , pub    = redis.createClient()
    , sub    = redis.createClient()
    , client = redis.createClient();

io.set('store', new RedisStore({
    redisPub : pub
    , redisSub : sub
    , redisClient : client
}));

io.enable('browser client minification');  // send minified client
io.enable('browser client etag');          // apply etag caching logic based on version number
io.enable('browser client gzip');          // gzip the file
//io.set('log level', 1);                    // reduce logging

io.set('transports', [ 'websocket','flashsocket','htmlfile','xhr-polling','jsonp-polling']);

io.sockets.on('connection', function (socket) {

    socket.emit('server', {
        server: 'Server2',
        port: port
    });
});

4). 修改Nginx配置文件,配置3100,3101端口的负载均衡

修改Nginx配置文件:nginx.conf


http{
	map $http_upgrade $connection_upgrade {
		default upgrade;
		''      close;
	}

	upstream websocket {
		#ip_hash;
		server localhost:3100;  
		server localhost:3101;
	}

	server {
		listen       3102;
		server_name localhost;

		location / {
			proxy_pass http://websocket;
			
			#proxy_pass http://localhost:3100/;  
			
			proxy_set_header X-Real-IP $remote_addr;
			proxy_set_header Host $host;
			proxy_set_header X-Forwarded-For $proxy_add_x_forwarded_for;

			proxy_http_version 1.1;
			proxy_set_header Upgrade $http_upgrade;
			proxy_set_header Connection "upgrade";
		}
	}
}

5). 启动Nginx服务器,启动app1.js, app2.js


D:\toolkit\nginx-1.5.11>nginx.exe
D:\workspace\javascript\nginx-websocket>node app1.js
D:\workspace\javascript\nginx-websocket>node app2.js

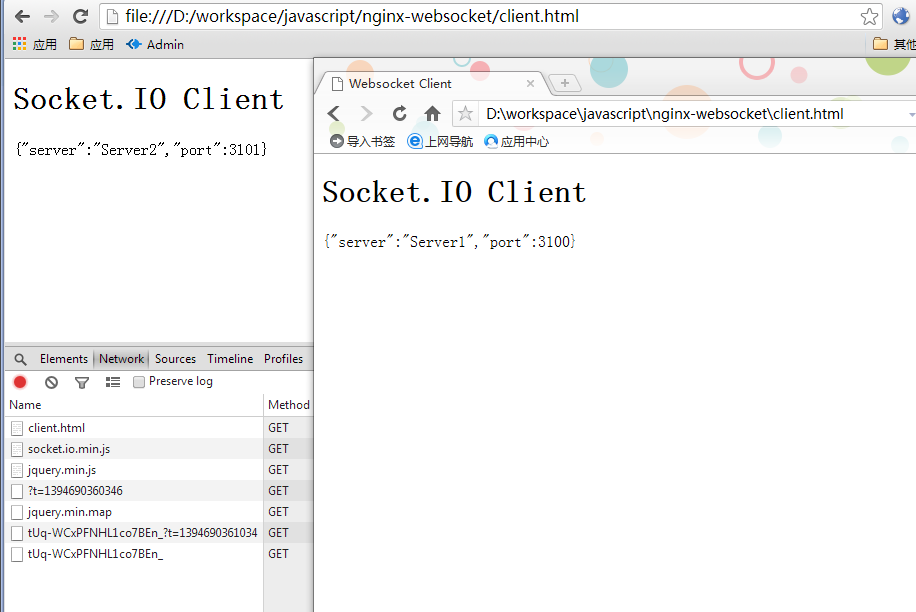
6). 浏览器访问测试

打开2个浏览器页面:

websocket3

这样就实现2个Websocket服务器轮训的负载均衡!!不过,建立连接非常慢的问题依然存在,我还没有什么好的办法。希望了解内情的同学,帮助解答!

转载请注明出处:
http://blog.fens.me/nodejs-websocket-nginx/

打赏作者

Nodejs创建HTTPS服务器

从零开始nodejs系列文章,将介绍如何利Javascript做为服务端脚本,通过Nodejs框架web开发。Nodejs框架是基于V8的引擎,是目前速度最快的Javascript引擎。chrome浏览器就基于V8,同时打开20-30个网页都很流畅。Nodejs标准的web开发框架Express,可以帮助我们迅速建立web站点,比起PHP的开发效率更高,而且学习曲线更低。非常适合小型网站,个性化网站,我们自己的Geek网站!!

关于作者

  • 张丹(Conan), 程序员Java,R,PHP,Javascript
  • weibo:@Conan_Z
  • blog: http://blog.fens.me
  • email: bsspirit@gmail.com

转载请注明出处:
http://blog.fens.me/nodejs-https-server/

nodejs-https

前言

互联网应用越来越多,网络安全问题应该值得大家注意起来,特别是对于有在线支付业务的网站!为保证用户的账户安全,应该使用HTTPS协议代替HTTP协议,在数据传输层保持加密。

大部分的美国网站,当涉及到个人信息时,如果不提供HTTPS的服务,多数用户都会拒绝使用的。中国的网民什么时候,才会有这种意识呢?

目录

  1. HTTP和HTTPS介绍
  2. 用Nodejs创建HTTPS服务器(Win7)
  3. 用Nodejs创建HTTPS服务器(Linux)
  4. 抓取请求,验证加密

1. HTTP和HTTPS介绍

HTTP: 超文本传输协议 (HTTP-Hypertext transfer protocol) 是一种详细规定了浏览器和万维网服务器之间互相通信的规则,通过因特网传送万维网文档的数据传送协议。

HTTPS:(全称:Hypertext Transfer Protocol over Secure Socket Layer),是以安全为目标的HTTP通道,简单讲是HTTP的安全版。即HTTP下加入SSL层,HTTPS的安全基础是SSL,因此加密的详细内容就需要SSL。 它是一个URI scheme(抽象标识符体系),句法类同http:体系。用于安全的HTTP数据传输。https:URL表明它使用了HTTP,但HTTPS存在不同于HTTP的默认端口及一个加密/身份验证层(在HTTP与TCP之间)。这个系统的最初研发由网景公司进行,提供了身份验证与加密通讯方法,现在它被广泛用于万维网上安全敏感的通讯,例如交易支付方面。

HTTPS和HTTP的区别

  • https协议需要到ca申请证书,一般免费证书很少,需要交费。
  • http是超文本传输协议,信息是明文传输,https 则是具有安全性的ssl加密传输协议。
  • http和https使用的是完全不同的连接方式,用的端口也不一样,前者是80,后者是443。
  • http的连接很简单,是无状态的;HTTPS协议是由SSL+HTTP协议构建的可进行加密传输、身份认证的网络协议,比http协议安全。

HTTP和HTTPS的介绍,摘自http://baike.baidu.com/view/14121.htm

在Nodejs中,我们可以通过内置的https库,来实现HTTPS服务器。

Nodejs的HTTPS使用文档:http://nodejs.org/api/https.html

2. 用Nodejs创建HTTPS服务器(Win7)

系统环境

  • win7 64bit
  • IP: 192.168.1.13
  • Nodejs:v0.10.5
  • Npm:1.2.19

创建express的开发环境


~ D:\workspace\javascript>express -e  nodejs-https
~ D:\workspace\javascript>cd nodejs-https && npm install

ejs@0.8.5 node_modules\ejs
express@3.2.6 node_modules\express
├── methods@0.0.1
├── fresh@0.1.0
├── cookie-signature@1.0.1
├── range-parser@0.0.4
├── debug@0.7.4
├── buffer-crc32@0.2.1
├── cookie@0.1.0
├── commander@0.6.1
├── mkdirp@0.3.4
├── send@0.1.0 (mime@1.2.6)
└── connect@2.7.11 (pause@0.0.1, qs@0.6.5, bytes@0.2.0, cookie@0.0.5, formidable@1.0.14, send@0.1.1)

我本地已经安装了git客户端msysgit,其中包括了openssl程序。


~ D:\workspace\javascript\nodejs-https>git --version
git version 1.8.1.msysgit.1

~ D:\workspace\javascript\nodejs-https>openssl version -a
OpenSSL 0.9.8e 23 Feb 2007
built on: Sat Sep 15 20:34:58 EDT 2007
platform: MSys
options:  bn(64,32) md2(int) rc4(idx,int) des(ptr,risc1,16,long) blowfish(idx)
compiler: gcc -D_WINDLL -DOPENSSL_PIC -DOPENSSL_THREADS  -DDSO_DLFCN -DHAVE_DLFCN_H -DTERMIOS -DL_ENDIAN -D__CYGWIN__ -f
omit-frame-pointer -fnative-struct -O3 -mcpu=pentium -march=i486 -Wall -DOPENSSL_BN_ASM_PART_WORDS -DOPENSSL_IA32_SSE2 -
DSHA1_ASM -DMD5_ASM -DRMD160_ASM -DAES_ASM
OPENSSLDIR: "/usr/ssl"

openssl生成证书文件


#生成私钥key文件:
~ D:\workspace\javascript\nodejs-https>openssl genrsa -out privatekey.pem 1024
Generating RSA private key, 1024 bit long modulus
...........................++++++
........++++++
e is 65537 (0x10001)

#通过私钥生成CSR证书签名
~ D:\workspace\javascript\nodejs-https>openssl req -new -key privatekey.pem -out certrequest.csr
You are about to be asked to enter information that will be incorporated
into your certificate request.
What you are about to enter is what is called a Distinguished Name or a DN.
There are quite a few fields but you can leave some blank
For some fields there will be a default value,
If you enter '.', the field will be left blank.
-----
Country Name (2 letter code) [AU]:CN
State or Province Name (full name) [Some-State]:Beijing
Locality Name (eg, city) []:Beijing
Organization Name (eg, company) [Internet Widgits Pty Ltd]:fens.me
Organizational Unit Name (eg, section) []:fens.me
Common Name (eg, YOUR name) []:Conan Zhang
Email Address []:bsspirit@gmail.com

Please enter the following 'extra' attributes
to be sent with your certificate request
A challenge password []:
An optional company name []:

# 通过私钥和证书签名生成证书文件
~ D:\workspace\javascript\nodejs-https>openssl x509 -req -in certrequest.csr -signkey privatekey.pem -out certificate.pem
Signature ok
subject=/C=CN/ST=Beijing/L=Beijing/O=fens.me/OU=fens.me/CN=Conan Zhang/emailAddress=bsspirit@gmail.com
Getting Private key

新生成了3个文件:certificate.pem, certrequest.csr, privatekey.pem


~ D:\workspace\javascript\nodejs-https>ls -l
total 17
-rwx------  1 4294967295 mkpasswd 877 Dec 14 10:53 app.js
-rwx------  1 4294967295 mkpasswd 956 Dec 14 11:22 certificate.pem
-rwx------  1 4294967295 mkpasswd 704 Dec 14 11:21 certrequest.csr
drwx------+ 1 4294967295 mkpasswd   0 Dec 14 11:10 node_modules
-rwx------  1 4294967295 mkpasswd 216 Dec 14 11:03 package.json
-rwx------  1 4294967295 mkpasswd 887 Dec 14 11:20 privatekey.pem
drwx------+ 1 4294967295 mkpasswd   0 Dec 14 10:53 public
drwx------+ 1 4294967295 mkpasswd   0 Dec 14 10:53 routes
drwx------+ 1 4294967295 mkpasswd   0 Dec 14 10:53 views
  • privatekey.pem: 私钥
  • certrequest.csr: CSR证书签名
  • certificate.pem: 证书文件

修改启动文件:app.js


~ vi app.js

//最下面
var https = require('https')
    ,fs = require("fs");

var options = {
    key: fs.readFileSync('./privatekey.pem'),
    cert: fs.readFileSync('./certificate.pem')
};

https.createServer(options, app).listen(3011, function () {
    console.log('Https server listening on port ' + 3011);
});

启动服务器:


~ D:\workspace\javascript\nodejs-https>node app.js

Express server listening on port 3000
Https server listening on port 3011

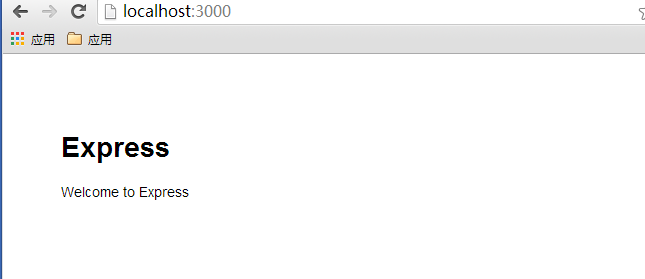
打开浏览器:HTTP访问
https-http

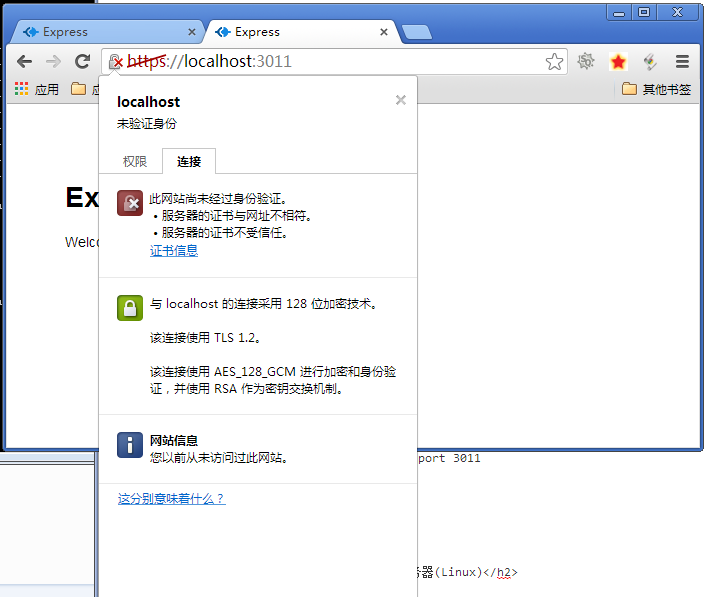
HTTPS访问
https-https

查看证书
https-https-cert

由于我们证书是自己创建的,没有经过第三方机构的验证,因此会出现警告的提示。大家可以去有资质的网络运营商,去申请自己的证书。比如:godaddy SSL Certificates,优惠码:WOWfensme

这样我们就在win7完整的HTTPS服务器创建。

3. 用Nodejs创建HTTPS服务器(Linux)

创建过程与win7类似

系统环境

  • Linux: Ubuntu 12.04.2 LTS 64bit deskop
  • IP: 192.168.1.20
  • Nodejs: npm 1.2.21
  • node v0.11.2

创建express项目


~ cd /home/conan/nodejs
~ express -e  nodejs-https
~ cd nodejs-https
~ sudo npm install

用openssl生成证书文件


~ openssl version -a
OpenSSL 1.0.1 14 Mar 2012
built on: Tue Jun  4 07:26:06 UTC 2013
platform: debian-amd64
options:  bn(64,64) rc4(16x,int) des(idx,cisc,16,int) blowfish(idx)
compiler: cc -fPIC -DOPENSSL_PIC -DZLIB -DOPENSSL_THREADS -D_REENTRANT -DDSO_DLFCN -DHAVE_DLFCN_H -m64 -DL_ENDIAN -DTERMIO -g -O2 -fstack-protector --param=ssp-buffer-size=4 -Wformat -Wformat-security -Werror=format-security -D_FORTIFY_SOURCE=2 -Wl,-Bsymbolic-functions -Wl,-z,relro -Wa,--noexecstack -Wall -DOPENSSL_NO_TLS1_2_CLIENT -DOPENSSL_MAX_TLS1_2_CIPHER_LENGTH=50 -DMD32_REG_T=int -DOPENSSL_IA32_SSE2 -DOPENSSL_BN_ASM_MONT -DOPENSSL_BN_ASM_MONT5 -DOPENSSL_BN_ASM_GF2m -DSHA1_ASM -DSHA256_ASM -DSHA512_ASM -DMD5_ASM -DAES_ASM -DVPAES_ASM -DBSAES_ASM -DWHIRLPOOL_ASM -DGHASH_ASM
OPENSSLDIR: "/usr/lib/ssl"

~ openssl genrsa -out privatekey.pem 1024
~ openssl req -new -key privatekey.pem -out certrequest.csr 
~ openssl x509 -req -in certrequest.csr -signkey privatekey.pem -out certificate.pem

修改文件app.js


~ vi app.js

//在最下面
var https = require('https')
    ,fs = require("fs");

var options = {
    key: fs.readFileSync('./privatekey.pem'),
    cert: fs.readFileSync('./certificate.pem')
};

https.createServer(options, app).listen(3011, function () {
    console.log('Https server listening on port ' + 3011);
});

启动服务器


~ node app.js

Express server listening on port 3000
Https server listening on port 3011

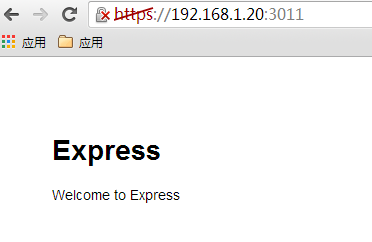
打开浏览器:
https-https-linux

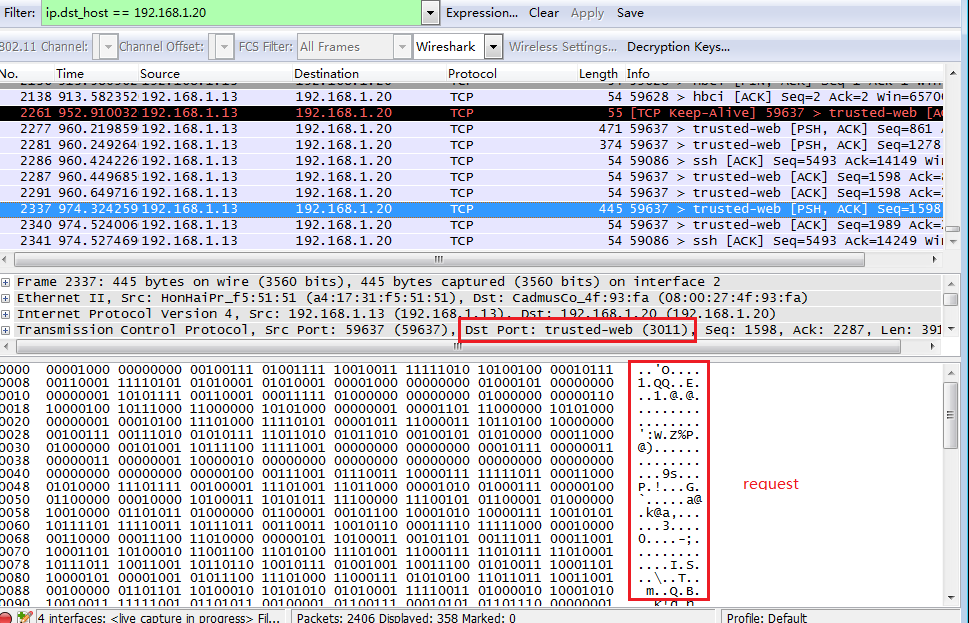
4. 抓取请求,验证加密

为了验证数据在传输过程中是加密的,我们用wireshark抓取网络包。

HTTP请求:http://192.168.1.20:3000/users?a=111
http-request

HTTPS请求:https://192.168.1.20:3011/users?a=112
https-request

在HTTP下面,URL请求的参数是被暴露的。在HTTPS下面,URL的请求参数是被加密的。因此,希望需要填写个人信息,及在线支付的网站,都把HTTPS服务器搭建起来。防止私密数据,在网络传输过程中被获取。

转载请注明出处:
http://blog.fens.me/nodejs-https-server/

打赏作者